Toshiba 55VX700U User Manual - Page 21
Connecting a PC - + 720p
 |
View all Toshiba 55VX700U manuals
Add to My Manuals
Save this manual to your list of manuals |
Page 21 highlights
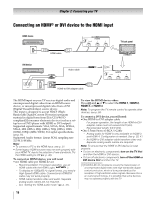
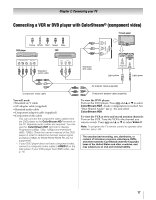
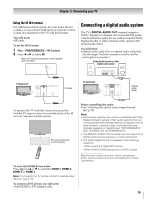
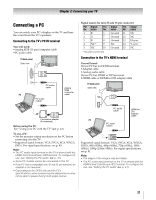
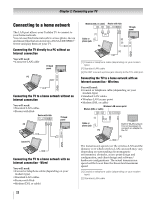
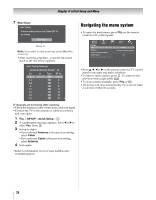
Chapter 2: Connecting your TV Connecting a PC You can watch your PC's display on the TV and hear the sound from the TV's speakers. Connecting to the TV's PC IN terminal You will need: •Analog RGB (15-pin) computer cable •PC audio cable TV back panel Side view PC audio cable Analog RGB computer PC cable PC audio output Signal names for mini D-sub 15-pin connector Pin Signal No. name Pin Signal No. name Pin Signal No. name 1 R 2 G 3 B 4 NC * 5 NC 6 Ground 11 NC 7 Ground 12 NC 8 Ground 13 H-sync 9 NC 14 V-sync 10 Ground 15 NC * NC=Not connected Connection to the TV's HDMI terminal You will need: If your PC has no HDMI terminal: •Adapter cable •Analog audio cable If your PC has HDMI or DVI terminal: •HDMI cable or HDMI-to-DVI adapter cable TV back panel Side view Conversion adapter (if necessary) Before using the PC: See "Using your PC with the TV" (- p. 41). To use a PC: • Set the monitor output resolution on the PC before connecting it to the TV. •Supported signal formats: VGA, SVGA, XGA, WXGA, SXGA. For signal specifications, see p. 80. Note: • The PC audio input terminal on the TV is shared with the HDMI 4 and ColorStream HD2 terminal. To configure for use, see "Setting the PC audio" (- p. 41). • Some PC models cannot be connected to this TV. • If the PC has a compatible mini D-sub15-pin terminal, an adapter is not required. • Depending on the DVD's title and the PC's specifications, some scenes may be skipped or you may not be able to pause during multi-angle scenes. PC audio cable HDMI-toDVI adapter cable PC PC audio output Supported signal formats: VGA, SVGA, XGA, WXGA, SXGA, 480i (60Hz), 480p (60Hz), 720p (60Hz), 1080i (60Hz), 1080p (24Hz/60Hz). For signal specifications, see p. 81. Note: • The edges of the images may be hidden. • The PC audio input terminal on the TV is shared with the HDMI 4 and ColorStream HD2 terminal. To configure for use, see "Setting the PC audio" (- p. 41). 21
-
 1
1 -
2
-
3
-
4
-
5
-
6
-
7
-
8
-
9
-
10
-
11
-
12
-
13
-
14
-
15
-
 16
16 -
 17
17 -
 18
18 -
 19
19 -
 20
20 -
 21
21 -
 22
22 -
 23
23 -
 24
24 -
 25
25 -
 26
26 -
27
-
28
-
29
-
30
-
31
-
32
-
33
-
34
-
35
-
36
-
37
-
38
-
39
-
40
-
41
-
42
-
43
-
44
-
45
-
46
-
47
-
48
-
49
-
50
-
51
-
52
-
53
-
54
-
55
-
56
-
57
-
58
-
59
-
60
-
61
-
62
-
63
-
64
-
65
-
66
-
67
-
68
-
69
-
70
-
71
-
72
-
73
-
74
-
75
-
76
-
77
-
78
-
79
-
80
-
81
-
82
-
83
-
84
-
85
-
86
-
87
-
88
-
89
-
90
-
91
-
92
-
93
-
94
-
95
-
96
-
97
-
98
-
99
-
100
 |
 |
