Toshiba 55VX700U User Manual - Page 59
Network Connection Test
 |
View all Toshiba 55VX700U manuals
Add to My Manuals
Save this manual to your list of manuals |
Page 59 highlights
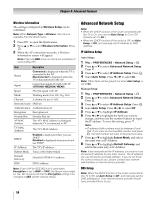
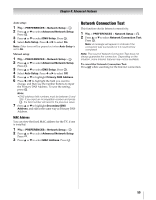
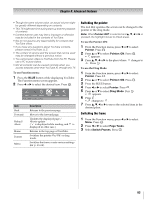
Chapter 8: Advanced features Auto setup: 1 Y > PREFERENCES > Network Setup > . OK 2 Press B or b to select Advanced Network Setup. Press . OK 3 Press B or b to select DNS Setup. Press . OK 4 Select Auto Setup. Press C or c to select On. Note: Other items will be grayed out when Auto Setup is set to On. Manual setup: 1 Y > PREFERENCES > Network Setup > . OK 2 Press B or b to select Advanced Network Setup. Press . OK 3 Press B or b to select DNS Setup. Press . OK 4 Select Auto Setup. Press C or c to select Off. 5 Press B or b to highlight Primary DNS Address. 6 Press C or c to highlight the field you want to change, and then use the number buttons to input the Primary DNS Address. To save the setting, press . OK Note: • DNS address field numbers must be between 0 and 255. If you input an incompatible number and press OK , the field number will reset to the previous value. 7 Press B or b to highlight Secondary DNS Address, and edit in the same way as Primary DNS Address. MAC Address You can view the fixed MAC address for the TV, if one is installed. 1 Y > PREFERENCES > Network Setup > . OK 2 Press B or b to select Advanced Network Setup. Press . OK 3 Press B or b to select MAC Address. Press . OK Network Connection Test This function checks Internet connectivity. 1 Y > PREFERENCES > Network Setup > . OK 2 Press B or b to select Network Connection Test. Press . OK Note: A message will appear to indicate if the connection was successful or if it could not be completed. Note: The result of Network Connection Test does not always guarantee the connection. Depending on the situation, some Internet features may not be available. To cancel the Network Connection Test: Press O while searching for the Internet connection. 59
-
 1
1 -
2
-
3
-
4
-
5
-
6
-
7
-
8
-
9
-
10
-
11
-
12
-
13
-
14
-
15
-
16
-
17
-
18
-
19
-
20
-
21
-
22
-
23
-
24
-
25
-
26
-
27
-
28
-
29
-
30
-
31
-
32
-
33
-
34
-
35
-
36
-
37
-
38
-
39
-
40
-
41
-
42
-
43
-
44
-
45
-
46
-
47
-
48
-
49
-
50
-
51
-
52
-
53
-
 54
54 -
 55
55 -
 56
56 -
 57
57 -
 58
58 -
 59
59 -
 60
60 -
 61
61 -
 62
62 -
 63
63 -
 64
64 -
65
-
66
-
67
-
68
-
69
-
70
-
71
-
72
-
73
-
74
-
75
-
76
-
77
-
78
-
79
-
80
-
81
-
82
-
83
-
84
-
85
-
86
-
87
-
88
-
89
-
90
-
91
-
92
-
93
-
94
-
95
-
96
-
97
-
98
-
99
-
100
 |
 |
