Toshiba 55VX700U User Manual - Page 25
Initial Setup and Menu - screen
 |
View all Toshiba 55VX700U manuals
Add to My Manuals
Save this manual to your list of manuals |
Page 25 highlights
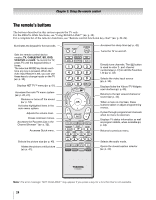
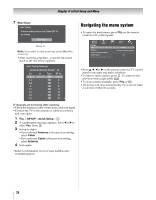
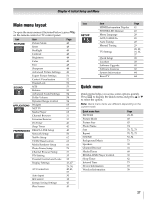
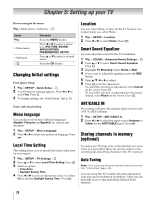
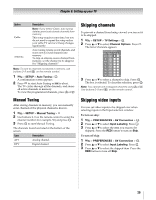
Chapter 4: Initial Setup and Menu Initial Setup When you first turn on or reset the TV, the Initial Setup window will appear. Note: • You can stop the Initial Setup by pressing O. However, if you do not finish the Initial Setup, the Initial Setup screen will appear every time you turn on your TV. To finish, see "Changing Initial settings" (- p. 28). • O does not work until Menu Language/Time Zone/ Location have been set. 1 Menu Language Quick Setup Menu Language English 2 Time Zone Local Time Setting Time Zone Daylight Saving Time Select a language. Press . OK Eastern Off 3 Daylight Saving Time Local Time Setting Time Zone Daylight Saving Time Set a time zone. Eastern Off 4 Location Select On or Off. Press . OK Location To use the TV for displaying in a store showroom, please select [Store]. [Home] mode is recommended for normal use. (ENERGY STAR® qualified) Home Select Home for normal home use. Press . OK 5 TV Mounting TV Mounting If you are mounting the TV on a wall, please select [Wall]. [Stand] is recommended for other uses. This setting may be modified later under Smart Sound Equalizer in the SOUND menu. Stand Select Stand or Wall. Press . OK 6 ANT/CABLE If you select Antenna: First, select Antenna. ANT/CABLE In Antenna Cable Next Second, select Next. Press . OK Channel Tuning Mode Channel Tuning Mode Auto Select Auto, Digital, or Standard (- "Setting the Channel Tuning Mode" on p. 31). Press . OK If you select Cable: ANT/CABLE In First, select Cable. Antenna Cable Next Second, select Next. Press . OK Note: If you do not want to scan channels, you do not need to make a selection for ANT/CABLE. Select Next and press OK to skip this step. 25
-
 1
1 -
2
-
3
-
4
-
5
-
6
-
7
-
8
-
9
-
10
-
11
-
12
-
13
-
14
-
15
-
16
-
17
-
18
-
19
-
 20
20 -
 21
21 -
 22
22 -
 23
23 -
 24
24 -
 25
25 -
 26
26 -
 27
27 -
 28
28 -
 29
29 -
 30
30 -
31
-
32
-
33
-
34
-
35
-
36
-
37
-
38
-
39
-
40
-
41
-
42
-
43
-
44
-
45
-
46
-
47
-
48
-
49
-
50
-
51
-
52
-
53
-
54
-
55
-
56
-
57
-
58
-
59
-
60
-
61
-
62
-
63
-
64
-
65
-
66
-
67
-
68
-
69
-
70
-
71
-
72
-
73
-
74
-
75
-
76
-
77
-
78
-
79
-
80
-
81
-
82
-
83
-
84
-
85
-
86
-
87
-
88
-
89
-
90
-
91
-
92
-
93
-
94
-
95
-
96
-
97
-
98
-
99
-
100
 |
 |
