Toshiba 57HLX82 Owners Manual - Page 15
Connecting a camcorder, Connecting a device to the DVI/HDCP IN, terminal
 |
View all Toshiba 57HLX82 manuals
Add to My Manuals
Save this manual to your list of manuals |
Page 15 highlights
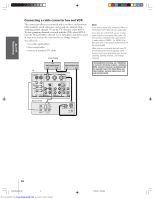
Introduction Connecting your TV Using the Remote Control Connecting a camcorder This connection allows you to watch video materials recorded on a camcorder. You will need: • one set of standard A/V cables Note: If you have an S-VHS camcorder, use an S-video cable instead of a standard video cable. Do not connect both a standard video cable and an S-video cable at the same time, or the picture performance will be unacceptable. Camcorder VIDEO AUDIO OUT L R VIDEO-3 IN S-VIDEO VIDEO AUDIO L/MONO R Video-3 (front panel) Connecting a device to the DVI/HDCP IN terminal Your TV's DVI/HDCP* IN terminal is designed to accept HDCP program material in digital form from EIA/CEA-861-compliant ** consumer electronic devices, such as a set-top box or DVD player equipped with a DVI-D digital single-link OUT terminal.† The DVI/HDCP IN terminal is designed for best performance with 1080i high-definition video signals, but also will accept and display 480p, 720p, and 480i picture signals. The DVI/HDCP IN terminal is not intended for connection to and should not be used with a PC (personal computer). For PC connection, see "Connecting a computer" on page 18. You will need: • one DVI-D digital single-link cable Note: For proper operation, the DVI-D cable length should not exceed 3m (9.8 ft). The recommended length is 2m (6.6 ft). • one pair of standard audio cables (or one digital audio cable, if applicable; see pages 14, 53, and 57 for details on digital audio connection) DVI/HDCP device (for example, set-top box or DVD player) VIDEO AUDIO LR IN DVI / HDCP OUT OUT * DVI/HDCP = Digital Visual Interface/ High-bandwidth Digital Content Protection. ** EIA/CEA-861 compliance covers the transmission of uncompressed digital video with high-bandwidth digital content protection, which is being standardized for future reception of high-definition video signals. † Consult your consumer electronics dealer for availability. Note: • Make sure the DVI cable is fastened securely to the TV and DVI device. If the cable is not fastened securely on both ends, the TV may suffer from picture noise ("snow") or have no picture at all. • To ensure that the DVI/HDCP device is reset properly, it is recommended that you follow these procedures: a) When turning on your electronic devices, turn on the TV first, and then the DVI/HDCP device. b) When turning off your electronic devices, turn off the DVI/HDCP device first, and then the TV. Setting up your TV Using the TV's Features Appendix Index TV DIGITAL AUDIO IN AUDIO CENTER CHANNEL IN COAXIAL OPTICAL IR BLASTER IN OUT L L ON OFF R R For DVI/HDCP For PC IN PC IN DVI / HDCP IN 57HLX82(E)08-18 15 Downloaded from www.Manualslib.com manuals search engine 10/29/02, 10:28 AM 15
-
 1
1 -
2
-
3
-
4
-
5
-
6
-
7
-
8
-
9
-
 10
10 -
 11
11 -
 12
12 -
 13
13 -
 14
14 -
 15
15 -
 16
16 -
 17
17 -
 18
18 -
 19
19 -
 20
20 -
21
-
22
-
23
-
24
-
25
-
26
-
27
-
28
-
29
-
30
-
31
-
32
-
33
-
34
-
35
-
36
-
37
-
38
-
39
-
40
-
41
-
42
-
43
-
44
-
45
-
46
-
47
-
48
-
49
-
50
-
51
-
52
-
53
-
54
-
55
-
56
-
57
-
58
-
59
-
60
-
61
-
62
-
63
-
64
-
65
-
66
-
67
-
68
-
69
-
70
-
71
-
72
 |
 |
