Toshiba D-R1 Owners Manual - Page 22
Using the GUI Graphical User Interface, If a message appears, Before operating this recorder - user guide
 |
View all Toshiba D-R1 manuals
Add to My Manuals
Save this manual to your list of manuals |
Page 22 highlights
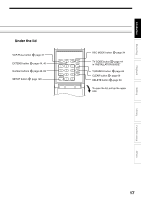
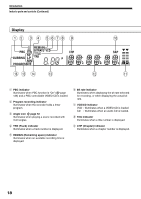
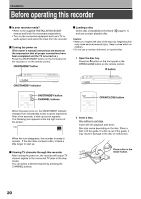
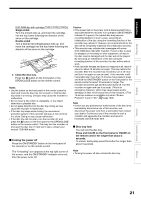
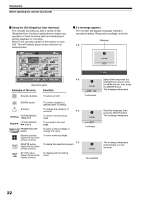
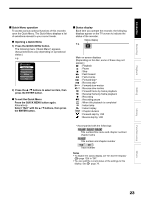
Introduction Before operating this recorder (Continued) Using the GUI (Graphical User Interface) The recorder provides you with a variety of GUI (Graphical User Interface) applications to assist your operation of most functions such as customizing of setting, playback or recording. Refer to the operation guide on the bottom on each GUI. This will indicate proper button selection for desired action. CONTENT MENU Title List 1/ 1 001 : 2003/07/08 19:00 Ch:4 (0:53:45) Original 2003/07/10 21:00 Ch:3 (0:52:40) Original 2003/07/12 12:00 Ch:4 (0:30:08) Original DVD 2003/07/08 23:00 Ch:6 (0:29:50) Original 2003/07/11 19:00 Ch:8 (0:54:30) Original 2003/07/12 21:00 Ch:10 (0:51:28) Original Prev Chapter Play Delete Next Operation guide Example of the icon Function Direction buttons To select an item. If a message appears The recorder will display messages related to operational status. Respond accordingly, as below: Message e.g. message OK e.g. message YOeKs No 2 selections Set Select either response (by highlighting in green) using the / buttons, then press the ENTER button. The message disappears. ENTER button button Prev PICTURE SEARCH button Next PICTURE SEARCH button FRAME/ADJUST FRAME/ADJUST button 1 2 3 Number buttons 4 5 6 (Open the lid of the 7 8 9 remote control.) DELETE button (Open the lid of the remote control.) SETUP SETUP button (Open the lid of the remote control.) To confirm (register) a selected item or setting. To change the category of contents e.g. To return to the previous page. To proceed to the next page. To enter numerical digits or change the value. To enter numerical digits. e.g. To delete the selected program. To display/exit the Setting menu. message OK 1 selection message No selection Read the message, then press the ENTER button. The message disappears. The message disappears automatically in a few seconds. 22
-
 1
1 -
2
-
3
-
4
-
5
-
6
-
7
-
8
-
9
-
10
-
11
-
12
-
13
-
14
-
15
-
16
-
 17
17 -
 18
18 -
 19
19 -
 20
20 -
 21
21 -
 22
22 -
 23
23 -
 24
24 -
 25
25 -
 26
26 -
 27
27 -
28
-
29
-
30
-
31
-
32
-
33
-
34
-
35
-
36
-
37
-
38
-
39
-
40
-
41
-
42
-
43
-
44
-
45
-
46
-
47
-
48
-
49
-
50
-
51
-
52
-
53
-
54
-
55
-
56
-
57
-
58
-
59
-
60
-
61
-
62
-
63
-
64
-
65
-
66
-
67
-
68
-
69
-
70
-
71
-
72
-
73
-
74
-
75
-
76
-
77
-
78
-
79
-
80
-
81
-
82
-
83
-
84
-
85
-
86
-
87
-
88
-
89
-
90
-
91
-
92
-
93
-
94
-
95
-
96
-
97
-
98
-
99
-
100
-
101
-
102
-
103
-
104
-
105
-
106
-
107
-
108
-
109
-
110
-
111
-
112
-
113
-
114
-
115
-
116
-
117
-
118
-
119
-
120
-
121
-
122
-
123
-
124
-
125
-
126
-
127
-
128
-
129
-
130
-
131
-
132
-
133
-
134
-
135
-
136
-
137
-
138
-
139
-
140
-
141
-
142
-
143
-
144
 |
 |
