Toshiba D-R1 Owners Manual - Page 32
Recording a TV program
 |
View all Toshiba D-R1 manuals
Add to My Manuals
Save this manual to your list of manuals |
Page 32 highlights
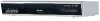
Recording DVD-RAM DVD-RW DVD-R Recording a TV program To record a TV program currently being broadcast, follow the procedures of this chapter. Preparation • Load a DVD-RAM/R/RW disc into the recorder. - Load a disc which has sufficient space available to record the program. - Make sure the loaded disc is not write-protected. • If you record on a DVD-R or a DVD-RW disc, set "DVD Video Compatibility" ( DVD-R/RW recording, "Off" setting is regarded as "SAP." • If you record on a DVD-R or DVD-RW disc, set "Aspect Ratio (Video mode)" ( sources. page 132) to "Main" or "SAP." In page 132) according to recording OPEN/CLOSE DVD TOP MENU MENU RETURN ANGLE SUBTITLE AUDIO CHANNEL V-REMOTE TIMESLIP INSTANT REPLAY INSTANT SKIP REC MENU EDIT MENU LIBRARY CONTENT MENU OW SK ENTER 1 Press INPUT SELECT repeatedly to select a recording source. Each time you press the button, the indicator alternates. INPUT SELECT Ch-: To record a TV program or CATV program. L-1: To record a source connected to the INPUT1 jacks on the rear panel ( page 37). L-2: To record a source connected to the INPUT2 jacks on the front panel ( page 37). L-3: To record a source connected to the INPUT3 jacks on the rear panel ( page 37). SL SEARCH IP FRAME /ADJUST PAUSE STOP PICTURE PLAY REC QUICK MENU To record a program from a connected cable box or satellite receiver, set the channel to "Ch-3", "Ch-4", or "L-1" according to the connection (the same as page 39 on "INSTALLATION GUIDE"). Select the proper channel on the cable box or satellite receiver to receive the desired program. REMAIN DISPLAY TIME BAR CHP DIVIDE DIMMER FL SELECT ZOOM P in P TV PROGRESSIVE TV/VIDEO CHANNEL VOLUME INPUT SELECT 32
-
 1
1 -
2
-
3
-
4
-
5
-
6
-
7
-
8
-
9
-
10
-
11
-
12
-
13
-
14
-
15
-
16
-
17
-
18
-
19
-
20
-
21
-
22
-
23
-
24
-
25
-
26
-
 27
27 -
 28
28 -
 29
29 -
 30
30 -
 31
31 -
 32
32 -
 33
33 -
 34
34 -
 35
35 -
 36
36 -
 37
37 -
38
-
39
-
40
-
41
-
42
-
43
-
44
-
45
-
46
-
47
-
48
-
49
-
50
-
51
-
52
-
53
-
54
-
55
-
56
-
57
-
58
-
59
-
60
-
61
-
62
-
63
-
64
-
65
-
66
-
67
-
68
-
69
-
70
-
71
-
72
-
73
-
74
-
75
-
76
-
77
-
78
-
79
-
80
-
81
-
82
-
83
-
84
-
85
-
86
-
87
-
88
-
89
-
90
-
91
-
92
-
93
-
94
-
95
-
96
-
97
-
98
-
99
-
100
-
101
-
102
-
103
-
104
-
105
-
106
-
107
-
108
-
109
-
110
-
111
-
112
-
113
-
114
-
115
-
116
-
117
-
118
-
119
-
120
-
121
-
122
-
123
-
124
-
125
-
126
-
127
-
128
-
129
-
130
-
131
-
132
-
133
-
134
-
135
-
136
-
137
-
138
-
139
-
140
-
141
-
142
-
143
-
144
 |
 |
