Toshiba D-R1 Owners Manual - Page 47
Press ENTER.
 |
View all Toshiba D-R1 manuals
Add to My Manuals
Save this manual to your list of manuals |
Page 47 highlights
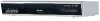
Introduction Recording Playback FRAME IP FRAME OPEN/CLOSE DVD TOP MENU MENU RETURN ANGLE SUBTITLE AUDIO CHANNEL V-REMOTE TIMESLIP INSTANT REPLAY INSTANT SKIP REC MENU EDIT MENU LIBRARY CONTENT MENU OW SK SL SEARCH ENTER /ADJUST PAUSE STOP PICTURE PLAY REC QUICK MENU VCR Plus+ EXTEND REC MODE TV CODE 1 2 4 5 7 8 SETUP 0 T.SEARCH 3 CLEAR 6 DELETE 9 +10 4 Select an item by pressing / , then press ADJUST ( / ) to set the item, if necessary. For details about items, see page 41. ENTER /ADJUST Note • If "Cable Box/DSS" is set to "Use" ( page 38, "INSTALLATION GUIDE"), "3", "4" or "L1" is automatically entered in "CH" according to your setting of "Output Channel". To record a desired channel, be sure to change the "CH" setting to it. 5 Press ENTER. ENTER 6 To enter another program, repeat steps 1 to 5. 7 After completing all your entries, press REC MENU. REC MENU The REC MENU disappears. Editing Library Function setup Others Notes • The maximum timer program capacity is 32. Any new program will be rejected if the recorder is full. To enter a new program, you must cancel an existing one ( page 43). • Depending on the program, an actual recording may continue a few minutes longer than programmed. • Entries made under the following conditions will be rejected. - when an entry is for a non existing program. - when the digit order of an entry is in error. - when the guide channel has not yet been set. • To erase a timer program, press the QUICK MENU button to display a Quick Menu on the REC MENU. For details, see "Deleting a timer program" ( page 43). • While displaying the REC MENU, the VCR Plus+ programming is not available. • When recording onto a DVD-R/RW disc, set "DVD Compatible Mode" ( page 41) to the desired recording sound for each timer program. • In the event of a broadcast delay, the next program starts even if when the start time arrives prior to the end of the previous program. 47
-
 1
1 -
2
-
3
-
4
-
5
-
6
-
7
-
8
-
9
-
10
-
11
-
12
-
13
-
14
-
15
-
16
-
17
-
18
-
19
-
20
-
21
-
22
-
23
-
24
-
25
-
26
-
27
-
28
-
29
-
30
-
31
-
32
-
33
-
34
-
35
-
36
-
37
-
38
-
39
-
40
-
41
-
 42
42 -
 43
43 -
 44
44 -
 45
45 -
 46
46 -
 47
47 -
 48
48 -
 49
49 -
 50
50 -
 51
51 -
 52
52 -
53
-
54
-
55
-
56
-
57
-
58
-
59
-
60
-
61
-
62
-
63
-
64
-
65
-
66
-
67
-
68
-
69
-
70
-
71
-
72
-
73
-
74
-
75
-
76
-
77
-
78
-
79
-
80
-
81
-
82
-
83
-
84
-
85
-
86
-
87
-
88
-
89
-
90
-
91
-
92
-
93
-
94
-
95
-
96
-
97
-
98
-
99
-
100
-
101
-
102
-
103
-
104
-
105
-
106
-
107
-
108
-
109
-
110
-
111
-
112
-
113
-
114
-
115
-
116
-
117
-
118
-
119
-
120
-
121
-
122
-
123
-
124
-
125
-
126
-
127
-
128
-
129
-
130
-
131
-
132
-
133
-
134
-
135
-
136
-
137
-
138
-
139
-
140
-
141
-
142
-
143
-
144
 |
 |
