Toshiba PA3897U-1CAS Camileo BW10 - S User Guide - Page 33
Resetting the date and time, Starting again from the power save mode
 |
View all Toshiba PA3897U-1CAS Camileo BW10 - S manuals
Add to My Manuals
Save this manual to your list of manuals |
Page 33 highlights
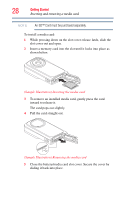
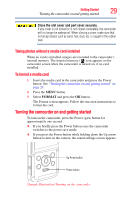
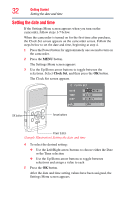
Getting Started 33 Starting again from the power save mode NOTE Under normal conditions, while replacing the battery, the internal battery will maintain the date and time settings. However, there is a small chance the settings may be lost (the internal battery backup will last for approximately seven days). It is recommended to check that the date and time settings are still correct after replacing the battery and before taking photos or recording of any type. Resetting the date and time 1 Press the Power button for approximately one second to turn on the camcorder. 2 Press the MENU button. 3 Select CLOCK SET and press the OK button. The Clock Set screen appears. 4 Use the Up/Down arrow buttons to toggle between selections and assign a value to each. Starting again from the power save mode In order to preserve battery power, the power save (sleep) function will automatically turn off the camcorder after approximately one minute of inactivity while taking photos or videos, or about five minutes of inactivity while in playback mode. This setting is factory-preset. ❖ You can restore the power by pressing the Power button. ❖ The camcorder turns off after approximately twelve hours, if connected to a computer or printer. If the ( ) icon appears... ❖ When a photo is taken, the date and time it was captured are recorded with it. If the date and time settings have not been completed, the date and time cannot be recorded with the captured images. For this reason, immediately after the camcorder is turned on, the "Set date and time" reminder briefly appears, after which the ( ) icon is shown on the Recording Screen. To have the date and time recorded with the images, please complete this setting before capturing images.
-
 1
1 -
2
-
3
-
4
-
5
-
6
-
7
-
8
-
9
-
10
-
11
-
12
-
13
-
14
-
15
-
16
-
17
-
18
-
19
-
20
-
21
-
22
-
23
-
24
-
25
-
26
-
27
-
 28
28 -
 29
29 -
 30
30 -
 31
31 -
 32
32 -
 33
33 -
 34
34 -
 35
35 -
 36
36 -
 37
37 -
 38
38 -
39
-
40
-
41
-
42
-
43
-
44
-
45
-
46
-
47
-
48
-
49
-
50
-
51
-
52
-
53
-
54
-
55
-
56
-
57
-
58
-
59
-
60
-
61
-
62
-
63
-
64
-
65
-
66
-
67
-
68
-
69
-
70
-
71
-
72
-
73
-
74
-
75
-
76
-
77
-
78
-
79
-
80
-
81
-
82
-
83
-
84
-
85
-
86
-
87
-
88
-
89
-
90
-
91
-
92
-
93
-
94
-
95
-
96
-
97
-
98
-
99
-
100
-
101
-
102
-
103
-
104
-
105
-
106
-
107
-
108
-
109
-
110
-
111
-
112
-
113
-
114
-
115
-
116
-
117
-
118
-
119
 |
 |
