Toshiba Satellite L55-B5267 Satellite L40/L50/L70/S40/S50/S70-B Series Windows - Page 101
Setting up for communications, Connect to the Internet
 |
View all Toshiba Satellite L55-B5267 manuals
Add to My Manuals
Save this manual to your list of manuals |
Page 101 highlights
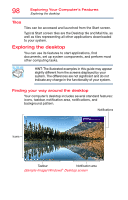
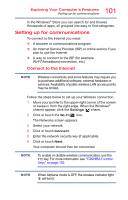
101 Exploring Your Computer's Features Setting up for communications In the Windows® Store you can search for and browse thousands of apps, all grouped into easy to find categories. Setting up for communications To connect to the Internet you need: ❖ A browser or communications program ❖ An Internet Service Provider (ISP) or online service if you plan to use the Internet ❖ A way to connect to the ISP (for example Wi-Fi®/broadband connection, etc.) Connect to the Internet NOTE Wireless connectivity and some features may require you to purchase additional software, external hardware or services. Availability of public wireless LAN access points may be limited. Follow the steps below to set up your Wireless connection. 1 Move your pointer to the upper-right corner of the screen or swipe in from the right edge. When the Windows® charms appear, click the Settings ( ) charm. 2 Click or touch the Wi-Fi ( ) icon. The Networks screen appears. 3 Select your network. 4 Click or touch Connect. 5 Enter the network security key (if applicable). 6 Click or touch Next. Your computer should then be connected. NOTE To enable or disable wireless communication, use the F12 key. For more information see "TOSHIBA Function Keys" on page 152. NOTE When Airplane mode is OFF, the wireless indicator light will be lit.
-
 1
1 -
2
-
3
-
4
-
5
-
6
-
7
-
8
-
9
-
10
-
11
-
12
-
13
-
14
-
15
-
16
-
17
-
18
-
19
-
20
-
21
-
22
-
23
-
24
-
25
-
26
-
27
-
28
-
29
-
30
-
31
-
32
-
33
-
34
-
35
-
36
-
37
-
38
-
39
-
40
-
41
-
42
-
43
-
44
-
45
-
46
-
47
-
48
-
49
-
50
-
51
-
52
-
53
-
54
-
55
-
56
-
57
-
58
-
59
-
60
-
61
-
62
-
63
-
64
-
65
-
66
-
67
-
68
-
69
-
70
-
71
-
72
-
73
-
74
-
75
-
76
-
77
-
78
-
79
-
80
-
81
-
82
-
83
-
84
-
85
-
86
-
87
-
88
-
89
-
90
-
91
-
92
-
93
-
94
-
95
-
 96
96 -
 97
97 -
 98
98 -
 99
99 -
 100
100 -
 101
101 -
 102
102 -
 103
103 -
 104
104 -
 105
105 -
 106
106 -
107
-
108
-
109
-
110
-
111
-
112
-
113
-
114
-
115
-
116
-
117
-
118
-
119
-
120
-
121
-
122
-
123
-
124
-
125
-
126
-
127
-
128
-
129
-
130
-
131
-
132
-
133
-
134
-
135
-
136
-
137
-
138
-
139
-
140
-
141
-
142
-
143
-
144
-
145
-
146
-
147
-
148
-
149
-
150
-
151
-
152
-
153
-
154
-
155
-
156
-
157
-
158
-
159
-
160
-
161
-
162
-
163
-
164
-
165
-
166
-
167
-
168
-
169
-
170
-
171
-
172
-
173
-
174
-
175
-
176
-
177
-
178
-
179
 |
 |