Toshiba TOSHIBA SD800KA Gigabeat, MEG201, Toshiba Digital Audio Player, Owners - Page 38
Moving Audio Data to the recycle bin
 |
UPC - 733002676224
View all Toshiba TOSHIBA SD800KA manuals
Add to My Manuals
Save this manual to your list of manuals |
Page 38 highlights
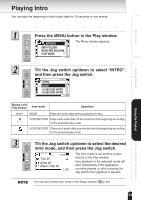
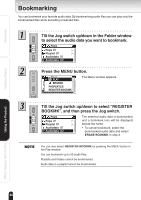
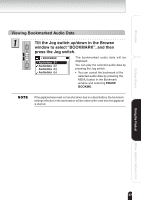
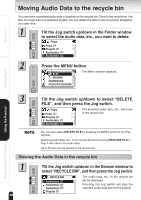
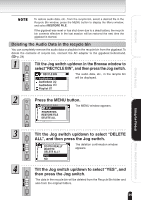
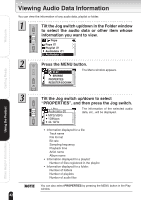
Welcome Moving Audio Data to the recycle bin You can move unwanted audio data or playlists to the recycle bin. Once in the recycle bin, the files no longer become playback targets. You can delete the data in the recycle bin altogether at a later time. Tilt the Jog switch up/down in the Folder window to select the audio data, etc., you want to delete. Pops Pops Playlist Audiodata Audiodata Press the MENU button. Pops PLAY BROWSE PROPERTIES REGISTER BOOKMK The Menu window appears. Getting Ready Using the Product Other Helpful Information Tilt the Jog switch up/down to select "DELETE FILE", and then press the Jog switch. Pops Pops Playlist Audiodata Audiodata The selected audio data, etc., will move to the recycle bin. You can also select DELETE FILE by pressing the MENU button in the Play window. Selecting audio data, etc., in the recycle bin and choosing RESTORE FILE in step 3 will restore the audio data. Up to 50 files can be placed in the recycle bin. Viewing the Audio Data in the recycle bin Tilt the Jog switch up/down in the Browse window to select "RECYCLE BIN", and then press the Jog switch. RECYLE BIN The audio data, etc., in the recycle bin Audiodata Audiodata will be displayed. Pressing the Jog switch will play the Audiodata selected audio data but not the playlist. Playlist 38
-
 1
1 -
2
-
3
-
4
-
5
-
6
-
7
-
8
-
9
-
10
-
11
-
12
-
13
-
14
-
15
-
16
-
17
-
18
-
19
-
20
-
21
-
22
-
23
-
24
-
25
-
26
-
27
-
28
-
29
-
30
-
31
-
32
-
 33
33 -
 34
34 -
 35
35 -
 36
36 -
 37
37 -
 38
38 -
 39
39 -
 40
40 -
 41
41 -
 42
42 -
 43
43 -
44
-
45
-
46
-
47
-
48
-
49
-
50
-
51
-
52
-
53
-
54
-
55
-
56
-
57
-
58
-
59
-
60
-
61
-
62
-
63
-
64
-
65
-
66
-
67
-
68
 |
 |
