Uniden BCD996P2 English Manual - Page 50
Set Number Tag, ID Scan/Search no EDACS SCAT, SCAN/SEARCH, Set Delay Time, Edit Fleetmap Motorola
 |
View all Uniden BCD996P2 manuals
Add to My Manuals
Save this manual to your list of manuals |
Page 50 highlights
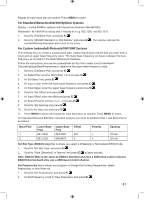
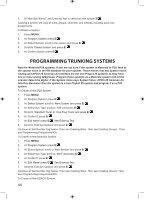
Edit Fleetmap (Motorola Type I/IIi only) Priority ID Scan (no EDACS SCAT/P25-1Tr) Set ID Format (no EDACS SCAT) Set Record P25 NAC Option (P25-1Tr only) Set Number Tag allows you to number a system. The default setting is no number tag (blank). See also Using Number Tags. 1. Scroll to 'Set Number Tag' and press E/ . 2. Enter the number tag (0-999) (Press .No to clear the display) and press E/ to save and exit. ID Scan/Search (no EDACS SCAT) sets whether the scanner scans the programmed ID groups (ID Scan) or searches for all IDs (ID Search) in a trunking system. The default setting is ID search. 1. Scroll to 'ID Scan/Search' and press E/ . 2. Scroll to 'ID Scan' or 'ID Search' and press E/ to save and exit. Note: You can also toggle this while scanning each trunked system by pressing then SCAN/SEARCH. Set Delay Time sets the delay (in seconds) the amount of time the scanner stays on a channel after the transmission has ended before moving to the next channel. A negative delay will force a resume after that number of seconds. This setting applies to all channels in the system. You cannot set the delay on a 'per channel' basis. The default setting is 2 seconds. 1. Scroll to 'Set Delay Time' and press E/ . 2. Scroll to the desired delay time (-10, -5, -2, 0, 1, 2, 5, 10, or 30 secs.) and press E/ to save and exit. Edit Fleetmap (Motorola Type I/IIi systems only) allows you to select a preprogrammed fleetmap or program a fleetmap for Motorola Type I systems. You must program a system fleet map in order for the scanner to properly track and display talkgroup ID's. 1. Scroll to 'Edit Fleetmap' and press E/ . 2. To select a Preset Fleetmap, scroll to 'Preset' and press E/ . 3. Scroll to the number of the preset fleetmap and press E/ to save and exit. See Preset Fleetmaps. 4. To program a Custom Fleetmap, scroll to 'Custom' and press E/ . 5. At 'Block 0' scroll to the size code (0-14) and press E/ See Size Codes. 6. The scanner will prompt you to the next available block so you can scroll to and enter the next size code (0-14) then press E/ . 7. The scanner will prompt you to the next available block so you can scroll to and enter the next size code (0-14) then press E/ . 8. Repeat for each block as needed (0-7) and you will return to the 'Edit Sys Option' menu. Note: If you select size code 12, 13, or 14, these restrictions apply: • 12 can only be assigned to Blocks 0, 2, 4 or 6. • 13 can only be assigned to Blocks 0 and 4. • 14 can only be assigned to Block 0. Since these size codes require multiple blocks, you will be prompted for the next available block. For example, if you assign Block 0 as 12, the scanner prompts you for block 2, the next block 46
-
 1
1 -
2
-
3
-
4
-
5
-
6
-
7
-
8
-
9
-
10
-
11
-
12
-
13
-
14
-
15
-
16
-
17
-
18
-
19
-
20
-
21
-
22
-
23
-
24
-
25
-
26
-
27
-
28
-
29
-
30
-
31
-
32
-
33
-
34
-
35
-
36
-
37
-
38
-
39
-
40
-
41
-
42
-
43
-
44
-
 45
45 -
 46
46 -
 47
47 -
 48
48 -
 49
49 -
 50
50 -
 51
51 -
 52
52 -
 53
53 -
 54
54 -
 55
55 -
56
-
57
-
58
-
59
-
60
-
61
-
62
-
63
-
64
-
65
-
66
-
67
-
68
-
69
-
70
-
71
-
72
-
73
-
74
-
75
-
76
-
77
-
78
-
79
-
80
-
81
-
82
-
83
-
84
-
85
-
86
-
87
-
88
-
89
-
90
-
91
-
92
-
93
-
94
-
95
-
96
-
97
-
98
-
99
-
100
-
101
-
102
-
103
-
104
-
105
-
106
-
107
-
108
-
109
-
110
-
111
-
112
 |
 |
