ViewSonic PJD8353s PJD8353S, PJD8653WS User Guide (English) - Page 22
Period, Timer Display, Timer Position, Timer count
 |
View all ViewSonic PJD8353s manuals
Add to My Manuals
Save this manual to your list of manuals |
Page 22 highlights
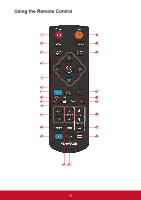
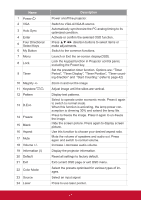
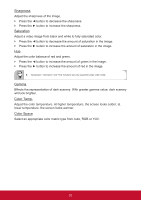
Name 1 Power 2 VGA 3 Auto Sync 4 Enter 5 Four Directional Select Keys 6 My Button 7 Menu 8 Lock 9 Timer 10 Magnify +/11 Keystone / 12 Pattern 13 D.Eco 14 Freeze 15 Blank 16 Aspect 17 Mute 18 Volume +/19 Information (i) 20 Default 21 Exit 22 Color Mode 23 Source 24 Laser Description Power on/off the projector. Switch to VGA-A/VGA-B source. Automatically synchronize the PC analog timing to its optimized condition. Activate or confirm the selected OSD function. Press direction buttons to select items or make adjustments. Switch to the common functions. Launch or Exit the on-screen display(OSD). Lock the keypad function in Projector control panel, excluding the Power key. Set the prestation timer function. Options are: "Timer Period", "Timer Display", "Timer Position", "Timer counting direction" and "Start Counting." (refer to page 42) Zoom in and out the image. Adjust image until the sides are vertical. Display test patterns. Select to operate under economic mode. Press it again to switch to normal mode. When this function is activating, the lamp power consumption is dimming 30% and extend the lamp life. Press to freeze the image. Press it again to un-freeze the image. Hide the screen picture. Press again to display screen picture. Use this function to choose your desired aspect ratio. Mute the volume of speakers and audio out. Press again and switch to normal volume. Increase / decrease audio volume. Display the projector information. Reset all settings to factory default. Exit current OSD page or exit OSD menu. Select the presets optimized for various types of images. Select an input signal. Press to use laser pointer. 21
-
 1
1 -
2
-
3
-
4
-
5
-
6
-
7
-
8
-
9
-
10
-
11
-
12
-
13
-
14
-
15
-
16
-
 17
17 -
 18
18 -
 19
19 -
 20
20 -
 21
21 -
 22
22 -
 23
23 -
 24
24 -
 25
25 -
 26
26 -
 27
27 -
28
-
29
-
30
-
31
-
32
-
33
-
34
-
35
-
36
-
37
-
38
-
39
-
40
-
41
-
42
-
43
-
44
-
45
-
46
-
47
-
48
-
49
-
50
-
51
-
52
-
53
-
54
-
55
-
56
-
57
-
58
-
59
-
60
-
61
-
62
-
63
-
64
-
65
-
66
-
67
-
68
 |
 |
