ViewSonic PJD8353s PJD8353S, PJD8653WS User Guide (English) - Page 23
On-screen Display Menus
 |
View all ViewSonic PJD8353s manuals
Add to My Manuals
Save this manual to your list of manuals |
Page 23 highlights
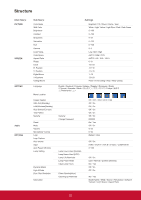
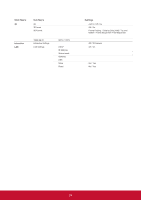
On-screen Display Menus The Projector has multilingual On-screen Display menus that allow you to make image adjustments and change a variety of settings. The projector will automatically detect the source. How to operate 1. To open the OSD menu, press the "Menu" button on the remote control or on the control panel. 2. When OSD is displayed, use the buttons to select the desired item and adjust the settings by the ◄► buttons. 3. If the setting has icon, you could press the ► button to enter another sub menu. Press the "Menu" button to close the sub menu after adjustment. 4. After adjusting the settings, press the "Menu" button to go back to the main menu. 5. To exit, press the "Menu" button again. The OSD menu will be closed and the projector will automatically save the new settings. Main Menu Picture Color Mode Wall Color Brightness Contrast Sharpness Saturation Hue Gamma Color Temp Color Space Bright White Low Auto Select Enter Sub Menu 22 Exit Settings
-
 1
1 -
2
-
3
-
4
-
5
-
6
-
7
-
8
-
9
-
10
-
11
-
12
-
13
-
14
-
15
-
16
-
17
-
 18
18 -
 19
19 -
 20
20 -
 21
21 -
 22
22 -
 23
23 -
 24
24 -
 25
25 -
 26
26 -
 27
27 -
 28
28 -
29
-
30
-
31
-
32
-
33
-
34
-
35
-
36
-
37
-
38
-
39
-
40
-
41
-
42
-
43
-
44
-
45
-
46
-
47
-
48
-
49
-
50
-
51
-
52
-
53
-
54
-
55
-
56
-
57
-
58
-
59
-
60
-
61
-
62
-
63
-
64
-
65
-
66
-
67
-
68
 |
 |
