Vivitar DVR 943HD Camera Manual - Page 13
Video Capture Mode
 |
View all Vivitar DVR 943HD manuals
Add to My Manuals
Save this manual to your list of manuals |
Page 13 highlights
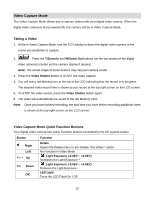
Video Capture Mode The Video Capture Mode allows you to capture videos with your digital video camera. When the digital video camera is first powered ON, the camera will be in Video Capture Mode. Taking a Video 1. While in Video Capture Mode, use the LCD display to direct the digital video camera at the scene you would like to capture. 2. Press the T/Zoom In and W/Zoom Out buttons (on the top section of the digital video camera) to better set the camera display if desired. Note: The actual shape of these buttons may vary per camera model. 3. Press the Video Shutter button to START the video capture. 4. You will see a red blinking icon at the top of the LCD indicating that the record is in progress. The elapsed video record time is shown as you record at the top right corner on the LCD screen. 5. To STOP the video record, press the Video Shutter button again. 6. The video will automatically be saved to the SD Memory card. Note: Once you have finished recording, the total time you have left for recording additional video is shown at the top right corner on the LCD screen. Video Capture Mode Quick Function Buttons Your digital video camera has Quick Function buttons controlled by the OK joystick button. Button Function Right Left EV + Up EV- Down OK Delete Opens the Delete menu to the „Delete This Video?‟ option No Function in Video Mode Light Exposure (-3.0EV ~ +3.0EV) Increases the Light Exposure + Light Exposure (-3.0EV ~ +3.0EV) Reduces the Light Exposure LED Light Turns the LED Flash On / Off 13
-
 1
1 -
2
-
3
-
4
-
5
-
6
-
7
-
 8
8 -
 9
9 -
 10
10 -
 11
11 -
 12
12 -
 13
13 -
 14
14 -
 15
15 -
 16
16 -
 17
17 -
 18
18 -
19
-
20
-
21
-
22
-
23
-
24
-
25
-
26
-
27
-
28
-
29
-
30
-
31
-
32
-
33
-
34
-
35
-
36
-
37
-
38
-
39
-
40
-
41
-
42
-
43
-
44
-
45
-
46
-
47
-
48
-
49
-
50
-
51
-
52
-
53
-
54
-
55
-
56
-
57
-
58
-
59
-
60
-
61
-
62
-
63
-
64
-
65
 |
 |