Vivitar DVR 943HD Camera Manual - Page 6
Powering, Digital Video Recorder, Setting the Language
 |
View all Vivitar DVR 943HD manuals
Add to My Manuals
Save this manual to your list of manuals |
Page 6 highlights
When powering the digital video recorder ON for the first time the digital video recorder will take you through the initial setup. Powering the Digital Video Recorder ON 1. Make sure the lithium battery has been charged and inserted properly. To charge the lithium battery: - Connect the USB cable (supplied) to camcorder and the other end of the cable either to your computer USB slot or to the supplied AC Adapter (which you then plug into an electrical outlet). - Charge light will turn off when battery is fully charged. 2. Make sure an SD card has been properly inserted into your digital video recorder (inserted until a click sound is heard). Note: After the digital video recorder is powered on, an SD icon will appear on the LCD display. If you do not see the SD icon on the display, please check if the card was inserted properly. Important - You must use a Class 4 SD card or higher SD card only. Insert SD Memory Card (up to 32GB) before use. Make sure the SD card is not locked (check the lock switch on the side of the SD card). If the SD card is locked this will prevent the camera from saving captured photos to the SD card. 3. Flip open the LCD screen and press the POWER button turn on the digital video recorder. , located on the inside wall, to Setting the Language 1. You will first be prompted to select a language for the camera. The Language selection menu will appear. Select the language of your choice and press the OK button to confirm the selection. 2. After selecting a language, you will be asked if you would like to continue with the initial 6
-
 1
1 -
 2
2 -
 3
3 -
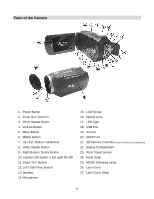 4
4 -
 5
5 -
 6
6 -
 7
7 -
 8
8 -
 9
9 -
 10
10 -
 11
11 -
 12
12 -
13
-
14
-
15
-
16
-
17
-
18
-
19
-
20
-
21
-
22
-
23
-
24
-
25
-
26
-
27
-
28
-
29
-
30
-
31
-
32
-
33
-
34
-
35
-
36
-
37
-
38
-
39
-
40
-
41
-
42
-
43
-
44
-
45
-
46
-
47
-
48
-
49
-
50
-
51
-
52
-
53
-
54
-
55
-
56
-
57
-
58
-
59
-
60
-
61
-
62
-
63
-
64
-
65
 |
 |