Weider Pro 9450 Uk Manual - Page 13
Attach the High Cable 58 to a Small U-Bracket
 |
View all Weider Pro 9450 manuals
Add to My Manuals
Save this manual to your list of manuals |
Page 13 highlights
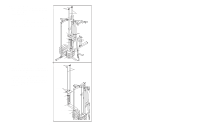
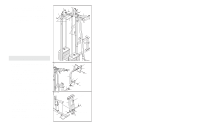
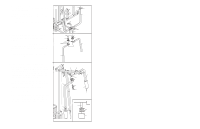
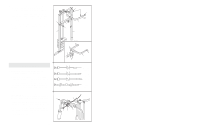
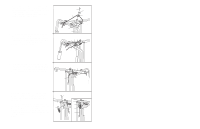
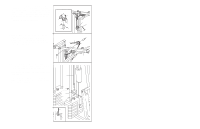
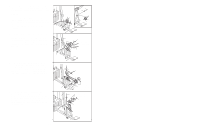
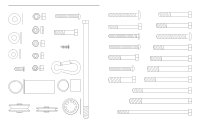
22. See the inset drawing. Wrap the High Cable (58) around a 3 1/2" Pulley (15). Attach the Pulley and a set of Pulley Covers (77) to the upper hole in a Long "U"-Bracket (57) with a 3/8" x 2" Bolt (12) and a 3/8" Nylon Locknut (21). Note: This may be pre-assembled. Be sure that the small tabs on the Pulley Covers are in the position shown and that the Cable and Pulley move smoothly. 22 Small tabs should be up. 58 77 15 77 21 57 12 23. Wrap the High Cable (58) around a 3 1/2" Pulley 23 (15). Attach the Pulley to the bracket on the Top Frame (55) with a 3/8" x 2" Bolt (12) and a 3/8" Nylon Locknut (21). Be sure that the Cable is in the groove of the Pulley and that the Cable and Pulley move smoothly. 58 Bracket 15 58 57 12 15 21 24. Attach the High Cable (58) to a Small "U"-Bracket 24 (71) with a 1/4" Nylon Locknut (2) and a 1/4" Washer (10). Do not completely tighten the Nylon Locknut. It should be threaded onto the end of the Cable only a couple of turns, as shown in the inset drawing. 58 Attach the Small "U"-Bracket (71) to the indicated Weight Tube (63) with a 5/16" x 1 3/4" Bolt (24) and a 5/16" Nylon Locknut (3). 3 71 63 71 58 10 2 13 55 24 10 2
-
 1
1 -
2
-
3
-
4
-
5
-
6
-
7
-
 8
8 -
 9
9 -
 10
10 -
 11
11 -
 12
12 -
 13
13 -
 14
14 -
 15
15 -
 16
16 -
 17
17 -
 18
18 -
19
-
20
-
21
-
22
-
23
-
24
-
25
-
26
-
27
-
28
-
29
-
30
-
31
-
32
-
33
-
34
-
35
 |
 |
