Weider Pro 9930 User Manual
Weider Pro 9930 Manual
 |
View all Weider Pro 9930 manuals
Add to My Manuals
Save this manual to your list of manuals |
Weider Pro 9930 manual content summary:
- Weider Pro 9930 | User Manual - Page 1
satisfaction. If you have questions, or if there are missing parts, we will guarantee complete satisfaction through direct assistance from our Read all precautions and instructions in this manual before using this equipment. Save this manual for future reference. USER'S MANUAL Visit our website at - Weider Pro 9930 | User Manual - Page 2
BEGIN 4 ASSEMBLY 5 CABLE DIAGRAMS 19 ADJUSTMENT 21 TROUBLE-SHOOTING AND MAINTENANCE 22 WEIGHT RESISTANCE CHART 23 ORDERING REPLACEMENT PARTS Back Cover Note: A PART LIST/EXPLODED DRAWING and a PART IDENTIFICATION CHART are attached in the center of this manual. Remove the PART LIST/EXPLODED - Weider Pro 9930 | User Manual - Page 3
the weight system. 1. Read all instructions in this manual and in the accompanying literature before using the weight system. 2. It is the responsibility of the owner to ensure that all users of the weight system are adequately informed of all precautions. 3. The weight system is intended for home - Weider Pro 9930 | User Manual - Page 4
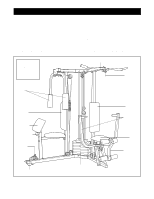
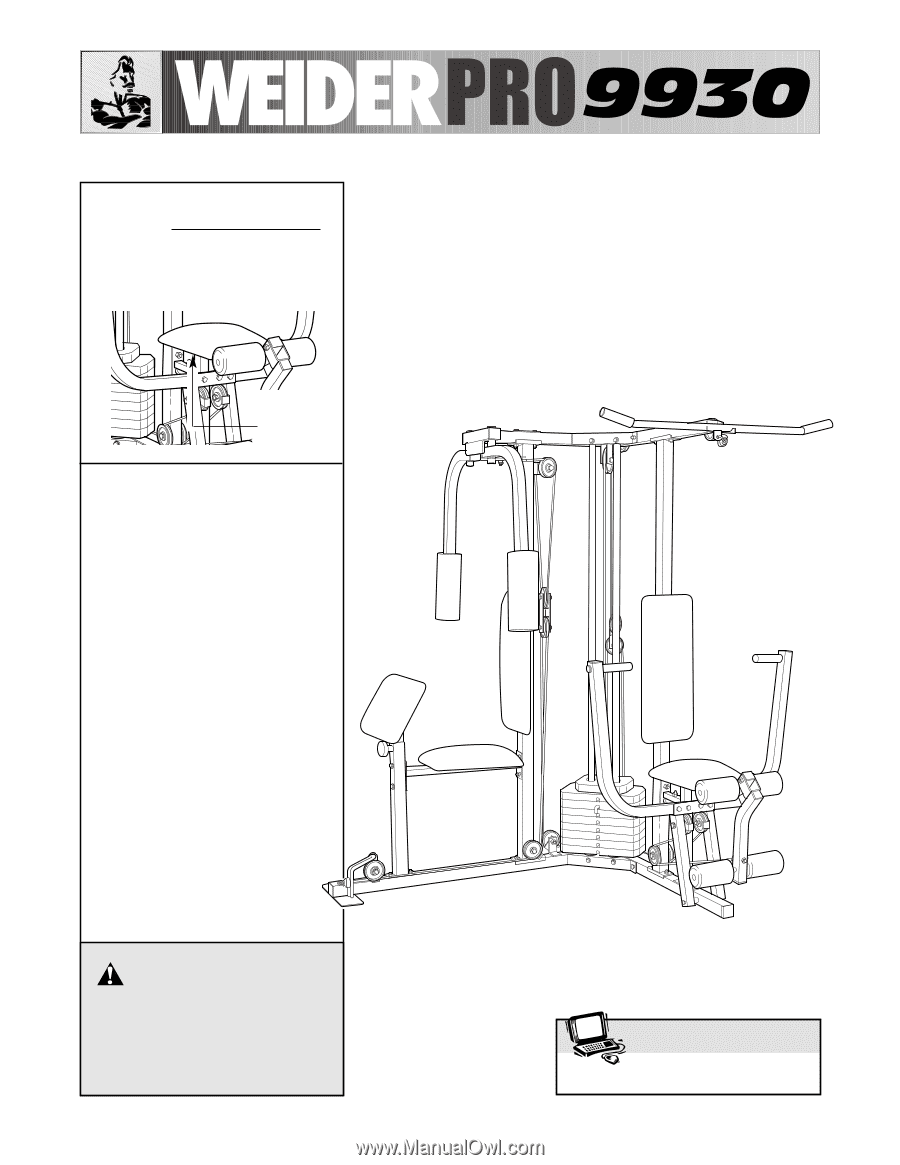
, read this manual carefully before Please use the drawing below to familiarise your- using the weight system. If you have additional self with the major parts of the weight system. ASSEMBLED DIMENSIONS: Height: 198 cm Width: 165 cm Depth: 86 cm Lat Bar High Pulley Station Butterfly Arms - Weider Pro 9930 | User Manual - Page 5
it will be used. Make sure that there is enough room to walk around the weight system as you assemble it. To help you identify the small parts used in assembly, we have included a PART IDENTIFICATION CHART in the center of this manual. Place the chart on the floor and use it to easily identify - Weider Pro 9930 | User Manual - Page 6
1 1. Before beginning, make sure that you have read and understood the information on page 5. Locate and open the parts bag labelled "FRAME ASSEMBLY." Press a 2" Square Inner Cap (38) into the Butterfly Base (61). Press two 2" Square Inner Caps into the Press Base (60). Insert four 5/16 - Weider Pro 9930 | User Manual - Page 7
of the Weights. Pin Grooves 84 18 17 58 8 18 17 61 4. Press a Weight Tube Bumper (76) into the lower end 4 of the Weight Tube (77). Slide the Weight Tube into the center hole in the Weights (8). Lubricate the holes in the Top Weight (78). Slide the Top Weight onto the Weight Guides (58). 17 - Weider Pro 9930 | User Manual - Page 8
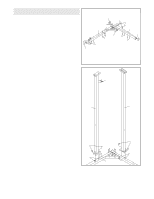
(58) 46 46 are inside of the indicated holes. Do not tighten 64 63 the Nylon Locknuts yet. Secure the Weight Guides (58) to the Butterfly Top Frame (64) with two 3/8" x 2 1/2" Bolts (6), four 3/8" 17 Holes 17 6 Flat Washers (17), and two 3/8" Jam Nuts (18). 58 2 2 59 62 7. - Weider Pro 9930 | User Manual - Page 9
Locate and open the parts bag labelled "ARM ASSEMBLY." Press a 1" x 7/8" Plastic Bushing (29) onto each welded spacer on the Press Frame (53). Slide the Press Frame onto the Press Base (60). (See the inset drawing for proper orientation.) Note: The Plastic Bushings should fit onto the ends of the - Weider Pro 9930 | User Manual - Page 10
Arm. Repeat this step to assemble the Left Butterfly Arm (67). 37 67 Cable Assembly 37 64 65 25 14. Open the parts bag labelled "CABLE ASSEMBLY AND PULLEYS." For cable identification and routing during steps 14-32, refer to the CABLE DIAGRAMS and CABLE ID CHART on pages 19 and 20. Teeth - Weider Pro 9930 | User Manual - Page 11
the Pulley to the Press Top Frame (63) with a 3/8" x 3 1/2" Bolt (24), a 3/8" Flat Washer (17), and a 3/8" Jam Nut (18). Make sure that the Medium Cable (72) is between the 3 1/2" Pulley (5) and the welded pin on the Press Top Frame (63). 6 21 14 4 21 6 Welded Bracket 14 71 63 24 5 18 17 72 - Weider Pro 9930 | User Manual - Page 12
) to the Weight Tube (77) with a 5/16" x 1 3/4" Bolt (9) and a 5/16" Nylon 2 43 11 16 9 77 72 Locknut (2). 11 16 43 21. Identify the Long Cable (73). It has a ball on one 21 end and a loop on the other. Route the end with the loop through the slot in the cable guide on the Butterfly - Weider Pro 9930 | User Manual - Page 13
on the Butterfly Base (61) with a 3/8" x 2" Bolt (35) and a 3/8" Nylon Locknut (4). 73 35 5 24. Wrap the Long Cable (73) around a 3 1/2" Pulley (5). Attach the Pulley and a Cable Trap (39) to the indicat- 24 ed bracket on the Butterfly Base (61) with a 3/8" x 2" Bolt (35) and a 3/8" Nylon - Weider Pro 9930 | User Manual - Page 14
25. Note: For clarity, this and the following drawings 25 show some parts removed. Remove the lower 3 1/2" Pulley (5) from the Double "U"-Bracket (36). Wrap the Long Cable (73) over the Pulley in the direction shown. Attach the Pulley to the Double "U"-Bracket with a 3/8" x 1 3/4" Bolt (22) and a - Weider Pro 9930 | User Manual - Page 15
. 5 23 53 4 73 32. Note: Lift the Top Weight (78) on the weight stack 32 in order to create slack in the Long Cable (73) before beginning this step. Attach the Long Cable (73) to the Leg Lever (49) by slipping the looped end of the Cable onto the looped end of the 3/8" x 2 1/2" Eyebolt (83 - Weider Pro 9930 | User Manual - Page 16
33 33. Locate and open the parts bag labelled "SEAT ASSEMBLY." Insert a 1/4" x 2" Carriage Bolt (85) into the center hole in a Seat Plate ( 40 47 49 40 47 35. Insert a 1/4" x 2 1/2" Carriage Bolt (12) into the center hole in a Seat Plate (42). Attach the Seat Plate to the 35 10 Press Backrest ( - Weider Pro 9930 | User Manual - Page 17
36. Insert a 1/4" x 1 1/2" Carriage Bolt (82) into the center 36 hole in a Seat Plate (42). Attach the Seat Plate to a Seat (51) with two 1/4" x 3/4" Screws (13). Insert the 1/4" x 1 1/2" Carriage Bolt (82) into the indicated - Weider Pro 9930 | User Manual - Page 18
. Apply the WEIDER PRO 9930 decal in the location 39 shown. WEIDER PRO 9930 40. Make sure that all parts have been properly tightened. The use of the remaining parts will be explained in ADJUSTMENT, beginning on page 21 of this manual. Before using the weight system, pull each cable a few times - Weider Pro 9930 | User Manual - Page 19
are routed correctly, that the Pulleys move smoothly, and that the Cable Traps do not touch or bind the Cables. Incorrect cable routing can damage the weight system. Short Cable (71) 1 Medium Cable (72) 2 2 4 1 4 5 3 3 5 Cable ID Chart (71) 1.9m (6 ft. 3 in.) (72) 3.5m (11 ft. 6 in.) (73 - Weider Pro 9930 | User Manual - Page 20
Long Cable (73) 6 3 10 5 7 4 8 9 13 2 1 12 11 20 - Weider Pro 9930 | User Manual - Page 21
of the weight stack, insert a Weight Pin (87) under the desired Weight (8). Make sure you insert the Weight Pin as far as it will go. Note: Due to the cables and pulleys, the amount of resistance at each exercise station may vary from the weight setting. Use the WEIGHT RESISTANCE CHART on page - Weider Pro 9930 | User Manual - Page 22
Inspect and tighten all parts each time you use the weight system. Replace any worn parts immediately. The weight system can be cleaned using a damp cloth and mild non-abrasive detergent. Do not use solvents. TIGHTENING THE CABLES The type of cable used on weight systems can stretch slightly when - Weider Pro 9930 | User Manual - Page 23
each exercise station. "Top" refers to the 6-lb. top weight; the other numbers refer to the 12.5-lb. weight plates. Note: The actual resistance at each station may vary due to differences in individual weight plates as well as friction between the cables, pulleys, and weight guides. Weight Plates - Weider Pro 9930 | User Manual - Page 24
) 2. The NAME of the product (WEIDER® PRO 9930 weight system) 3. The SERIAL NUMBER of the product (see the front cover of this manual) 4. The KEY NUMBER and DESCRIPTION of the part(s) (see the PART LIST and EXPLODED DRAWING attached in the center of this manual). ™ ® of/du Canada Inc. PRODUCT - Weider Pro 9930 | User Manual - Page 25
PART IDENTIFICATION CHART FROM THE MANUAL This chart is provided to help you identify the small parts used in assembly. The number in parenthesis below each part refers to the key number of the part. Important: Some parts may have been pre-assembled for shipping purposes. If you cannot find a part - Weider Pro 9930 | User Manual - Page 26
PART IDENTIFICATION CHART-Model No. WESY99300 1/4" Flat Washer (11) 5/16" x 1 3/4" Bolt (9) 5/16" Flat Washer (19) 5/16" x 2 1/2" Bolt (3) 3/8" Flat Washer (17) 1/4" Nylon Locknut (16) 5/16" Nylon Locknut (2) 5/16" Jam - Weider Pro 9930 | User Manual - Page 27
(35) 3/8" x 2 1/4" Bolt (81) 3/8" x 2 1/2" Bolt (6) 3/8" x 3 1/4" Bolt (28) "V" Pulley (21) (Not shown to scale) 3 1/2" Pulley (5) (Not shown to scale) 4 1/2" Pulley (34) (Not shown to scale) Cable Clip (57) 3/8" x 3 1/2" Bolt (24) 3/8" x 3 3/4" Bolt (7) 3/8" x 4 3/4" Bolt (23) 1" Retainer (25) - Weider Pro 9930 | User Manual - Page 28
3/4" Round Inner Cap (40) 1" Round Inner Cap (41) 1" x 7/8" Plastic Bushing (29) 1" Round Cap (26) 1" Inner Cap (80) 1 3/4" Square Inner Cap (37) 1 1/2" Square Inner Cap (79) 2" Square Inner Cap (38) - Weider Pro 9930 | User Manual - Page 29
REMOVE THIS PART LIST/EXPLODED DRAWING FROM THE MANUAL 81 - Weider Pro 9930 | User Manual - Page 30
Frame Press Frame Press Arm Chain Nylon Strap Cable Clip Weight Guide Press Frame Upright Press Base Butterfly Base Butterfly Weight Bumper 1/4" x 2" Carriage Bolt 1/4" x 2" Bolt Weight Pin 1/4" x 1 1/2" Screw Press Backrest 5/16" Jam Nut User's Manual Note: "#" indicates a non-illustrated part - Weider Pro 9930 | User Manual - Page 31
68 25 37 26 27 15 25 26 18 18 71 18 18 71 67 66 37 65 69 70 13 65 51 82 42 13 75 45 19 20 2 2 74 2 2 2 11 88 16 38 5 39 7 20 20 20 2 64 19 19 46 46 63 38 41 18 22 4 18 6 21 17 38 34 6 17 2 17 18 6 72 22 2 58 4 43 14 52 21 6 14 37 77 36 11 16 78 9 5 10 22
-
 1
1 -
 2
2 -
 3
3 -
 4
4 -
 5
5 -
 6
6 -
 7
7 -
8
-
9
-
10
-
11
-
12
-
13
-
14
-
15
-
16
-
17
-
18
-
19
-
20
-
21
-
22
-
23
-
24
-
25
-
26
-
27
-
28
-
29
-
30
-
31
 |
 |
®
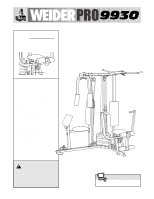
USER’S MANUAL
Model No. WESY99300
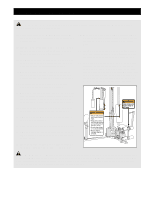
Serial No.
The serial number is found in the
location shown below. Write the
serial number in the space above.
CAUTION
Read all precautions and instruc-
tions in this manual before using
this equipment. Save this manu-
al for future reference.
Serial
Number
Decal
www.weiderfitness.com
Visit our website at
QUESTIONS?
We are committed to providing
complete customer satisfaction.
If you have questions, or if there
are missing parts, we will guar-
antee complete satisfaction
through direct assistance from
our factory.
TO AVOID UNNECESSARY
DELAYS, PLEASE CALL DIRECT
TO OUR TOLL-FREE CUS-
TOMER HOT LINE. The trained
technicians on our customer hot
line will provide immediate
assistance, free of charge.
CUSTOMER HOT LINE:
1-888-936-4266
Mon.–Fri., 8 a.m.–6:30 p.m. EST
(excluding holidays)