Weslo Gym 1500 Uk Manual - Page 6
Slide the Top Weight onto the Weight
 |
View all Weslo Gym 1500 manuals
Add to My Manuals
Save this manual to your list of manuals |
Page 6 highlights
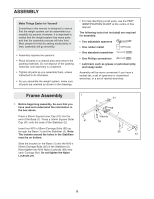
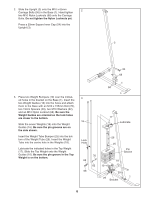
2. Slide the Upright (3) onto the M10 x 65mm 2 Carriage Bolts (56) in the Base (1). Hand tighten two M10 Nylon Locknuts (68) onto the Carriage Bolts. Do not tighten the Nylon Locknuts yet. Press a 25mm Square Inner Cap (54) into the Upright (3). 3 54 68 1 56 3. Place two Weight Bumpers (19) over the indicated holes in the bracket on the Base (1). Insert the two Weight Guides (16) into the holes and attach them to the Base with an M10 x 155mm Bolt (76), two 19mm Spacers (29), two M10 Washers (62), and an M10 Nylon Locknut (68). Be sure the Weight Guides are oriented so the lock holes are closer to the bottom. Slide the seven Weights (18) onto the Weight Guides (16). Be sure the pin grooves are on the side shown. Insert the Weight Tube Bumper (25) into the bottom of the Weight Tube (26). Insert the Weight Tube into the centre hole in the Weights (18). Lubricate the indicated holes in the Top Weight (17). Slide the Top Weight onto the Weight Guides (16). Be sure the pin groove in the Top Weight is on the bottom. 3 17 16 Lubricate 26 Lock Hole 25 76 62 62 19 Pin Groove 18 68 29 29 1 Bracket 6
-
 1
1 -
 2
2 -
 3
3 -
 4
4 -
 5
5 -
 6
6 -
 7
7 -
 8
8 -
 9
9 -
 10
10 -
 11
11 -
 12
12 -
13
-
14
-
15
-
16
-
17
-
18
-
19
-
20
-
21
-
22
-
23
-
24
-
25
-
26
-
27
 |
 |
