Whirlpool WOES5030LB Owners Manual - Page 16
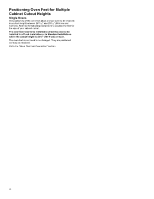
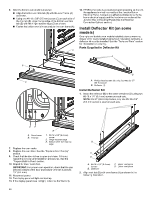
Cutout Height is Between 50, and 51, 128.2 cm and, 9 cm or for Flush Installation
 |
View all Whirlpool WOES5030LB manuals
Add to My Manuals
Save this manual to your list of manuals |
Page 16 highlights
Cutout Height is Between 501/2" and 511/8" (128.2 cm and 129.9 cm) or for Flush Installation 1. Using 2 or more people, place the oven on its back on a covered surface. 4. Install a front foot on the left front spacer using a #8-18 x 3/8" (9.5 mm) screw. NOTE: Position the foot so the long side of the foot is facing toward the inside of the oven. 2. Install a rear foot on the left rear spacer using a #8-18 x 3/8" (9.5 mm) screw. NOTE: Position the foot so the long side of the foot is facing toward the top of the oven. A. Front Foot B. #8-18 x 3/8" (9.5 mm) screw C. Spacer 5. In the same manner, install a front foot on the right front of the oven. 6. Using 2 or more people, place the oven in its upright position. A. Spacer B. Rear foot C. #8-18 x 3/8" (9.5 mm) screw 3. In the same manner, install a rear foot on the right rear of the oven. 7. Go to the "Make Electrical Connection" section. 16
-
 1
1 -
2
-
3
-
4
-
5
-
6
-
7
-
8
-
9
-
10
-
 11
11 -
 12
12 -
 13
13 -
 14
14 -
 15
15 -
 16
16 -
 17
17 -
 18
18 -
 19
19 -
 20
20 -
 21
21 -
22
-
23
-
24
-
25
-
26
-
27
-
28
-
29
-
30
-
31
-
32
-
33
-
34
-
35
-
36
-
37
-
38
-
39
-
40
-
41
-
42
-
43
-
44
-
45
-
46
-
47
-
48
-
49
-
50
-
51
-
52
-
53
-
54
-
55
-
56
-
57
-
58
-
59
-
60
-
61
-
62
-
63
-
64
-
65
-
66
-
67
-
68
-
69
-
70
-
71
-
72
 |
 |
