Xerox 385 User Manual
Xerox 385 - WorkCentre 385 Laser Multifunction Manual
 |
UPC - 095205132960
View all Xerox 385 manuals
Add to My Manuals
Save this manual to your list of manuals |
Xerox 385 manual content summary:
- Xerox 385 | User Manual - Page 1
Pro 385 User Manual Table of Contents Chapter 1 Getting Started Chapter 2 Making a Copy Chapter 3 Sending a Fax Chapter 4 Receiving a Fax Chapter 5 Printing Chapter 6 Scanning Chapter 7 Trouble Shooting Chapter 8 Maintenance Chapter 9 Appendix Chapter 10 Glossary Index http://xww.xedoc.world.xerox - Xerox 385 | User Manual - Page 2
1-9 PC Cable 1-10 AC Power Cord 1-12 Print Media Specifications 1-13 Core media List 1-14 Loading Paper 1-15 Using the Automatic Paper Feeder 1-15 Using the Manual Paper Feeder 1-20 Paper Guidelines 1-22 Installing Software 1-24 System Requirements 1-24 Overview of the WorkCentre 385 Drivers 1-24 - Xerox 385 | User Manual - Page 3
Installing the Machine Reports 1-46 Printing Reports 1-46 User Options (System Data) 1-47 Setting an Option 1-47 Selectable Options 1-48 http://xww.xedoc.world.xerox.com/data/XEDOC/Central/Multifunction/wc385/user/chapter1/chpt1.htm (2 of 2) [07/09/1999 14:30:53] - Xerox 385 | User Manual - Page 4
Chapter 1 1 Getting Started Set Up Your Machine Unpacking WorkCentre 385 Laser Printer cartridge One-touch label User Guide Document Exit tray Document Input tray Printer exit tray CD-ROM Telephone line cord* Power cord* Parallel cable * Appearance may vary according to country. 1-1 - Xerox 385 | User Manual - Page 5
locations. Front View Document Input Tray Control Panel Paper Guides Automatic Paper Feeder Extension Tray Automatic Paper Feeder Manual Paper Feeder Automatic Document Feeder Document Guides Document Exit Tray Paper Exit Tray Note: Your machine may look slightly different than the illustration - Xerox 385 | User Manual - Page 6
Rear View 1 TEL LINE Jack EXT. LINE Jack Power Cord Connector PC Cable Connector Inside Cover Laser Printer Cartridge Cover Release Buttons (right and left sides) Set Up Your Machine 1-3 - Xerox 385 | User Manual - Page 7
Choosing a Location To help guarantee trouble-free operation of your machine, place it on a flat, stable surface near your workstation. Leave enough space to allow for easy paper loading, paper unloading, and opening of the front cover. Do not place your machine: n In direct sunlight. n Near heat - Xerox 385 | User Manual - Page 8
tray Document Exit Tray Insert the two tabs on the document exit tray into the slots on the front of your machine. Fold out the extension tray, if necessary. Side tab Extension tray Insert one side tab. Then, while pushing inward on the remaining tab, slide it into place. Set Up Your - Xerox 385 | User Manual - Page 9
Installing the Laser Printer Cartridge 1 Open the cover by pulling the cover release buttons on both sides of the machine toward you. Cover Release Button 2 Unwrap the Laser Printer Cartridge. 3 Shake the Laser Printer Cartridge from side to side five or six times to distribute the toner evenly. - Xerox 385 | User Manual - Page 10
4 Carefully remove the sealing tape by pulling straight out on the tab protruding from the end of the Laser Printer Cartridge. 1 5 Locate the two Laser Printer Cartridge slots inside the printer, one on each side. cartridge slot Set Up Your Machine 1-7 - Xerox 385 | User Manual - Page 11
6 Grasp the handle and slide the Laser Printer Cartridge down along the cartridge slots until it clicks into place. 7 Close the cover. Make sure that the cover is securely closed and both cover release buttons have clicked into place. 1-8 Getting Started - Xerox 385 | User Manual - Page 12
Telephone Line Plug one end of the telephone line cord into the TEL LINE jack and the other end into a standard phone wall jack. 1 To a standard phone wall jack Extension Phone If you want to use an ordinary phone or answering machine with your WorkCentre 385, connect it to the jack labelled EXT. - Xerox 385 | User Manual - Page 13
Cable Your Xerox WorkCentre 385 is equipped with a parallel interface port for use with IBM PCs and compatible computers. Using the supplied Centronics parallel cable, connect your WorkCentre 385 to a computer that supports bi-directional communications (IEEE standard 1284). Note: If using another - Xerox 385 | User Manual - Page 14
1 Connector Clips 2 Connect the other end of the cable to the parallel port on your computer. If necessary, refer to your computer documentation for assistance with this procedure. Set Up Your Machine 1-11 - Xerox 385 | User Manual - Page 15
NO On/Off switch for the WC 385. When the AC power cord is plugged in, the machine is fully energized. Note: To correctly install the WC 385, the AC power cord must remain unplugged from the grounded wall outlet until software is to be loaded. In the next step, one end of the power cord - Xerox 385 | User Manual - Page 16
paper, the Automatic Paper Feeder and the Manual Paper Feeder. The table below illustrates the Paper Feeder Standard Paper Transparency Film Paper Label Manual Paper Feeder Non-Standard Paper Transparency Film Paper Label and the Manual Paper Feeder are shown: Type Paper Transparency Film - Xerox 385 | User Manual - Page 17
that has been tested and is guaranteed to successfully print. Paper Size Xerox 4200 Xerox 4024DP Bond Letter (8 1/2 x11) Letter (8 1/2 x11) Xerox 80 Premier 210 X 297 mm Xerox Blue, Green and Red Xerox 3R9023 Transparency Film Letter (8 1/2 x11) Letter (8 1/2 x11) Weight 16# 20# 80 gm2 - Xerox 385 | User Manual - Page 18
that has been tested and is guaranteed to successfully print. Paper Size Xerox 4200 Xerox 4024DP Bond Letter (8 1/2 x11) Letter (8 1/2 x11) Xerox 80 Premier 210 X 297 mm Xerox Blue, Green and Red Xerox 3R9023 Transparency Film Letter (8 1/2 x11) Letter (8 1/2 x11) Weight 16# 20# 80 gm2 - Xerox 385 | User Manual - Page 19
may be reduced. Note: If you experience problems feeding paper, place the media into the Manual Paper Feeder one sheet at a time. 1 Pull the Automatic Paper Feeder all the way up. Extension Tray Automatic Paper Feeder Manual Paper Feeder 2 Prepare the print material for loading. For paper and - Xerox 385 | User Manual - Page 20
Straighten the edges on a level surface. Note: If envelopes jam while printing, try reducing the number of envelopes in the Automatic Paper Feeder. For transparencies, refer to the packaging for the transparency stock to determine the print side. Hold the transparencies by the edges and avoid - Xerox 385 | User Manual - Page 21
the Appendix. Do not mix different types of print media. Refer to the following instructions for loading each type of print material. a) Load paper or transparencies with the print side facing you. The WorkCentre 385 will print on the side facing you. b) Load envelopes with the flap side facing - Xerox 385 | User Manual - Page 22
stamp is shown in the previous illustration for reference only. CAUTION: Never use envelopes with clasps, snaps, windows, coated linings, or self-stick adhesives. These envelopes may severely damage the printer. c) Load letterhead paper with the design facing you. The top edge of the sheet with the - Xerox 385 | User Manual - Page 23
1 guides may bend the media or provide too much resistance when feeding. Note: When you print a file from your PC using the Automatic Paper Feeder, make sure that you select the correct paper source and paper size from your software application before starting your print job. Set Up Your Machine - Xerox 385 | User Manual - Page 24
Paper Feeder Use the Manual Paper Feeder to feed paper one sheet at a time into your machine. Manual Paper Feeder Note: When you print a file from your PC using the Manual Paper Feeder, make sure that you select the correct paper source and paper size from your software application before starting - Xerox 385 | User Manual - Page 25
2 Ensure that the media is fed into the machine as far as it will go. 1 3 Press the Start button to start manual feeding of the media. If you have more than one page to print, press the Start button for each page. Set Up Your Machine 1-21 - Xerox 385 | User Manual - Page 26
texture that is too smooth or too rough. n Colored paper should be of the same high quality as white paper. The pigments must withstand the printer's fusing temperature of 392o F (200o C) for 0.1 second without deterioration. Do not use paper with a colored coating that was added after the paper was - Xerox 385 | User Manual - Page 27
n Use only transparencies designed for use with xerographic printers. n Use only well-constructed envelopes with sharp, well creased folds. l DO NOT use envelopes with clasps and snaps. 1 l DO NOT use envelopes with windows, coated linings, self-stick adhesives, or other synthetic materials. l - Xerox 385 | User Manual - Page 28
.5 Lite). Overview of the WorkCentre 385 Drivers Before the WorkCentre 385 can interface with your computer, you must install driver files. These drivers will enable your computer to properly communicate with the WorkCentre 385 for printing, scanning and PC fax operations. PC fax is the process of - Xerox 385 | User Manual - Page 29
faxes to your PC. n TextBridge Pro, a scanning program with optical character recognition (OCR) capabilities, is also included for your convenience. Proper operation of the WorkCentre 385 with either of the additional software applications requires prior installation of the WorkCentre 385 drivers - Xerox 385 | User Manual - Page 30
Procedure In Windows 3.x, Windows 95/98, or Windows NT 4.0 1 Turn on your PC and start Windows. 2 Ensure the Xerox WorkCentre 385 is plugged into a standard grounded AC power outlet and connected to your computer. To AC outlet 3 The machine turns on. Note: To power off the machine; unplug the - Xerox 385 | User Manual - Page 31
Note: If you are using Windows 3.x, the Xerox WorkCentre 385 installation program will not begin automatically. To start the program, Select FILE>RUN from the Windows Program Manager then proceed to step 1 4b. If the program does not start: a) From the Start menu, select Run. b) Type D:\autorun. - Xerox 385 | User Manual - Page 32
5 Select a language. A window will appear showing the components to be installed. 1-28 Getting Started - Xerox 385 | User Manual - Page 33
6 Follow the on-screen instructions and click Continue. 1 The selected components are installed one at a time in the order they are presented on the screen. Note: Although the installation program will prompt you to shut down your machine after each component is installed, it is not necessary to - Xerox 385 | User Manual - Page 34
installing the printer driver, the WorkCentre 385 will be selected as the default Windows printer. Uninstalling Software Uninstallation of software is required only if you are upgrading the software, or if your installation fails. In Windows 3.x In Windows 3.x, all WorkCentre 385 software components - Xerox 385 | User Manual - Page 35
the Start Menu Program Item for component you wish to uninstall. 4 Click on the Submenu uninstall icon for the component you wish to remove. A window will appear prompting you to confirm that you wish to remove the selected application. 5 Click on Yes. 6 Uninstall Shield launches and the component - Xerox 385 | User Manual - Page 36
Print Priority Use to assign print priority to PC file printing over fax printing. LCD Display The display shows the current status of your machine, and guides you through various tasks using a menu system for each operation. One-touch Dial and Special Function Buttons Use to call most frequently - Xerox 385 | User Manual - Page 37
contrast of copied or transmitted documents. Speed/Dual Use to dial calls and send fax documents by entering a 2-digit number. Also use to switch the LCD display Number Keypad Use to dial numbers manually or to enter letters and numbers for various programming functions. Using the Control Panel - Xerox 385 | User Manual - Page 38
. 1 Press the Menu button, then press the System Setup button on the One- Touch keypad. The display indicates RINGER VOLUME ?. 2 Press Enter, then press no > symbol is displayed, the ringer will be turned off. The machine will work normally even if the ringer is set to off. RINGER VOLUME [>>>>>>>> ] - Xerox 385 | User Manual - Page 39
by using the Resolution or Contrast button on the control panel. 1 Press the Menu button, then press the System Setup button on the One- Touch keypad. The display indicates RINGER VOLUME ?. 2 Press the Up or Down button until DEFAULT SETTINGS ? appears. 3 Press Enter. The display prompts you - Xerox 385 | User Manual - Page 40
; for example, when out of paper, or if a cover is open. You can also set the machine to beep when any key is pressed. 1 Press the Menu button, then press the System Setup button on the One- Touch keypad. The display indicates RINGER VOLUME ?. 2 Press the Up or Down button until you - Xerox 385 | User Manual - Page 41
; for example, when out of paper, or if a cover is open. You can also set the machine to beep when any key is pressed. 1 Press the Menu button, then press the System Setup button on the One- Touch keypad. The display indicates RINGER VOLUME ?. 2 Press the Up or Down button until you - Xerox 385 | User Manual - Page 42
telephone. If you want to disable remote diagnosis (to protect your machine from being serviced by an unauthorized person), you must activate the Remote Diagnosis Protection feature. 1 Press Menu, then press System Setup on the One-Touch keypad. The display indicates RINGER VOLUME ?. 2 Press the Up - Xerox 385 | User Manual - Page 43
telephone. If you want to disable remote diagnosis (to protect your machine from being serviced by an unauthorized person), you must activate the Remote Diagnosis Protection feature. 1 Press Menu, then press System Setup on the One-Touch keypad. The display indicates RINGER VOLUME ?. 2 Press the Up - Xerox 385 | User Manual - Page 44
the Stop button. Econo Mode Setting Econo Mode can be set to on to conserve the supply of toner in your Laser Printer Cartridge. 1 Press the Menu button, then press the System Setup button on the One-Touch keypad. The display indicates RINGER VOLUME ?. 2 Press the Up or Down button until ECONO MODE - Xerox 385 | User Manual - Page 45
low or empty toner, use the Last Fax Data Reprint feature to print the last fax data. Your machine continuously stores the last 10 pages of received fax data, and updates the pages each time you receive a fax. 1 Press the Menu button, then press the System Setup button on the One- Touch keypad. The - Xerox 385 | User Manual - Page 46
low or empty toner, use the Last Fax Data Reprint feature to print the last fax data. Your machine continuously stores the last 10 pages of received fax data, and updates the pages each time you receive a fax. 1 Press the Menu button, then press the System Setup button on the One- Touch keypad. The - Xerox 385 | User Manual - Page 47
to return to the Standby mode. Setting the Clock Mode You can configure your machine to display time using either a 12 hour or 24 hour format. 1 Press the Menu button, then press the System Data (01) button on the One-Touch keypad. PAPER SIZE appears on the display. 2 Press the Up button. - Xerox 385 | User Manual - Page 48
date and time are shown in the display when the machine is on and ready for use (Standby mode). The date and time are printed on all 1 faxes you send. 1 Press the Menu button, then press the Date & Time button on the One- Touch keypad. The current date and time are displayed. A flashing - Xerox 385 | User Manual - Page 49
required by law to indicate your fax number on any fax you send. The System ID, including your telephone number and name, will be printed at the top of each page sent from your machine. 1 Press the Menu button, then press the System ID button on the One- Touch keypad. The display prompts you - Xerox 385 | User Manual - Page 50
. Dual The WorkCentre 385 can perform more than one function at the same time. For example, it can simultaneously: n Print a PC document while sending a fax. n Receive a fax into memory while making a copy. n Receive a fax into memory while printing a PC document. n Store a fax document for later - Xerox 385 | User Manual - Page 51
. Dual The WorkCentre 385 can perform more than one function at the same time. For example, it can simultaneously: n Print a PC document while sending a fax. n Receive a fax into memory while making a copy. n Receive a fax into memory while printing a PC document. n Store a fax document for later - Xerox 385 | User Manual - Page 52
15) This quick reference guide consists of a list detailing the machine's basic functions and operating instructions. n TX Confirm (One-Touch button 16) The Message Confirmation Report lists important information about faxes sent from your machine including: the remote site fax number, number of - Xerox 385 | User Manual - Page 53
15) This quick reference guide consists of a list detailing the machine's basic functions and operating instructions. n TX Confirm (One-Touch button 16) The Message Confirmation Report lists important information about faxes sent from your machine including: the remote site fax number, number of - Xerox 385 | User Manual - Page 54
-Touch button 18) This Telephone Numbers List indicates all of the numbers currently stored in machine memory as One-Touch Dial numbers, Speed Dial numbers, and Group Dial numbers. n System List (One-Touch button 19) This System Data List indicates the status of the user-selectable options. See - Xerox 385 | User Manual - Page 55
button. 2 Press the One-Touch button corresponding to the desired report on the One-Touch keypad. Refer to the table below: One-Touch Button # Button Label printed automatically after sending to or receiving from more than one location and provides detailed information about the operation. Note: - Xerox 385 | User Manual - Page 56
. Setting an Option 1 Press the Menu button. 2 Press the System Data button on the One-Touch keypad. The display shows the first option menu. 3 Scroll through the options by pressing the the Stop button, the machine stores the options you changed and returns to the Standby mode. System Setup 1-47 - Xerox 385 | User Manual - Page 57
instructions assume you've followed the steps listed in the previous procedure, Setting an Option, and the machine is prompting you to change one of the options listed below. All of these options are menu settings accessed by the One automatically each time you send a fax (ON). Press 2 to turn this - Xerox 385 | User Manual - Page 58
Power Saving OFF. This keeps the printer ready to print with minimum warm-up time. n DIAL MODE - Select the type of dial system your fax machine is connected to: Press 1 if the fax machine is connected to a tone (Touch Tone) dial line. Press 2 if the fax machine is connected to a pulse (Rotary - Xerox 385 | User Manual - Page 59
to automatically reduce an incoming page (that would otherwise be divided into two pages) to fit on a single page. If the fax machine cannot reduce the data to fit into one page with this feature enabled, the data is divided and printed in actual size on two or more sheets. Press 1 to turn - Xerox 385 | User Manual - Page 60
axes in order to maintain the proportionality of the original image, turn the horizontal reduction feature off. If you turn this feature off, the machine reduces the data as shown below. Original Received data Press 1 to turn this feature on. Press 2 to turn this feature off. System Setup 1-51 - Xerox 385 | User Manual - Page 61
. Using the Number keypad, enter the desired discard size, and press the Enter button to store your selection. n REDIAL INTERVAL - Your machine can automatically redial a remote fax machine if it was busy or does not answer the first call attempt. Enter the number of minutes (from 1 to 15) using the - Xerox 385 | User Manual - Page 62
. This feature is often used by answering services who answer telephones for many different clients. They need to know which number someone is calling on to properly answer the phone. Using the Distinctive Ring Pattern Detection feature, your fax machine can "learn" the ring pattern you designate - Xerox 385 | User Manual - Page 63
number from another telephone. It is not necessary to place the call from a fax machine. When your machine begins to ring, do not answer the call. The machine requires several rings to learn the pattern. When the machine completes "learning," the LCD displays END DRPD SETUP. With the DRPD feature - Xerox 385 | User Manual - Page 64
fax jobs. 1 Press 1 to turn this feature on. Press 2 to turn this feature off. n LOCAL ID - Enabling this feature causes the machine n PRIORITY TERM - You can set your machine to turn Print Priority off automatically if there is no further PC printing activity. There are two user selectable - Xerox 385 | User Manual - Page 65
n CLOCK MODE - Use this feature to determine how time is displayed on your machine. Press 1 to select a 12 hour Clock Mode. Press 2 to select a 24 hour Clock Mode. 1-56 Getting Started - Xerox 385 | User Manual - Page 66
Making a Copy Chapter 2 Making a Copy Set Up Your Machine 2-1 http://xww.xedoc.world.xerox.com/data/XEDOC/Central/Multifunction/wc385/user/chapter2/chpt2.htm [07/09/1999 14:33:44] - Xerox 385 | User Manual - Page 67
in increments of 1%. n Collation - When the Copy Collate menu option is set to On, the machine sorts the print job. For example, if you print two copies of a three-page document, the machine prints one complete document (page 1, page 2, page 3) before printing a second copy (page 1, page 2, and page - Xerox 385 | User Manual - Page 68
To make a quick copy: 1 Adjust the document guides to match the width of the document. 2 Slide the document face down into the Automatic Document Feeder until it is grasped and pulled into the machine. 3 If necessary, press the Contrast button. You may choose NORMAL, DARKEN, LIGHTEN or PHOTO. 4 - Xerox 385 | User Manual - Page 69
To make copies using the Copy menu features: 1 Adjust the document guides to match the width of the document. 2 Slide the document face down into the Automatic Document Feeder until it is grasped and pulled into the machine. 3 If necessary, press the Contrast button. You may choose NORMAL, - Xerox 385 | User Manual - Page 70
REDUCE\ENLARGE menu. REDUCE\ENLARGE 1.AUTO 2.MANUAL a) Selecting 1. AUTO, will cause the WorkCentre 385 to automatically reduce the copy size of each page to fit on a single page. b) Selecting 2. MANUAL, brings up the COPY RATE menu, where you can manually adjust the copy image scale size settings - Xerox 385 | User Manual - Page 71
and 3 in order, then makes a second copy of 1, 2, and 3 until a total of n copies has been made. SORT 2 3 3 2 1 2 1 l Selecting 2:OFF will make n copies of page one, n copies of page two, and so on. These copy sets will all be stacked on top of each other. GROUP 1 1 1 2 2 2 Press 1 or 2 to - Xerox 385 | User Manual - Page 72
Fax Chapter 3 Sending a Fax Options for Sending a Fax Using the WorkCentre 385 3-1 Manual Faxing 3-2 Preparing Documents for Faxing 3-2 Sending a Fax Manually 3-3 Sending a Fax Using a One-Touch Number 3-4 Sending a Fax Using a Speed Dial Number 3-5 Sending a Fax .world.xerox.com/data/XEDOC/Central/Multifunction/wc385/ - Xerox 385 | User Manual - Page 73
Polled By a Remote Machine (TX POLL) 3-34 Adding Documents To the Job to be Polled 3-36 Cancelling a Job Already in Memory Which is Waiting to be Polled 3-37 PC Faxing 3-38 What is LaserFax Lite? 3-38 LaserFAX Installation 3-38 Sending Faxes with LaserFAX Lite 3-39 Fax Conversion Dialog Advanced - Xerox 385 | User Manual - Page 74
required for faxing at the WorkCentre 385 Control Panel. This is called Manual Faxing. For information and instructions for Manual Faxing, refer to Manual Faxing on page 3-2. n By faxing the document directly from your computer workstation using LaserFAX software. This is called PC Faxing. For - Xerox 385 | User Manual - Page 75
Manual Faxing This section provides information and instructions for faxing a document from the WorkCentre 385 using the WorkCentre 385 Control Panel. Preparing Documents for Faxing You can fax documents that are printed on standard letter, legal or A4 size paper. Follow these guidelines to prepare - Xerox 385 | User Manual - Page 76
Sending a Fax Manually 1 Adjust the document guides to match the width of the document. 2 Slide the document face down into the Automatic Document Feeder until it is grasped and pulled into the machine. 3 document guide The display alternately reads DOCUMENT READY and shows the remaining memory - Xerox 385 | User Manual - Page 77
button when the number appears correctly in the display. The machine dials the number and begins to transmit the fax. If you wish to cancel the fax, press the Stop button two times. Sending a Fax Using a One-Touch Number 1 Adjust the document guides to match the width of the document. 2 Slide the - Xerox 385 | User Manual - Page 78
button when the number appears correctly in the display. The machine dials the number and begins to transmit the fax. If you wish to cancel the fax, press the Stop button two times. Sending a Fax Using a One-Touch Number 1 Adjust the document guides to match the width of the document. 2 Slide the - Xerox 385 | User Manual - Page 79
3-18. 4 Press the Start button to dial the number. The machine will scan the document and dial the number automatically. When the remote fax machine answers the phone, the document will be transmitted automatically. 3 Note: You can store One-Touch or Speed Dial numbers so you can dial your most - Xerox 385 | User Manual - Page 80
3-18. 4 Press the Start button to dial the number. The machine will scan the document and dial the number automatically. When the remote fax machine answers the phone, the document will be transmitted automatically. 3 Note: You can store One-Touch or Speed Dial numbers so you can dial your most - Xerox 385 | User Manual - Page 81
the remote fax number, enter the Group Number. Note: A Group Number may be assigned to a One-Touch Fax After Talking If you have a regular phone connected to the EXT.LINE jack on the back of the machine, you can send a fax after speaking with a person at the remote site. 1 Adjust the document guides - Xerox 385 | User Manual - Page 82
the remote fax number, enter the Group Number. Note: A Group Number may be assigned to a One-Touch Fax After Talking If you have a regular phone connected to the EXT.LINE jack on the back of the machine, you can send a fax after speaking with a person at the remote site. 1 Adjust the document guides - Xerox 385 | User Manual - Page 83
instruct the person at the remote location to press the start button on their fax machine. They can then hang up. The remote fax machine will send the initial fax tones. 3 5 Wait until you hear the fax tone from the remote fax machine. 6 Press the Start button on the WorkCentre 385. The machine - Xerox 385 | User Manual - Page 84
instruct the person at the remote location to press the start button on their fax machine. They can then hang up. The remote fax machine will send the initial fax tones. 3 5 Wait until you hear the fax tone from the remote fax machine. 6 Press the Start button on the WorkCentre 385. The machine - Xerox 385 | User Manual - Page 85
the Menu button. 2 Press the TX Confirm (16) button on the One-Touch keypad. 3 The machine prints out a Message Confirmation report. You can also configure your machine to print out a confirmation report automatically each time a fax is sent. To automatically print a confirmation report: 1 Press the - Xerox 385 | User Manual - Page 86
to more than ten locations, you can increase the 3 number of fax locations dialed by including a Group Dial number as one of the ten numbers. After sending, the documents are automatically erased from memory. 1 Adjust the document guides to match the width of the document. 2 Slide the document - Xerox 385 | User Manual - Page 87
to more than ten locations, you can increase the 3 number of fax locations dialed by including a Group Dial number as one of the ten numbers. After sending, the documents are automatically erased from memory. 1 Adjust the document guides to match the width of the document. 2 Slide the document - Xerox 385 | User Manual - Page 88
to more than one location, press the Enter button and enter another fax number using the numeric keypad, One-Touch keypad, or fax number setting and pressed the Stop button. 7 The document is scanned into memory. The display shows the remaining memory capacity and the number of pages. The machine - Xerox 385 | User Manual - Page 89
configure your machine to send a fax at a specified time. Up to 30 delayed transmission operations can be reserved in your machine. 1 button, then press the Delay TX button on the One- Touch keypad. 3 Enter the telephone number of the remote machine. There are several methods available to do this: - Xerox 385 | User Manual - Page 90
setting, press the Stop button. Or If you want to send the document to more than one location, press the Enter button and enter another fax number using the numeric keypad, One-Touch keypad, or two digit Speed Dial number. The number appears in the display. Repeat Step 5 until you have entered - Xerox 385 | User Manual - Page 91
fax will be sent. Use the Up or Down button to switch between AM and PM. If you set a time earlier than the current time, the document will be sent at that time on the following day. 9 After entering the time, press the Enter button. 10 The machine Add/Cancel button on the One-Touch keypad. The LCD - Xerox 385 | User Manual - Page 92
fax will be sent. Use the Up or Down button to switch between AM and PM. If you set a time earlier than the current time, the document will be sent at that time on the following day. 9 After entering the time, press the Enter button. 10 The machine Add/Cancel button on the One-Touch keypad. The LCD - Xerox 385 | User Manual - Page 93
you want to add documents to, then press the Enter button. 6 The machine automatically adds the new documents to the pages already in memory, displays the a Standby Operation 1 Press Menu, then press the Add/Cancel button on the One-Touch keypad. The display prompts you to select 1.ADD or 2.CANCEL. 2 - Xerox 385 | User Manual - Page 94
you want to add documents to, then press the Enter button. 6 The machine automatically adds the new documents to the pages already in memory, displays the a Standby Operation 1 Press Menu, then press the Add/Cancel button on the One-Touch keypad. The display prompts you to select 1.ADD or 2.CANCEL. 2 - Xerox 385 | User Manual - Page 95
Configuring Automatic Dialing Features One-Touch Dialing One-Touch dialing lets you use any one of the 20 One-Touch buttons located on the left of the machine's control panel to automatically dial a number. Storing a Number for One-Touch Dialing 1 When assigning a One-Touch number, press and - Xerox 385 | User Manual - Page 96
One-Touch button. 4 Press the Enter button when the name appears correctly or without entering a name. To set another One-Touch number, press the desired One . Using the One-Touch Address Label Sheet A One-Touch label sheet is included with your machine. As you store numbers in One-Touch dial buttons - Xerox 385 | User Manual - Page 97
1 Remove the clear cover and label using a pointed instrument, as shown below. Label 3 Note: You may want to use pencil in case you wish to change these numbers later. 2 Write information on the label and replace the label and cover. Configuring Automatic Dialing Features 3-17 - Xerox 385 | User Manual - Page 98
correctly or without entering a name. 6 To store more telephone numbers, repeat steps 2 through 5. Or To return to Standby mode, press the Stop button. 3-18 Sending a Fax - Xerox 385 | User Manual - Page 99
as a Group. Your machine will dial the remote numbers in a stored sequence. If the number is busy, your machine will dial the next One-Touch button or enter a Speed Dial number which you wish to include in the group. ENTER ONE-TOUCH / SPEED DIAL> ## 3 Press the One-Touch button assigned to the fax - Xerox 385 | User Manual - Page 100
to assign (01 through 20) for 2 seconds. 2 Enter the two digit Group number. 3 Press the Enter button. The group number is assigned to the selected One-Touch button, and the display asks you to enter One-Touch button for another group dial if you wish. 3-20 Sending a Fax - Xerox 385 | User Manual - Page 101
to store another One-Touch Group Dial number, repeat steps 1 to 3. Or If you want to return to Standby mode, press the Stop button. Setting Document Resolution and Contrast It is recommended that you fax documents that were printed with a typewriter, felt tip pen, black ink or laser printer. The - Xerox 385 | User Manual - Page 102
to store another One-Touch Group Dial number, repeat steps 1 to 3. Or If you want to return to Standby mode, press the Stop button. Setting Document Resolution and Contrast It is recommended that you fax documents that were printed with a typewriter, felt tip pen, black ink or laser printer. The - Xerox 385 | User Manual - Page 103
will be stored to memory in Fine Resolution mode. If the WorkCentre 385 is set to Super Fine Resolution mode and the remote fax machine does not support Super Fine Resolution, the WorkCentre 385 will transmit using the highest resolution mode supported by the remote fax machine. 3-22 Sending - Xerox 385 | User Manual - Page 104
DARKEN, LIGHTEN, or PHOTO. Mode Recommended for... Normal Faxing most documents. Darken Documents containing light print or faint For example, when you set up your machine, you enter your name (or your company's name) and telephone number. When setting up One-Touch or Speed Dial numbers, you will - Xerox 385 | User Manual - Page 105
DARKEN, LIGHTEN, or PHOTO. Mode Recommended for... Normal Faxing most documents. Darken Documents containing light print or faint For example, when you set up your machine, you enter your name (or your company's name) and telephone number. When setting up One-Touch or Speed Dial numbers, you will - Xerox 385 | User Manual - Page 106
6. You can enter special characters (space, plus sign, etc.) in the name by using the 0 key. See Keypad Character Assignments on page 3-26. 3-24 Sending a Fax - Xerox 385 | User Manual - Page 107
6. You can enter special characters (space, plus sign, etc.) in the name by using the 0 key. See Keypad Character Assignments on page 3-26. 3-24 Sending a Fax - Xerox 385 | User Manual - Page 108
you want. The blinking cursor moves right and the next letter appears in the display. 3 ID>OP If the letter that appears is not the one you wish to enter, press the Number keypad button repeatedly until the letter you wish to enter appears in the display. Select additional letters in - Xerox 385 | User Manual - Page 109
, letters or characters 1 1 2 A'B'C'2 3 D'E'F'3 4 G'H'I'4 5 J'K'L'5 6 M'N'O'6 7 P'Q'R'S'7 8 T'U'V'8 9 W'X'Y'Z'9 0 Space 0 Entering Numbers You can enter the telephone number of a remote fax machine manually by using the Number keypad. The number you press appears in the LCD display. TEL - Xerox 385 | User Manual - Page 110
, letters or characters 1 1 2 A'B'C'2 3 D'E'F'3 4 G'H'I'4 5 J'K'L'5 6 M'N'O'6 7 P'Q'R'S'7 8 T'U'V'8 9 W'X'Y'Z'9 0 Space 0 Entering Numbers You can enter the telephone number of a remote fax machine manually by using the Number keypad. The number you press appears in the LCD display. TEL - Xerox 385 | User Manual - Page 111
number for entering telephone numbers. Your machine lets you send the same document to more than one location. After you enter a fax number, the display prompts you to enter ANOTHER FAX NUMBER?. To enter another fax number, you can enter the number manually, use a One-Touch button, or a two digit - Xerox 385 | User Manual - Page 112
number for entering telephone numbers. Your machine lets you send the same document to more than one location. After you enter a fax number, the display prompts you to enter ANOTHER FAX NUMBER?. To enter another fax number, you can enter the number manually, use a One-Touch button, or a two digit - Xerox 385 | User Manual - Page 113
machine automatically begins to send. Redial Memory To search through Redial memory: 1 Press and hold the Redial button for 2 seconds. The Redial memory in your machine retains the last 10 numbers called. If you have dialed the same number multiple times, the machine remote machine answers - Xerox 385 | User Manual - Page 114
for One-Touch dial, 'S' for speed, or 'G' for group dial number. These letters tell you how the 3 number is stored. 2 When the number you want appears in the display, press the Start button to commence dialing. If a document is loaded, transmission will begin when the remote fax machine answers - Xerox 385 | User Manual - Page 115
for One-Touch dial, 'S' for speed, or 'G' for group dial number. These letters tell you how the 3 number is stored. 2 When the number you want appears in the display, press the Start button to commence dialing. If a document is loaded, transmission will begin when the remote fax machine answers - Xerox 385 | User Manual - Page 116
you want appear, press the Start button to initiate dialing. Tone If your telephone service is configured for pulse dialing, you may still need to use Touch Tone signals to the remaining numbers required by the service. The machine returns to the pulse mode after you complete the call. 3-30 Sending - Xerox 385 | User Manual - Page 117
you want appear, press the Start button to initiate dialing. Tone If your telephone service is configured for pulse dialing, you may still need to use Touch Tone signals to the remaining numbers required by the service. The machine returns to the pulse mode after you complete the call. 3-30 Sending - Xerox 385 | User Manual - Page 118
button again to return to the first caller. 3 CAUTION: If your telephone service does not use the switch-hook signal, do not press the Flash button during Redial If the number you dial to send a fax is busy or there is no answer, the machine hangs up and waits for the specified retry period. - Xerox 385 | User Manual - Page 119
button again to return to the first caller. 3 CAUTION: If your telephone service does not use the switch-hook signal, do not press the Flash button during Redial If the number you dial to send a fax is busy or there is no answer, the machine hangs up and waits for the specified retry period. - Xerox 385 | User Manual - Page 120
press the Priority TX button on the One- Touch keypad. 3 Enter the telephone number of the remote machine. There are several methods available to do One-Touch Keypad dialing of stored telephone numbers (see One- Touch Dialing on page 3-15). l Speed Number dialing using the numeric keypad (see One- - Xerox 385 | User Manual - Page 121
Entering Alphanumeric Characters on page 3-24. 5 The document is scanned into memory. The display shows the remaining memory capacity and the number of pages. The machine dials the first telephone number and begins sending the document. 3 Other Functions 3-33 - Xerox 385 | User Manual - Page 122
. In other words, it "polls" the machine holding the original. Note: The remote machine must also support Polling to use this feature. Being Polled By a Remote Machine (TX POLL) You can program your fax machine to send documents when polled by a remote fax machine. It is possible to assign a Poll - Xerox 385 | User Manual - Page 123
. In other words, it "polls" the machine holding the original. Note: The remote machine must also support Polling to use this feature. Being Polled By a Remote Machine (TX POLL) You can program your fax machine to send documents when polled by a remote fax machine. It is possible to assign a Poll - Xerox 385 | User Manual - Page 124
0000 for TX-POLL CODE. If you 3 previously entered a poll code, and do not want one, you may enter 0000 and then press the Enter button. 7 The display prompts you to store the document in the machine bulletin board memory. BULLETIN ? Note: If you store the document in the bulletin board memory - Xerox 385 | User Manual - Page 125
capacity. 10 The machine returns to Standby mode and displays a reminder that a Polling Transmission is set. The machine automatically switches to FAX mode (automatic Menu button. 3 Press the Polling button on the One-Touch keypad. The LCD displays the polling options. 4 Press 1 to select TX - Xerox 385 | User Manual - Page 126
capacity. 10 The machine returns to Standby mode and displays a reminder that a Polling Transmission is set. The machine automatically switches to FAX mode (automatic Menu button. 3 Press the Polling button on the One-Touch keypad. The LCD displays the polling options. 4 Press 1 to select TX - Xerox 385 | User Manual - Page 127
The display prompts you to select 1.ADD or 2.CANCEL. 7 Press 1. The machine scans the new documents into memory and returns to Standby mode. Cancelling a Job for the last entered polling job is displayed. If you have more than one polling job waiting in memory, press the UP or DOWN arrows until the - Xerox 385 | User Manual - Page 128
The display prompts you to select 1.ADD or 2.CANCEL. 7 Press 1. The machine scans the new documents into memory and returns to Standby mode. Cancelling a Job for the last entered polling job is displayed. If you have more than one polling job waiting in memory, press the UP or DOWN arrows until the - Xerox 385 | User Manual - Page 129
provides information and instructions for PC Faxing from a computer workstation connected to the WorkCentre 385. Using this method, a fax is sent without first printing it and placing the printed document in the Automatic Document Feeder. This process is controlled by a PC Faxing application called - Xerox 385 | User Manual - Page 130
displayed will then prompt you to enter the phone number of the fax machine you are sending the fax to. To fax a document, perform the following steps: Note: The following steps are generally the same for all versions of Windows. The actual steps you perform may be slightly different depending on - Xerox 385 | User Manual - Page 131
you for details of the transmission: 7 Enter the fax number manually or click the Phonebook button to select from your LaserFAX You can also select the Help button and review the on-line help topics for this feature. 8 (Optional) Enter a description of the fax job. While this is an optional step, - Xerox 385 | User Manual - Page 132
fax recipient, the subject of the fax, and a short message. fax to be sent at a later time, fax is desired when the document is faxed, select the Print checkbox. 12 (Optional) Select other features available under the Advanced>> button selection. For more information on this features see Fax - Xerox 385 | User Manual - Page 133
will result in the job being displayed in the All jobs pending list in the LaserFAX application: 14 The fax job will appear in this list until it is transmitted using the features of the LaserFAX application. At that , refer to the on-line help system in the LaserFAX application. 3-42 Sending a Fax - Xerox 385 | User Manual - Page 134
there is an Advanced>> button that can be selected which makes available several other features for the fax job. When the Advanced>> button is selected the dialog below is displayed: 3 Note that the Fax Conversion screen now contains additional fields for the cover sheet, and three new buttons; Send - Xerox 385 | User Manual - Page 135
be conveyed on the cover sheet is entered here. Restore last cover sheet When selected, this feature will restore the last cover sheet for the fax job. Always Expand When this feature is selected, the expanded cover sheet dialog seen in the diagram above is displayed by default when the - Xerox 385 | User Manual - Page 136
route the outgoing fax to a specific fax machine. Signature A signature may be up to 20 digits long and may be sent and received with the fax. It is the a turnaround poll in the same transmission. Fax ID This is the identification you send to the remote fax system. If you do not enter a value - Xerox 385 | User Manual - Page 137
of fax files to choose from. n The arrow keys are used to change the order of the attachments. n The Edit button is used to change the displayed path to the attached file. n The Delete button is used to delete the attachment. This does not delete the file from the workstation. 3-46 Sending a Fax - Xerox 385 | User Manual - Page 138
down the CTRL key and clicking on the faxes that you wish to attach. 3 When all files are attached to the fax job, select OK to fax the job and its attachments. Note: For more information on the Attach... feature, refer to on-line help within the LaserFAX Lite 3.5 application. 3 PC Faxing 3-47 - Xerox 385 | User Manual - Page 139
The Keep... button will allow you to keep a copy of the fax on the workstation hard disk. When the Keep... button is pressed, the following dialog is enter a filename. The default file type will be .FAX. 2 (Optional) Select Delete file after keeping if you want to keep a copy of the transmitted - Xerox 385 | User Manual - Page 140
(Optional) Select Attach to existing file to attach the fax to the end of an existing fax document. 4 (Optional) Click on the Always show file 3 application. The LaserFAX application is displayed when a fax is sent from the WorkCentre 385. The following window is displayed: PC Faxing 3-49 - Xerox 385 | User Manual - Page 141
(Optional) Select Attach to existing file to attach the fax to the end of an existing fax document. 4 (Optional) Click on the Always show file 3 application. The LaserFAX application is displayed when a fax is sent from the WorkCentre 385. The following window is displayed: PC Faxing 3-49 - Xerox 385 | User Manual - Page 142
file currently selected in the All Jobs pending, Received faxes or Fax files list. The Print Button This will print the current fax or list. Use Printer setup from the File menu to select the default printer (or fax machine) to be used. The Information Button This will show more details of a job in - Xerox 385 | User Manual - Page 143
The Go Button This will release the selected fax from hold or failed status. If a job is shown as pending, a retry may be to a file before deleting them. The Keep Button This will keep a permanent copy of a fax file. The kept file may then be sent on its own, included as an image within another - Xerox 385 | User Manual - Page 144
is used to pass an incoming fax on to one or more LaserFAX users on a network. Note: See Route fax in the On-line Help for more details. The Scan Button If you are using an external fax machine with LaserFAX you can use this to scan documents into your PC. The QuickFax Button This allows - Xerox 385 | User Manual - Page 145
385 is connected and plugged in. n The parallel interface cable is properly connected and is not longer than 2 metre. n No error message is displayed on the WorkCentre 385. If an error message is displayed, check the Troubleshooting section of this manual to diagnose the problem. PC Faxing - Xerox 385 | User Manual - Page 146
(DRPD) 4-8 What is Polling? 4-9 Polling One or More Remote Machines (RX POLL) 4-9 PC Fax Reception 4-12 What is LaserFAX Lite? 4-12 LaserFAX Installation 4-12 Receiving Faxes With LaserFAX 4-13 Troubleshooting LaserFAX 4-15 http://xww.xedoc.world.xerox.com/data/XEDOC/Central/Multifunction/wc385/user - Xerox 385 | User Manual - Page 147
to configure the WorkCentre 385 as a Stand Alone fax machine. For information and instructions for operation as a Stand Alone fax machine, refer to Reception Modes on page 4-2. n By receiving faxes directly to your computer workstation using LaserFAX software. This is called PC Fax Reception. For - Xerox 385 | User Manual - Page 148
385 senses a fax tone, it automatically switches to fax reception mode. However, if a fax is not sensed, the WorkCentre 385 routes the call to the answering machine, and the caller can leave a message. n TEL In TEL mode, automatic fax reception is turned off. You can receive a fax only by manually - Xerox 385 | User Manual - Page 149
385 senses a fax tone, it automatically switches to fax reception mode. However, if a fax is not sensed, the WorkCentre 385 routes the call to the answering machine, and the caller can leave a message. n TEL In TEL mode, automatic fax reception is turned off. You can receive a fax only by manually - Xerox 385 | User Manual - Page 150
file, it is recommended that you stop PC file printing while receiving a fax. This will maximize memory space for the incoming fax. Receiving Automatically in FAX Mode 1 Press the Receive button until the display indicates FAX. 2 When a fax call comes in, the machine answers on the second ring and - Xerox 385 | User Manual - Page 151
file, it is recommended that you stop PC file printing while receiving a fax. This will maximize memory space for the incoming fax. Receiving Automatically in FAX Mode 1 Press the Receive button until the display indicates FAX. 2 When a fax call comes in, the machine answers on the second ring and - Xerox 385 | User Manual - Page 152
file, it is recommended that you stop PC file printing while receiving a fax. This will maximize memory space for the incoming fax. Receiving Automatically in FAX Mode 1 Press the Receive button until the display indicates FAX. 2 When a fax call comes in, the machine answers on the second ring and - Xerox 385 | User Manual - Page 153
indicating a voice phone call. 4 Lift the handset to answer the call. If the voice call is not answered within a specified time, the machine will switch to automatic fax reception mode. Receiving Manually in TEL Mode If you have an ordinary phone connected to the EXT. LINE jack on the back of the - Xerox 385 | User Manual - Page 154
indicating a voice phone call. 4 Lift the handset to answer the call. If the voice call is not answered within a specified time, the machine will switch to automatic fax reception mode. Receiving Manually in TEL Mode If you have an ordinary phone connected to the EXT. LINE jack on the back of the - Xerox 385 | User Manual - Page 155
indicates TEL. 2 Answer an incoming call by picking up the receiver. 3 If you hear a fax tone, or if the person calling asks you to receive a fax, press the Start button on the machine. If the machine is equipped with an extension phone, you may also press the characters * 9 * (star-nine-star - Xerox 385 | User Manual - Page 156
indicates TEL. 2 Answer an incoming call by picking up the receiver. 3 If you hear a fax tone, or if the person calling asks you to receive a fax, press the Start button on the machine. If the machine is equipped with an extension phone, you may also press the characters * 9 * (star-nine-star - Xerox 385 | User Manual - Page 157
is switched off, or no answering machine is connected to the Xerox WorkCentre 385, the machine will automatically go into fax receive mode after six rings. If your answering machine has a user-selectable ring counter, set it to answer incoming calls after one ring. If the machine is in TEL mode, and - Xerox 385 | User Manual - Page 158
is switched off, or no answering machine is connected to the Xerox WorkCentre 385, the machine will automatically go into fax receive mode after six rings. If your answering machine has a user-selectable ring counter, set it to answer incoming calls after one ring. If the machine is in TEL mode, and - Xerox 385 | User Manual - Page 159
will print the stored document immediately upon clearing the problem. Receiving a Fax Printed Too Light to Read If the toner level in the Laser Printer Cartridge is low or empty, you may receive a fax which is printed too light to read. Fortunately, the machine stores the last 10 pages of received - Xerox 385 | User Manual - Page 160
will print the stored document immediately upon clearing the problem. Receiving a Fax Printed Too Light to Read If the toner level in the Laser Printer Cartridge is low or empty, you may receive a fax which is printed too light to read. Fortunately, the machine stores the last 10 pages of received - Xerox 385 | User Manual - Page 161
will print the stored document immediately upon clearing the problem. Receiving a Fax Printed Too Light to Read If the toner level in the Laser Printer Cartridge is low or empty, you may receive a fax which is printed too light to read. Fortunately, the machine stores the last 10 pages of received - Xerox 385 | User Manual - Page 162
fax data. Full memory is available until a new fax is received. Erasing Last Fax Data From Memory 1 Press the Menu button, then press the System Setup button on the One short ringing tones. This feature is often used by answering services that answer telephones for many different clients and need to - Xerox 385 | User Manual - Page 163
fax data. Full memory is available until a new fax is received. Erasing Last Fax Data From Memory 1 Press the Menu button, then press the System Setup button on the One short ringing tones. This feature is often used by answering services that answer telephones for many different clients and need to - Xerox 385 | User Manual - Page 164
fax data. Full memory is available until a new fax is received. Erasing Last Fax Data From Memory 1 Press the Menu button, then press the System Setup button on the One short ringing tones. This feature is often used by answering services that answer telephones for many different clients and need to - Xerox 385 | User Manual - Page 165
. In other words, it "polls" the machine holding the original document. Polling One or More Remote Machines (RX POLL) You can set up the machine to automatically receive documents from unattended remote fax machines. The machine can be set up to receive the fax now, or at a later time. This - Xerox 385 | User Manual - Page 166
. In other words, it "polls" the machine holding the original document. Polling One or More Remote Machines (RX POLL) You can set up the machine to automatically receive documents from unattended remote fax machines. The machine can be set up to receive the fax now, or at a later time. This - Xerox 385 | User Manual - Page 167
. In other words, it "polls" the machine holding the original document. Polling One or More Remote Machines (RX POLL) You can set up the machine to automatically receive documents from unattended remote fax machines. The machine can be set up to receive the fax now, or at a later time. This - Xerox 385 | User Manual - Page 168
RX POLL. The display asks you to enter the number of the remote fax machine. 4 Enter the telephone number of the remote machine. There are several methods available to do this: l Direct entry of the telephone number using the numeric keypad l One-Touch keypad dialing of stored telephone numbers (see - Xerox 385 | User Manual - Page 169
the Enter button to accept [0000] which represents no code. 10 The display prompts for the time at which the machine will call and poll the remote machine. To call the remote machine immediately, skip over this step without entering a time for polling. Or If a specific time for polling is desired - Xerox 385 | User Manual - Page 170
Reception This section provides information and instructions for receiving faxes directly to a computer workstation connected to the WorkCentre 385. Using this method, a fax is received to the PC without printing it. This process is controlled by a PC Faxing application called LaserFAX Lite Version - Xerox 385 | User Manual - Page 171
With LaserFAX LaserFAX Lite can be configured to receive faxes directly to a computer workstation, rather than having them print on the WorkCentre 385. To do this, perform the following steps: 1 In the LaserFAX program group An example of this dialog is shown on the next page. PC Fax Reception 4-13 - Xerox 385 | User Manual - Page 172
. For a brief overview of LaserFAX application features, refer to LaserFAX Application Features on page 3-49. Note: If the WorkCentre 385 is not connected to the PC, or LaserFAX is not running, or the Receive to PC option is not selected, faxes will be printed on the WorkCentre 385. 4-14 Receiving - Xerox 385 | User Manual - Page 173
385 is connected and plugged in. 4 n The parallel interface cable is properly connected and is not longer than 6 feet. n No error message is displayed on the WorkCentre 385. If an error message is displayed, check the Troubleshooting section of this manual to diagnose the problem. PC Fax - Xerox 385 | User Manual - Page 174
385 is connected and plugged in. 4 n The parallel interface cable is properly connected and is not longer than 6 feet. n No error message is displayed on the WorkCentre 385. If an error message is displayed, check the Troubleshooting section of this manual to diagnose the problem. PC Fax - Xerox 385 | User Manual - Page 175
Printing Chapter 5 Printing Printing a Document 5-1 Printer Settings 5-2 Accessing and Changing Printer Settings 5-3 In Windows 3.x 5-3 In Windows 95/98 5-8 In Windows NT 4.0 5-13 http://xww.xedoc.world.xerox.com/data/XEDOC/Central/Multifunction/wc385/user/chapter5/chpt5.htm [07/09/1999 14:36:29] - Xerox 385 | User Manual - Page 176
printing from various Windows applications. The driver software for your machine. See Installing Software on page 1-24. 3 Create or open the document that you want to print. 4 Choose Print or Print Setup from the File menu. Make sure the Xerox WorkCentre 385 is selected as your default printer - Xerox 385 | User Manual - Page 177
panel of your Xerox WorkCentre 385 to assign first priority to the PC print job when the machine receives a fax. Printer Settings You can use your machine with all your Windows 3.x, Windows 95/98, or Windows NT applications. Be sure to set the Xerox WorkCentre 385 as the default printer for all your - Xerox 385 | User Manual - Page 178
panel of your Xerox WorkCentre 385 to assign first priority to the PC print job when the machine receives a fax. Printer Settings You can use your machine with all your Windows 3.x, Windows 95/98, or Windows NT applications. Be sure to set the Xerox WorkCentre 385 as the default printer for all your - Xerox 385 | User Manual - Page 179
the File menu of most applications that run in Windows, then select Printer in the Print dialog window, then select Options. From the Printer Setup window, you can review and change whatever settings are needed for your print job. The Printer Setup window consists of three tabs: n Paper/Output Tab - Xerox 385 | User Manual - Page 180
Paper/Output Tab The Paper Output tab is shown below. Copies Click in the Copies box to enter a value (1 to 99), or click on one of the arrows to raise or lower the value in the Copies box. Paper Source Click on the down arrow to display the two Paper - Xerox 385 | User Manual - Page 181
the Reduce/Enlarge box to enter a percent value (10 to 200), or click on one of the arrows to raise or lower the value in the Reduce/ Enlarge box. Other the bottom of the window. These buttons are used as follows: n Default All: Click on this button to change all printer settings to their default - Xerox 385 | User Manual - Page 182
: n OK: Click on this button to apply changes, and return to the Print dialog window. n Cancel: Click on this button to immediately terminate the Printer Settings Tab Menu, and return to the Print dialog window. Any parameter changes that have not been applied are ignored. n Apply: Click on this - Xerox 385 | User Manual - Page 183
Resolution Click on one of the two radio buttons to select either 300 dpi or 600 dpi print resolution for your print job. Toner Saver Click on the check box to save toner when you are printing. This results in a lighter printed image. To disable this option, click on the check box again. About - Xerox 385 | User Manual - Page 184
, you can then review and change whatever settings are needed for your print job. If accessed through the Printers folder, the Printer Properties consists of five tabs: n General Tab - for viewing and changing general Windows 95 printer information (see your Windows 95/98 User Guide for details - Xerox 385 | User Manual - Page 185
Paper Output Tab Note: If this tab is accessed through the Printers folder, any changes made to settings will become the default settings for the printer. Settings made when the printer properties are accessed through an application File menu and Print or Print Setup will remain active until the - Xerox 385 | User Manual - Page 186
the two Paper Source options, then click on the Paper tray or Manual feed option. Paper Size Click on the Down arrow to display the mm. 10 4.125 x 9.5 in. DL 110 x 220 mm. Portrait/Landscape Click on one of the two radio buttons to select either Portrait or Landscape orientation for your print job. - Xerox 385 | User Manual - Page 187
Image Quality Tab Note: If this tab is accessed through the Printers folder, any changes made to settings will become the default settings for the printer. Settings made when the printer properties are accessed through an application File menu and Print or Print Setup will remain active until the - Xerox 385 | User Manual - Page 188
Resolution Click on one of the two radio buttons to select either 300 dpi or 600 dpi print resolution for your print job. Toner Saver Click on the check box to enable toner saving for your printer. This results in a lighter printed image. To disable this option, click on the check box again. About - Xerox 385 | User Manual - Page 189
Paper/ Output, Image Quality and About tabs. When you see the Printer Properties displayed, you can then review and change whatever settings are needed for your print job. If accessed through the Printers folder, the Printer Properties consists of four tabs: n Paper/Output Tab - for paper sources - Xerox 385 | User Manual - Page 190
Paper Output Tab Note: If this tab is accessed through the Printers folder, any settings made will become the default settings for the printer. Settings made when the printer properties are accessed through an application File menu and Print or Print Setup will remain active until the application - Xerox 385 | User Manual - Page 191
, then click on the Paper tray or Manual feed option. Paper Size Click on the Down 9.5 in. DL 110 x 220 mm. Portrait/Landscape Click on one of the two radio buttons to select either Portrait or Landscape 5 orientation value (10 to 200), or click on one of the arrows to raise or lower the value - Xerox 385 | User Manual - Page 192
Image Quality Tab Note: If this tab is accessed through the Printers folder, any settings made will become the default settings for the printer. Settings made when the printer properties are accessed through an application File menu and Print or Print Setup will remain active until the application - Xerox 385 | User Manual - Page 193
Click on one of the two radio buttons to select either 300 dpi or 600 dpi print resolution for your print job. Toner Saver Click on the check box to enable toner saving for your printer. This results in a lighter printed image. To disable this option, click on the check box again. 5 Printer Settings - Xerox 385 | User Manual - Page 194
Advanced Tab Overview The Advanced Tab provides options to accommodate software applications that interface with printer drivers in non-standard ways. Most users need never access these options. However, if a particular document is not printing satisfactorily, you can try altering these settings - Xerox 385 | User Manual - Page 195
do not recognize the capabilities of your printer to interpret color images as shades of Document option. Graphics This selection enables special instruction codes developed by Micrografx. This set of Lotus Freelance for Windows and most Micrografx software either requires or works better with this - Xerox 385 | User Manual - Page 196
of gray. With the Dither Text option checked (the default), the WorkCentre 385 provides accurate grays even if it has to dither them. However, small dithered text is difficult to read. With the Dither Text option not checked, your printer maps text and lines to the nearest gray. For black & white - Xerox 385 | User Manual - Page 197
small or too dark, try changing the setting. Scale The WorkCentre 385 uses a process that automatically enlarges the bitmap fill patterns so times to nearly match the 300x300 dpi output of a laser printer. If you set Scale to 1, the printer will handle the brush patterns exactly as they come from - Xerox 385 | User Manual - Page 198
you are using on your workstation PC. Since the data is sent as graphics, you do not run into font substitution problems. If your text printing results Manager When the Adobe Type Manager (ATM) option is checked, the printer driver accesses a "back door" to the Adobe Type Manager. This may speed - Xerox 385 | User Manual - Page 199
the File menu of most applications that run in Windows, then select Printer in the Print dialog window, then select Options. From the Printer Setup window, you can review and change whatever settings are needed for your print job. The Printer Setup window consists of three tabs: n Paper/Output Tab - Xerox 385 | User Manual - Page 200
Paper/Output Tab The Paper Output tab is shown below. Copies Click in the Copies box to enter a value (1 to 99), or click on one of the arrows to raise or lower the value in the Copies box. Paper Source Click on the down arrow to display the two Paper - Xerox 385 | User Manual - Page 201
the Reduce/Enlarge box to enter a percent value (10 to 200), or click on one of the arrows to raise or lower the value in the Reduce/ Enlarge box. Other the bottom of the window. These buttons are used as follows: n Default All: Click on this button to change all printer settings to their default - Xerox 385 | User Manual - Page 202
: n OK: Click on this button to apply changes, and return to the Print dialog window. n Cancel: Click on this button to immediately terminate the Printer Settings Tab Menu, and return to the Print dialog window. Any parameter changes that have not been applied are ignored. n Apply: Click on this - Xerox 385 | User Manual - Page 203
Resolution Click on one of the two radio buttons to select either 300 dpi or 600 dpi print resolution for your print job. Toner Saver Click on the check box to save toner when you are printing. This results in a lighter printed image. To disable this option, click on the check box again. About - Xerox 385 | User Manual - Page 204
, you can then review and change whatever settings are needed for your print job. If accessed through the Printers folder, the Printer Properties consists of five tabs: n General Tab - for viewing and changing general Windows 95 printer information (see your Windows 95/98 User Guide for details - Xerox 385 | User Manual - Page 205
Paper Output Tab Note: If this tab is accessed through the Printers folder, any changes made to settings will become the default settings for the printer. Settings made when the printer properties are accessed through an application File menu and Print or Print Setup will remain active until the - Xerox 385 | User Manual - Page 206
the two Paper Source options, then click on the Paper tray or Manual feed option. Paper Size Click on the Down arrow to display the mm. 10 4.125 x 9.5 in. DL 110 x 220 mm. Portrait/Landscape Click on one of the two radio buttons to select either Portrait or Landscape orientation for your print job. - Xerox 385 | User Manual - Page 207
Image Quality Tab Note: If this tab is accessed through the Printers folder, any changes made to settings will become the default settings for the printer. Settings made when the printer properties are accessed through an application File menu and Print or Print Setup will remain active until the - Xerox 385 | User Manual - Page 208
Resolution Click on one of the two radio buttons to select either 300 dpi or 600 dpi print resolution for your print job. Toner Saver Click on the check box to enable toner saving for your printer. This results in a lighter printed image. To disable this option, click on the check box again. About - Xerox 385 | User Manual - Page 209
Paper/ Output, Image Quality and About tabs. When you see the Printer Properties displayed, you can then review and change whatever settings are needed for your print job. If accessed through the Printers folder, the Printer Properties consists of four tabs: n Paper/Output Tab - for paper sources - Xerox 385 | User Manual - Page 210
Paper Output Tab Note: If this tab is accessed through the Printers folder, any settings made will become the default settings for the printer. Settings made when the printer properties are accessed through an application File menu and Print or Print Setup will remain active until the application - Xerox 385 | User Manual - Page 211
, then click on the Paper tray or Manual feed option. Paper Size Click on the Down 9.5 in. DL 110 x 220 mm. Portrait/Landscape Click on one of the two radio buttons to select either Portrait or Landscape 5 orientation value (10 to 200), or click on one of the arrows to raise or lower the value - Xerox 385 | User Manual - Page 212
Image Quality Tab Note: If this tab is accessed through the Printers folder, any settings made will become the default settings for the printer. Settings made when the printer properties are accessed through an application File menu and Print or Print Setup will remain active until the application - Xerox 385 | User Manual - Page 213
Click on one of the two radio buttons to select either 300 dpi or 600 dpi print resolution for your print job. Toner Saver Click on the check box to enable toner saving for your printer. This results in a lighter printed image. To disable this option, click on the check box again. 5 Printer Settings - Xerox 385 | User Manual - Page 214
Advanced Tab Overview The Advanced Tab provides options to accommodate software applications that interface with printer drivers in non-standard ways. Most users need never access these options. However, if a particular document is not printing satisfactorily, you can try altering these settings - Xerox 385 | User Manual - Page 215
do not recognize the capabilities of your printer to interpret color images as shades of Document option. Graphics This selection enables special instruction codes developed by Micrografx. This set of Lotus Freelance for Windows and most Micrografx software either requires or works better with this - Xerox 385 | User Manual - Page 216
of gray. With the Dither Text option checked (the default), the WorkCentre 385 provides accurate grays even if it has to dither them. However, small dithered text is difficult to read. With the Dither Text option not checked, your printer maps text and lines to the nearest gray. For black & white - Xerox 385 | User Manual - Page 217
small or too dark, try changing the setting. Scale The WorkCentre 385 uses a process that automatically enlarges the bitmap fill patterns so times to nearly match the 300x300 dpi output of a laser printer. If you set Scale to 1, the printer will handle the brush patterns exactly as they come from - Xerox 385 | User Manual - Page 218
you are using on your workstation PC. Since the data is sent as graphics, you do not run into font substitution problems. If your text printing results Manager When the Adobe Type Manager (ATM) option is checked, the printer driver accesses a "back door" to the Adobe Type Manager. This may speed - Xerox 385 | User Manual - Page 219
the WorkCentre 385 TWAIN Scanner Application 6-3 The WorkCentre 385 Twain Scanner Window 6-7 WorkCentre 385 TWAIN Scanner Help 6-8 Scanner Control Tabs 6-9 The Basic Tab 6-10 The Image Quality Tab 6-19 The Filters Tab 6-30 Preview Window 6-34 Image Control Tools 6-35 http://xww.xedoc.world.xerox.com - Xerox 385 | User Manual - Page 220
Scanner Program includes drivers which may be used with any TWAIN-compliant application software. The scanner program software will operate the WorkCentre 385 black and white scanner. The TWAIN standard is an image data transfer protocol developed to allow one software package to use many devices - Xerox 385 | User Manual - Page 221
variety of filters n Control brightness n Gamma correction n Reduction or magnification of images, and more. To access these features, the WorkCentre 385 TWAIN Scanner window below opens when Acquire (or similar selection) is selected from the File menu of a TWAIN compliant image editing application - Xerox 385 | User Manual - Page 222
refer to Installing Software in the Getting Started section of this manual. To use the WC 385 as a scanner, the following are required: n WorkCentre 385 TWAIN Scanner application installed on the workstation connected to the WC 385. n A TWAIN compliant image editing software application (for example - Xerox 385 | User Manual - Page 223
TWAIN Scanner application: Note: To start the WorkCentre 385 TWAIN Scanner application from TextBridge Pro, refer to Starting the WorkCentre 385 TWAIN Scanner Application from TextBridge Pro below. 1 Plug in the WC 385 and switch on your PC. 2 Start Windows. 3 Start/Open the TWAIN-compliant image - Xerox 385 | User Manual - Page 224
. A list of supported scanners will be displayed. 2 From the list, select Xerox WorkCentre 385 (TWAIN). Click OK WorkCentre 385 TWAIN Scanner application is displayed. Select the appropriate scan options for the document or photograph to be scanned. After adjusting the settings in the Scan window - Xerox 385 | User Manual - Page 225
6 Adjust the scan options as desired before initiating the final scan. 7 Reload the document back into the Automatic Document Feeder. 8 Click the Scan button. 9 The document is scanned by the WorkCentre 385 and the updated image is displayed in TextBridge Pro. 6-6 Scanning - Xerox 385 | User Manual - Page 226
The WorkCentre 385 Twain Scanner Window The 385Scan Window is used to view and modify the scanned image. Using the features of this window, various image processing options can be applied to the scanned image. Scanner Control Tabs For more information, see page 6-9. Preview window For details on - Xerox 385 | User Manual - Page 227
move the cursor over the feature of the window that help is desired for. A yellow popup dialog box will appear. Click on the dialog box to access on-line help. On-line Help contains information about using the menus and commands of WorkCentre 385 TWAIN Scanner application. Use Help anytime you need - Xerox 385 | User Manual - Page 228
the features of the Scanner Control Tabs. Scanner Control Tabs Each of these tabs is described in detail in the following sections of this User Guide: n The Basic Tab see page 6-10. 6 n The Image Quality Tab see page 6-19. n The Filters Tab see page 6-30. n The About Tab indicates the version - Xerox 385 | User Manual - Page 229
The Basic Tab The features of the Basic Tab are described in this section. All of the features of this tab are available when the Gray 256 Scales selection is made for Image Type. Refer to the table below which indicates the tab features that are available for the Lineart B/W and Halftone B/W Image - Xerox 385 | User Manual - Page 230
Gray 256 Scales Halftone B/W Lineart B/W Gray 256 Scales Images scanned in Gray 256 Scales mode are scanned in 256 shades of gray. If high quality copies of photographs or other continuous tone originals are desired, Gray 256 Shades mode is the best choice. Gray 256 Scales provides accurate - Xerox 385 | User Manual - Page 231
for printed text or pen-andink drawings. Like the Halftone B/W image type, this image type defines the state of each pixel in the image with one bit that is either on or off. For this reason, files created in this mode will require approximately the same amount of disk space as - Xerox 385 | User Manual - Page 232
Resolution The resolution setting determines the amount of information the scanner will capture in a scanned image. Resolution is measured in dpi (dots per inch). The higher the resolution is, the finer the image detail and the bigger the image file size is. Increasing the resolution will result in - Xerox 385 | User Manual - Page 233
You can select any one of the resolution settings shown on the Resolution menu, or specify your own resolution by selecting the Custom option which invokes the Custom Resolution dialog - Xerox 385 | User Manual - Page 234
Reduce/Enlarge This feature allows an image to be automatically enlarged or reduced as it is scanned. The default scaling factor is 100%. The selected scaling factor, the range of which is dependent on the selected image type, affects the printed scan output. Note: When scanning a printed image for - Xerox 385 | User Manual - Page 235
boxes. 3 To prevent distortion of the image when changing height and width values, the height and width values are automatically linked-you need only enter one value, either a Height or Width value. The other value will be computed and the image will resize proportionately. 6-16 Scanning - Xerox 385 | User Manual - Page 236
Note: You can also change Height and Width values by directly adjusting the selection frame. Note: Output image file size is proportional to both Height and Width. If both Height and Width values are doubled, then the image area and image file size will increase four-fold. Note: Once you have - Xerox 385 | User Manual - Page 237
option. In order to see the results of Descreen process, it is always necessary to scan the image, and examine the output image on the workstation display. 6-18 Scanning - Xerox 385 | User Manual - Page 238
The Image Quality Tab The features of the Image Quality tab are described below. All of the features of this tab are available when the Gray 256 Scales selection is made for Image Type. Refer to the table below which indicates the tab features that are available for the Lineart B/W and Halftone B/W - Xerox 385 | User Manual - Page 239
specify the color channel in which to change the Highlight, Shadow and Midtone values. The only channel available to be selected when using the WorkCentre 385 to scan is the Gray channel. Red, Green and Blue are used for scanners capable of scanning documents in color. Highlight The Highlight value - Xerox 385 | User Manual - Page 240
The Highlight scroll bar allows you to manually set a highlight level. The default for the Highlight settings is 255. You can increase or decrease the highlights in a particular image as needed by adjusting - Xerox 385 | User Manual - Page 241
as the slider moves. Ordinarily, good results can be obtained from your machine by leaving the slider at its default value of 1.00. The Advanced Selection For both the Level Adjustment and the Tonal Map functions, the window displayed contains small representations, known as thumbnail views, of the - Xerox 385 | User Manual - Page 242
Level Adjustment The Level Adjustment dialog box shows the distribution of brightness levels in your image. To adjust the histogram plot, drag the triangles located below the horizontal bar to the desired values. The left (black) triangle changes the shadow levels. The right (white) triangle changes - Xerox 385 | User Manual - Page 243
The Midtone point represents the Gamma setting for your particular screen. On the histogram, the Shadow and Highlight scales are divided into 255 units. Therefore, all pixels in the original that are darker than the current shadow point are now completely black in the enhanced image. Conversely, all - Xerox 385 | User Manual - Page 244
Operation: 1 Select the Advanced... button on the Image Quality tab. This will display the Level Adjustment window. 2 On the histogram, use the mouse key to click on the Black, Gray, or White triangles to make changes to the Shadow, Midtone, and Highlight - Xerox 385 | User Manual - Page 245
Tonal Map If you select the Tonal Map tab, the following will be displayed. Tonal Map tab The Tonal Map is yet another way to adjust Highlight, Midtone, or Shadow levels in your images. When you open the Tonal Map dialog box, a tonal map consisting of a diagonally straight line appears. Notice that - Xerox 385 | User Manual - Page 246
The shape and slant of the tonal map represent brightness level ratios between the input of the original image and the output image data. By clicking on the tonal map line, a hand-shaped cursor will appear which can be dragged to change the shape of the tonal map line. The horizontal axis represents - Xerox 385 | User Manual - Page 247
original diagonal, the enhanced image will be darker than the original. Normal Image Darkened Image Operation: 1 Click on the Tonal Map icon in the Preview window or the Tonal Map tab in the Enhancement dialog box. Tonal Map dialog box will appear. 2 Click on the Tonal Map curve, an indicator - Xerox 385 | User Manual - Page 248
b) Or, click on the Reset button to return the Tonal Map to the default diagonal as in the original. c) Click the Save button to save the changes as a customized setting. A Save As dialog box will appear upon selection of this button. Enter the name for the customized curve and click on the OK - Xerox 385 | User Manual - Page 249
The Filters Tab The features of the Filters Tab are described below, and are used to apply various visual modifications to the scanned image. All of the features of this tab are available when the Gray 256 Scales selection is made for Image Type. Refer to the table below which indicates the tab - Xerox 385 | User Manual - Page 250
the relative contrast between adjacent pixels. In general, sharpen filters should only be used when you want to accentuate the differences between one area and another. Sharpen More This option further emphasizes the edges of an image. This option produces a much stronger contrast than the - Xerox 385 | User Manual - Page 251
Rotate Image This selection provides the ability to rotate an image. The rotation mechanism rotates an image clockwise in 90º increments. Flip Image This selection provides the ability to flip an image. The flipping mechanism flips an image about the horizontal or vertical axis. 6-32 Scanning - Xerox 385 | User Manual - Page 252
Invert Image This function inverts all the tone values, providing a photographic negative of the original. This effect is similar to using the Tonal Map to tonally invert the image. 6 Overview 6-33 - Xerox 385 | User Manual - Page 253
the settings in the Scanner Control window, choose any one of the tools in the Preview Window to further enhance the image. The following is detailed information about the tools available in the Preview Window. Image Control Tools. For information, see page 6-35. Preview Window. Used to view the - Xerox 385 | User Manual - Page 254
Tools are used to control the image displayed in the Preview Window. The functions of these tools are described below. Frame Tool After in or out. Alternatively, hold down the Shift key and the mouse key on one of the sides of the frame and then move the cursor accordingly. This action will contract - Xerox 385 | User Manual - Page 255
and drag diagonally. The first selection frame will disappear while the second one remains. Note: If you hold down the Shift key and drag image within the Preview window; zooming in (the + sign appears on the zoom cursor) enlarges the view of the active image so that you can work on small details in - Xerox 385 | User Manual - Page 256
3 Zoom in (magnify an area) by positioning the cursor on an area of interest in the preview area and clicking the left mouse button. The preview area will be doubled in size. Click again and the area will again be enlarged by a factor of 100%. By repeating this process, you can enlarge the preview - Xerox 385 | User Manual - Page 257
Frame tool. Prescan Button The Prescan button is used to obtain a low resolution preview of the document. The prescanned document will appear in the Preview Window. Scan Button The Scan button is used to obtain the final scan of the document after all of the enhancement features have been applied to - Xerox 385 | User Manual - Page 258
7-3 If Paper is Jammed in the Printer Output Area 7-5 If Paper is Jammed Inside the Machine 7-6 Tips for Avoiding Paper Jams 7-8 LCD Display Error Messages 7-8 Fax Problems 7-12 Printer Problems 7-14 Print Quality Problems 7-17 http://xww.xedoc.world.xerox.com/data/XEDOC/Central/Multifunction/wc385 - Xerox 385 | User Manual - Page 259
Chapter 7 Troubleshooting This section describes Troubleshooting for the following areas: n Clearing Jams n LCD Display Error Messages n Fax Problems n Printer Problems n Print Quality Problems Refer to the specific subsection for a description of the problem and associated solutions. 7 7-1 - Xerox 385 | User Manual - Page 260
JAM appears in the display. Do not pull the document out of the slot or you may damage your machine. 1 Open the control panel by pulling lightly on the Control Panel cover. 2 Carefully remove the jammed document. Close the control panel firmly until it clicks into place. 7-2 Troubleshooting - Xerox 385 | User Manual - Page 261
Paper Jams While the Machine is Printing By carefully selecting paper type and loading them the jammed paper out gently and slowly. If Jammed in the Paper Feed Area at the Rear of the Machine 1 Remove the stack of copy paper (if necessary). 2 Remove the jammed paper by carefully pulling it straight - Xerox 385 | User Manual - Page 262
4 Adjust the paper guides to match the width of the paper. 7-4 Troubleshooting - Xerox 385 | User Manual - Page 263
Area If the paper jams as it exits to the printer exit tray and most of the paper is visible, pull the paper straight out using both hands. CAUTION: If there does not move easily when you pull, stop pulling. Continue with the next section, If Paper is Jammed Inside the Machine. 7 Clearing Jams 7-5 - Xerox 385 | User Manual - Page 264
If Paper is Jammed Inside the Machine 1 Pull the cover release buttons toward you to open the cover. 2 Remove the Laser Printer Cartridge by lifting it carefully by the handle. 7-6 Troubleshooting - Xerox 385 | User Manual - Page 265
WARNING: The Fuser is hot. Use caution when removing the jammed paper. 3 Using both hands, gently pull the paper toward you. 4 Check that there is no other paper jammed inside the printer. 5 Reinstall the Laser Printer Cartridge. 6 Close the front cover. 7 Clearing Jams 7-7 - Xerox 385 | User Manual - Page 266
adjustable paper guides are positioned machine is waiting for the programmed interval to automatically redial a previously busy station. You can press Start to immediately redial, or Stop to cancel the redial operation. There is a fax communications problem. Try faxing again. 7-8 Troubleshooting - Xerox 385 | User Manual - Page 267
JAM appears in the display. Do not pull the document out of the slot or you may damage your machine. 1 Open the control panel by pulling lightly on the Control Panel cover. 2 Carefully remove the jammed document. Close the control panel firmly until it clicks into place. 7-2 Troubleshooting - Xerox 385 | User Manual - Page 268
Paper Jams While the Machine is Printing By carefully selecting paper type and loading them the jammed paper out gently and slowly. If Jammed in the Paper Feed Area at the Rear of the Machine 1 Remove the stack of copy paper (if necessary). 2 Remove the jammed paper by carefully pulling it straight - Xerox 385 | User Manual - Page 269
4 Adjust the paper guides to match the width of the paper. 7-4 Troubleshooting - Xerox 385 | User Manual - Page 270
Area If the paper jams as it exits to the printer exit tray and most of the paper is visible, pull the paper straight out using both hands. CAUTION: If there does not move easily when you pull, stop pulling. Continue with the next section, If Paper is Jammed Inside the Machine. 7 Clearing Jams 7-5 - Xerox 385 | User Manual - Page 271
If Paper is Jammed Inside the Machine 1 Pull the cover release buttons toward you to open the cover. 2 Remove the Laser Printer Cartridge by lifting it carefully by the handle. 7-6 Troubleshooting - Xerox 385 | User Manual - Page 272
WARNING: The Fuser is hot. Use caution when removing the jammed paper. 3 Using both hands, gently pull the paper toward you. 4 Check that there is no other paper jammed inside the printer. 5 Reinstall the Laser Printer Cartridge. 6 Close the front cover. 7 Clearing Jams 7-7 - Xerox 385 | User Manual - Page 273
Paper Jams While the Machine is Printing By carefully selecting paper type and loading them the jammed paper out gently and slowly. If Jammed in the Paper Feed Area at the Rear of the Machine 1 Remove the stack of copy paper (if necessary). 2 Remove the jammed paper by carefully pulling it straight - Xerox 385 | User Manual - Page 274
4 Adjust the paper guides to match the width of the paper. 7-4 Troubleshooting - Xerox 385 | User Manual - Page 275
Area If the paper jams as it exits to the printer exit tray and most of the paper is visible, pull the paper straight out using both hands. CAUTION: If there does not move easily when you pull, stop pulling. Continue with the next section, If Paper is Jammed Inside the Machine. 7 Clearing Jams 7-5 - Xerox 385 | User Manual - Page 276
If Paper is Jammed Inside the Machine 1 Pull the cover release buttons toward you to open the cover. 2 Remove the Laser Printer Cartridge by lifting it carefully by the handle. 7-6 Troubleshooting - Xerox 385 | User Manual - Page 277
WARNING: The Fuser is hot. Use caution when removing the jammed paper. 3 Using both hands, gently pull the paper toward you. 4 Check that there is no other paper jammed inside the printer. 5 Reinstall the Laser Printer Cartridge. 6 Close the front cover. 7 Clearing Jams 7-7 - Xerox 385 | User Manual - Page 278
adjustable paper guides are positioned machine is waiting for the programmed interval to automatically redial a previously busy station. You can press Start to immediately redial, or Stop to cancel the redial operation. There is a fax communications problem. Try faxing again. 7-8 Troubleshooting - Xerox 385 | User Manual - Page 279
adjustable paper guides are positioned machine is waiting for the programmed interval to automatically redial a previously busy station. You can press Start to immediately redial, or Stop to cancel the redial operation. There is a fax communications problem. Try faxing again. 7-8 Troubleshooting - Xerox 385 | User Manual - Page 280
down on the cover until it clicks in place, or install the Laser Printer Cartridge. Group Location Feature is not available. LINE ERROR Your machine cannot connect with the remote site, or it has lost contact because of a problem on the phone line. • Try again. If the failure persists, wait an - Xerox 385 | User Manual - Page 281
. Wait until it cools down. If you cannot solve the problem, please call Xerox Service. Press the Stop button and clear the jam. Refer to Paper Jams While the Machine is Printing on page 7-3. Paper jammed inside the unit. Clear the jam. Refer to Clearing Jams on page 7-2. 7-10 Troubleshooting - Xerox 385 | User Manual - Page 282
WARMING UP PLEASE WAIT Meaning Solution The jammed paper is still inside the unit. Clear the jam. Refer to If Paper is Jammed Inside the Machine on page 76. • The remote fax machine you want to poll is not ready to respond to your poll. • When setting up to poll another - Xerox 385 | User Manual - Page 283
message. The machine cannot receive faxes manually. Ensure that you are hanging up the handset before you press the Start button. NOTE: This applies only to Xerox WorkCentre 385 models equipped with a telephone connected to the EXT. LINE jack on the bottom of the machine. 7-12 Troubleshooting - Xerox 385 | User Manual - Page 284
sending to is able to receive faxes. The fax machine you are calling may be using a poll code. • The machine sending the fax may be faulty. • Line errors due to excessive noise on phone line. • Check your machine by making a copy. • The Laser Printer Cartridge is empty. Stretched words appear on - Xerox 385 | User Manual - Page 285
. Swap the cable with one known to work. If necessary, replace the cable. • The printer port is configured incorrectly. Check printer setting in Windows to make certain that the print job is being sent to the correct port (for example, LPT1). • The Laser Printer Cartridge is not installed properly - Xerox 385 | User Manual - Page 286
the cable with an IEEE-1284 rated cable. • The printer cable may be connected improperly. Check the cable connection. • There may be a problem with the printer driver software. Exit Windows and reboot the computer. Turn the printer off and on. • The printer cable may be incorrect. Use or replace the - Xerox 385 | User Manual - Page 287
may be set incorrectly. From the Start menu, select Settings and Printers. Click the Work Centre icon with the right mouse button, select Properties, click the Details tab, and then click the Spool Settings button. Select the desired spool setting from the available choices 7-16 Troubleshooting - Xerox 385 | User Manual - Page 288
. Remove the Laser Printer Cartridge and shake it gently to evenly distribute the toner. Reinstall the image cartridge. Black staining on prints. • There is a paper quality problem. Use only paper that meets printer specifications. • A Laser Printer Cartridge from another Xerox printer has been - Xerox 385 | User Manual - Page 289
enable True Type fonts. • Toner may be low. Remove the Laser Printer Cartridge and shake it gently to evenly distribute the toner. Reinstall the Laser Printer Cartridge. • Replace the Laser Printer Cartridge. Have a spare Laser Printer Cartridge ready to replace the empty one. 7-18 Troubleshooting - Xerox 385 | User Manual - Page 290
Pad Replacement 8-6 Adjust Shading 8-7 Managing the Laser Printer Cartridge 8-8 Expected Cartridge Life 8-8 Replacing the Laser Printer Cartridge 8-9 Extending the Life of the Laser Printer Cartridge 8-12 Cleaning the Drum 8-13 http://xww.xedoc.world.xerox.com/data/XEDOC/Central/Multifunction/wc385 - Xerox 385 | User Manual - Page 291
options. Memory Clear Items 1. SYSTEM ID The System ID number and name are cleared from the machine's memory. 2. SYSTEM DATA Restores user-selectable options to the default value. 3. PHONEBK/MEMORY Clears the One-Touch, Speed Dial, or Group Dial numbers stored in memory. All the Scheduled Job - Xerox 385 | User Manual - Page 292
memory is cleared. Cleaning the Document Scanner To keep your machine working properly, occasionally clean the white roller, Automatic Document Feeder (ADF) rubber, and the scanning glass. If they are dirty, documents sent to another fax machine may not be clear. 1 Open the Control Panel by pulling - Xerox 385 | User Manual - Page 293
memory is cleared. Cleaning the Document Scanner To keep your machine working properly, occasionally clean the white roller, Automatic Document Feeder (ADF) rubber, and the scanning glass. If they are dirty, documents sent to another fax machine may not be clear. 1 Open the Control Panel by pulling - Xerox 385 | User Manual - Page 294
the white roller as follows: a) Both ends of the white roller have plastic bushings that are used to secure the roller in the machine. Pull the two bushings slightly 8 inward (A). b) Rotate the bushings until they reach a vertical position (B). c) Pull the roller upward and out of the - Xerox 385 | User Manual - Page 295
4 Using a cotton swab or a soft dry cloth, clean the ADF rubber piece. 5 Carefully wipe the scanning glass with a soft, dry cloth. If the glass is very dirty, first wipe it with a slightly dampened cloth, then with a dry cloth. Be very careful not to scratch the glass surface. scanning glass 8-4 - Xerox 385 | User Manual - Page 296
6 Replace the roller by performing steps one and two in reverse order. 7 Close the control panel firmly until it clicks into place. 8 Cleaning the Document Scanner 8-5 - Xerox 385 | User Manual - Page 297
Automatic Document Feeder Rubber Pad Replacement 1 Open the Control Panel Cover. 2 Insert a small flat blade screwdriver under the right and left sides of the ADF Holder. ADF Holder ADF Sheet ADF Rubber 3 Apply upward pressure to release the two locking tabs on each side of the assembly. 4 Remove - Xerox 385 | User Manual - Page 298
if the white rubber roller remains stained after cleaning. To adjust the shading: 1 Press the Menu button, then press the Maintenance button on the One- Touch keypad. CLEAN DRUM ? appears in the LCD display 2 Press the Down or Up button. ADJUST SHADING ? appears in the display. 3 Press the START - Xerox 385 | User Manual - Page 299
Automatic Document Feeder. SHADING ... appears on the LCD display. 6 The WorkCentre 385 returns to standby mode. Managing the Laser Printer Cartridge Expected Cartridge Life The life of your Laser Printer Cartridge depends on the amount of toner (density) used in each print job. For instance, if the - Xerox 385 | User Manual - Page 300
Automatic Document Feeder. SHADING ... appears on the LCD display. 6 The WorkCentre 385 returns to standby mode. Managing the Laser Printer Cartridge Expected Cartridge Life The life of your Laser Printer Cartridge depends on the amount of toner (density) used in each print job. For instance, if the - Xerox 385 | User Manual - Page 301
the Laser Printer Cartridge 1 Pull the cover release buttons toward you to open the cover. 8 2 Remove the empty Laser Printer Cartridge by lifting it carefully by the handle. Follow the instructions printed on the cartridge box to recycle the used cartridge. Managing the Laser Printer Cartridge - Xerox 385 | User Manual - Page 302
3 Unwrap a new Laser Printer Cartridge; carefully remove the sealing tape. 4 Shake the cartridge from side to side five or six times to distribute the toner evenly. 8-10 Maintenance - Xerox 385 | User Manual - Page 303
5 Locate the cartridge slots inside the printer, one on each side. Grasp the handle; slide the Laser Printer Cartridge down between the cartridge slots until it drops into place. 8 Managing the Laser Printer Cartridge 8-11 - Xerox 385 | User Manual - Page 304
changes will occur. You can temporarily re-establish print quality by redistributing the remaining toner in the cartridge. 1 Pull the cover release buttons toward you to open the printer cover. 2 Remove the Laser Printer Cartridge. 3 Gently shake the cartridge from side to side to distribute the - Xerox 385 | User Manual - Page 305
successful for one time only. The toner will eventually run out and blank pages will be printed when a print job is sent, or when a fax is 8 received. To restore print quality, the Laser Printer Cartridge must be replaced. See Installing the Laser Printer Cartridge on page 1-6. Cleaning - Xerox 385 | User Manual - Page 306
Automatic Document Feeder. SHADING ... appears on the LCD display. 6 The WorkCentre 385 returns to standby mode. Managing the Laser Printer Cartridge Expected Cartridge Life The life of your Laser Printer Cartridge depends on the amount of toner (density) used in each print job. For instance, if the - Xerox 385 | User Manual - Page 307
the Laser Printer Cartridge 1 Pull the cover release buttons toward you to open the cover. 8 2 Remove the empty Laser Printer Cartridge by lifting it carefully by the handle. Follow the instructions printed on the cartridge box to recycle the used cartridge. Managing the Laser Printer Cartridge - Xerox 385 | User Manual - Page 308
3 Unwrap a new Laser Printer Cartridge; carefully remove the sealing tape. 4 Shake the cartridge from side to side five or six times to distribute the toner evenly. 8-10 Maintenance - Xerox 385 | User Manual - Page 309
5 Locate the cartridge slots inside the printer, one on each side. Grasp the handle; slide the Laser Printer Cartridge down between the cartridge slots until it drops into place. 8 Managing the Laser Printer Cartridge 8-11 - Xerox 385 | User Manual - Page 310
changes will occur. You can temporarily re-establish print quality by redistributing the remaining toner in the cartridge. 1 Pull the cover release buttons toward you to open the printer cover. 2 Remove the Laser Printer Cartridge. 3 Gently shake the cartridge from side to side to distribute the - Xerox 385 | User Manual - Page 311
changes will occur. You can temporarily re-establish print quality by redistributing the remaining toner in the cartridge. 1 Pull the cover release buttons toward you to open the printer cover. 2 Remove the Laser Printer Cartridge. 3 Gently shake the cartridge from side to side to distribute the - Xerox 385 | User Manual - Page 312
successful for one time only. The toner will eventually run out and blank pages will be printed when a print job is sent, or when a fax is 8 received. To restore print quality, the Laser Printer Cartridge must be replaced. See Installing the Laser Printer Cartridge on page 1-6. Cleaning - Xerox 385 | User Manual - Page 313
successful for one time only. The toner will eventually run out and blank pages will be printed when a print job is sent, or when a fax is 8 received. To restore print quality, the Laser Printer Cartridge must be replaced. See Installing the Laser Printer Cartridge on page 1-6. Cleaning - Xerox 385 | User Manual - Page 314
9-3 Data Coupler Information 9-3 Radio Frequency Emissions 9-5 Safety and Legal Requirements for Xerox Europe 9-6 The Electricity at Work Regulation (in England and Wales) Xerox Limited ONLY 9-10 Electricity at Work Regulations 9-10 European Product Marking Requirements 9-14 CTR 21 Annex II 9-14 - Xerox 385 | User Manual - Page 315
Chapter 9 Appendix 9 Specifications Applicable line Compatibility Data coding Modem speed Transmission speed Effective scanning width Effective printing width Scanning method Memory Halftone Printing speed Automatic document feeder LCD Dimension (H x W x D) Public Switched - Xerox 385 | User Manual - Page 316
to 86°F (10°C to 30°C) Humidity : 30% to 80% RH One-touch dialing (registration for 20 numbers) Speed dialing (registration for 80 numbers) to 75 g/m2) weight Printing method Printing resolution Scanning resolution (fax) - Horizontal - Vertical Laser Scanning Unit 600 x 600 dpi (23.6 x 23.6 lines/ - Xerox 385 | User Manual - Page 317
with the printed document. To comply with the FCC rules, carefully read and follow the instructions listed in this document to program the local ID and name. Data Coupler Information This Xerox Work Centre 385 machine contains an internal data coupler. Its use is restricted by the FCC (Federal - Xerox 385 | User Manual - Page 318
with the printed document. To comply with the FCC rules, carefully read and follow the instructions listed in this document to program the local ID and name. Data Coupler Information This Xerox Work Centre 385 machine contains an internal data coupler. Its use is restricted by the FCC (Federal - Xerox 385 | User Manual - Page 319
. A compliant telephone cord and modular plug is provided with this equipment. Do not connect this machine to a party or coin operated phone line. Repairs to the machine should be made only by a Xerox representative or an authorized Xerox service agency. This applies at any time during or after the - Xerox 385 | User Manual - Page 320
and used in accordance with the instructions, may cause harmful interference to radio user is encourage to try to correct the interference by one or more of the following measures: l Reorient or this equipment not specifically approved by the Xerox Corporation may void the authority granted to - Xerox 385 | User Manual - Page 321
with the printed document. To comply with the FCC rules, carefully read and follow the instructions listed in this document to program the local ID and name. Data Coupler Information This Xerox Work Centre 385 machine contains an internal data coupler. Its use is restricted by the FCC (Federal - Xerox 385 | User Manual - Page 322
with the printed document. To comply with the FCC rules, carefully read and follow the instructions listed in this document to program the local ID and name. Data Coupler Information This Xerox Work Centre 385 machine contains an internal data coupler. Its use is restricted by the FCC (Federal - Xerox 385 | User Manual - Page 323
. A compliant telephone cord and modular plug is provided with this equipment. Do not connect this machine to a party or coin operated phone line. Repairs to the machine should be made only by a Xerox representative or an authorized Xerox service agency. This applies at any time during or after the - Xerox 385 | User Manual - Page 324
and used in accordance with the instructions, may cause harmful interference to radio user is encourage to try to correct the interference by one or more of the following measures: l Reorient or this equipment not specifically approved by the Xerox Corporation may void the authority granted to - Xerox 385 | User Manual - Page 325
of the member states related to electromagnetic compatibility. A full declaration, defining the relevant directives and referenced standards can be obtained from your Xerox Europe representative or by contacting: Xerox Europe Product Safety, Xerox Europe Technical Centre, PO Box 17, Bessemer Road - Xerox 385 | User Manual - Page 326
contact your local Xerox Europe representative for a list of approved accessories. WARNING: In order and could create a hazardous situation. Do not use aersol cleaners. Follow the instructions in this User Guide for proper cleaning methods. Never use supplies or cleaning materials for purposes other - Xerox 385 | User Manual - Page 327
ventilation is provided. Never push objects of any kind into the slots of the product as they may touch dangerous voltage points or short out parts which could result in a fire or electric shock. Never spill liquid of any kind on the product. Never remove any covers or guards that require - Xerox 385 | User Manual - Page 328
Never defeat interlock switches. Machines are designed to restrict operator access to unsafe areas. 44 (0)1707 353434 *Safety Standards: The Xerox WorkCentre 385 is certified to EN 60950. Other National Standards: The Xerox WorkCentre 385 is also certified in compliance with applicable standards - Xerox 385 | User Manual - Page 329
Europe Technical Centre (see page 9-9) for advice prior to any test implementation. Xerox equipment should, however, be properly and regularly serviced and maintained at all times. QUESTION: What is the Electricity at Work Regulation? ANSWER: The Electricity at Work Regulation 1989 came into force - Xerox 385 | User Manual - Page 330
and maintained to such high standards, please contact your local Xerox Europe Customer Service Organisation. They will be pleased to assist you. QUESTION: Does the Xerox equipment in my premises comply with the Electricity at Work Regulations? ANSWER: All employers and self-employed persons must - Xerox 385 | User Manual - Page 331
a guide which contains a list of tests which may be completed by your Xerox Europe Customer Service Organisation. Xerox Europe Customer Support will be pleased to advise you on such testing. QUESTION: I require records of all tests. ANSWER: After safety testing, your Xerox Europe Customer Service - Xerox 385 | User Manual - Page 332
Please contact us if you have any queries regarding the information provided in this document. Xerox Europe Product Safety, Xerox Europe Technical Centre, PO Box 17, Bessemer Road, Welwyn Garden City, Herts AL7 1HE, England 9 Safety and Legal Requirements for Xerox Europe 9- - Xerox 385 | User Manual - Page 333
of successful operation on every PSTN network termination point. In the event of problems, you should contact your equipment supplier in the first instance. CTR 21 Annex III The Xerox fax options for the WorkCentre 385 have been approved in accordance with Council Decision 98/482/EC for pan - Xerox 385 | User Manual - Page 334
been designed to work with the national fax kits may also be configured by a Xerox representative to be compatible with other country networks. Other countries, not listed above, will be approved against their own National requirements. Please contact your Xerox representative if the WorkCentre 385 - Xerox 385 | User Manual - Page 335
Glossary Chapter 10 Glossary Glossary 10-1 http://xww.xedoc.world.xerox.com/data/XEDOC/Central/Multifunction/wc385/user/chapter10/chpt10.htm [07/09/1999 14:39:54] - Xerox 385 | User Manual - Page 336
The following terms and definitions pertain to the Xerox WorkCentre 385. Term Definition ANS/FAX Mode To use this mode, you must have an answering machine attached to the EXT.LINE jack on the back of the machine. In ANS/FAX mode, the machine automatically answers the phone call. If the - Xerox 385 | User Manual - Page 337
on the front of your machine, just above the Printer Exit Tray. The Document Exit Tray holds those sheets scanned for fax purposes. Document Guides Also called paper guides. These guides can be adjusted to the width of the paper medium There are two pairs of guides: one for the Automatic Paper - Xerox 385 | User Manual - Page 338
This is a telephone company service that lets you use a single phone line to answer several different phone numbers. Your machine can perform more than one 10 function at the same time. For example, you can print a PC document while sending a fax, or store a fax for later transmission while - Xerox 385 | User Manual - Page 339
display on the control panel shows FAX. Federal Communications Commission. This a branch of the United States Federal Government that establishes laws and standards for any machines involving communications. There is an FCC Registration number on your machine's Xerox label, located on the back of - Xerox 385 | User Manual - Page 340
can reprint the last fax pages after the image cartridge is replaced. LCD Liquid Crystal Display. The LCD on your machine is located near the top edge of the control panel. This LCD is used to display all menu items and error messages. LPT1 Line Printer 1. Most PCs have a single parallel port - Xerox 385 | User Manual - Page 341
that is positioned over the one-touch buttons on the left front of the machine's control panel. OS Operating System. Windows 95 is an Operating System. Parallel interface port This refers to the printer port found on the back of your machine. The Centronics printer cable plugs into this port - Xerox 385 | User Manual - Page 342
is printed before power is reduced. Printer Driver The Printer Driver is software that you load into your PC that enables your PC to print a document from its PC application to your printer. Printer Exit Tray This tray fits into the bottom front of your 10 machine, and holds the printed sheets - Xerox 385 | User Manual - Page 343
through the phone line by a service company at a remote place. see DPI. You can adjust the machine's ringer to the desired volume. Receive Terminal Identification. This feature automatically prints the page number, the date, and the time of reception on each page of a received fax. 10-8 Glossary - Xerox 385 | User Manual - Page 344
display language from English, German, French, Italian or Spanish. Sound control You can choose if an alarm to sounds when an error occurs in the machine. System ID The System ID consists of your telephone number (up to 20 digits and pauses) and name 10 (up to 20 characters). System reports - Xerox 385 | User Manual - Page 345
TEL Mode TEL/FAX Mode Xerox label In TEL Mode, your machine is set for you to manually answer any call. If you hear a fax signal, you then press the Start button and hang up the handset of the external phone to begin receiving the fax. For this function, the LCD display on the control panel shows - Xerox 385 | User Manual - Page 346
Work Centre 385 User Manual Index A Adding documents 3-13 Adjust Shading 8-7 ANS/FAX mode Receiving faxes automatically 4-5 Answer on ring 1-52 Auto Journal 1-48 Automatic Dialing 3-15 One 32 C Canceling Fax Transmission 3-7 Polling 3-37 Standby operations 3-14 http://xww.xedoc.world.xerox.com/data/ - Xerox 385 | User Manual - Page 347
2-4 Color Channel 6-20 Confirming fax transmission 3-8 Contrast Button 1-33 Contrast settings for faxes 3-23 Control locations and functions scanner Cleaning 8-2 Drivers Uninstalling 1-30 DRPD 1-53 Drum Cleaning 8-13 Dual Button 1-33 Dual functions 1-43 http://xww.xedoc.world.xerox.com/data/XEDOC - Xerox 385 | User Manual - Page 348
Mode Receiving automatically 4-3 Fax problems 7-12 Faxing Adding documents to 3-13 After talking 3-6 Automatic Redial 3-31 Canceling standby operations 3-14 Canceling Transmission 3-7 Confirming Transmission 3-8 Delayed Transmission 3-11 Manual sending 3-3 Memory Transmission 3-9 Preparing documents - Xerox 385 | User Manual - Page 349
1-34 Setting System ID 1-42 System setup 1-34 Using the Automatic Paper Feeder 1-15 Using the Manual Paper Feeder 1-20 Glossary 10-1 Group Dialing 3-19 Sending Faxes 3-5 Storing numbers 3-19 Grouping copies 2-4 H Highlight 6-20 Home Resolution and Contrast 1-35 Horizontal Reduction 1-51 I Images - Xerox 385 | User Manual - Page 350
12 Laser Printer Cartridge life 8-8 Printer Cartridge Management 8-8 Printer Cartridge Replacement 8-9 Making a Copy 2-1 Manual Faxing 3-2 Manual Paper Feeder 1-20 Memory Erasing last fax data 4-8 Receiving faxes into 4-6 Redial memory 3-28 Searching by first letter 3-29 http://xww.xedoc.world.xerox - Xerox 385 | User Manual - Page 351
4-9 Sending to a remote machine 3-34 Power Saving 1-49 Preparing documents for faxing 3-1 Print media specifications 1-13 Print Priority Term 1-55 Print Priority Button 1-32 Print quality problems 7-17 Printer problems 7-14 Printer settings 5-2 Windows 3.x http://xww.xedoc.world.xerox.com/data/XEDOC - Xerox 385 | User Manual - Page 352
Tab 5-9 Windows 95/98 5-8 Windows NT 4.0 5-13 Printing 4-7, 5-1 Clearing document jams 7-3 Documents 5-1 Printer settings 5-2 Printing last fax data 4-7 Priority Term 1-55 Priority Transmission 3-32 Product Marking Requirements 9-14 R Receive Button 1-33 Receiving faxes Out of paper 4-6 To PC 4-13 - Xerox 385 | User Manual - Page 353
Message Confirmation 1-48 Reprint 1-55 Resolution Of faxes 3-21 Settings for scanning 6-13 Resolution Button Newspaper 6-18 Overview 6-1 Preview Window 6-34 Reduce/Enlarge 6-15 Resolution 6-13 Scaling factor 6-15 Scan Button 6-38 http://xww.xedoc.world.xerox.com/data/XEDOC/Central/Multifunction/ - Xerox 385 | User Manual - Page 354
an image 6-4 Tonal Map 6-26 Width and Height Indicators 6-38 With TextBridge Pro 6-5 WorkCentre 385 TWAIN Scanner program 6-2 Zoom tools 6-36 Search Button 1-33 Sending a fax Clearing document jams 7-2 From a PC 3-39 Manually 3-3 Setting Options Answer on ring 1-52 Auto Journal 1-48 Dial Mode 1-49 - Xerox 385 | User Manual - Page 355
50 System ID 1-42 System Requirements 1-24 System setup 1-34 T TEL mode Receiving faxes manually 4-4 TEL/FAX mode Receiving faxes automatically 4-3 Telephone Line connection 1-9 TextBridge Pro http://xww.xedoc.world.xerox.com/data/XEDOC/Central/Multifunction/wc385/user/385index.htm (10 of 12) [07/09 - Xerox 385 | User Manual - Page 356
Troubleshooting 7-1 Clearing Jams 7-2 Clearing jams when faxing 7-2 Clearing jams when printing 7-3 Fax problems 7-12 LCD error messages 7-8 Print quality problems 7-17 Printer problems 3-26 V Volume Speaker adjustment 1-40 W When faxing 7-2 When printing 7-3 Windows3.x Number of copies 5-4, - Xerox 385 | User Manual - Page 357
Index Windows95 Printer Settings Image Quality Tab 5-11 Paper Output Tab 5-9 Windows 95/98 Printer Settings 5-8 Windows NT 4.0 Printer Settings 5-13 http://xww.xedoc.world.xerox.com/data/XEDOC/Central/Multifunction/wc385/user/385index.htm (12 of 12) [07/09/1999 14:40:08] - Xerox 385 | User Manual - Page 358
. Using the Number keypad, enter the desired discard size, and press the Enter button to store your selection. n REDIAL INTERVAL - Your machine can automatically redial a remote fax machine if it was busy or does not answer the first call attempt. Enter the number of minutes (from 1 to 15) using the - Xerox 385 | User Manual - Page 359
contrast of copied or transmitted documents. Speed/Dual Use to dial calls and send fax documents by entering a 2-digit number. Also use to switch the LCD display Number Keypad Use to dial numbers manually or to enter letters and numbers for various programming functions. Using the Control Panel - Xerox 385 | User Manual - Page 360
n CLOCK MODE - Use this feature to determine how time is displayed on your machine. Press 1 to select a 12 hour Clock Mode. Press 2 to select a 24 hour Clock Mode. 1-56 Getting Started - Xerox 385 | User Manual - Page 361
To make a quick copy: 1 Adjust the document guides to match the width of the document. 2 Slide the document face down into the Automatic Document Feeder until it is grasped and pulled into the machine. 3 If necessary, press the Contrast button. You may choose NORMAL, DARKEN, LIGHTEN or PHOTO. 4 - Xerox 385 | User Manual - Page 362
REDUCE\ENLARGE menu. REDUCE\ENLARGE 1.AUTO 2.MANUAL a) Selecting 1. AUTO, will cause the WorkCentre 385 to automatically reduce the copy size of each page to fit on a single page. b) Selecting 2. MANUAL, brings up the COPY RATE menu, where you can manually adjust the copy image scale size settings - Xerox 385 | User Manual - Page 363
specify the color channel in which to change the Highlight, Shadow and Midtone values. The only channel available to be selected when using the WorkCentre 385 to scan is the Gray channel. Red, Green and Blue are used for scanners capable of scanning documents in color. Highlight The Highlight value - Xerox 385 | User Manual - Page 364
To make copies using the Copy menu features: 1 Adjust the document guides to match the width of the document. 2 Slide the document face down into the Automatic Document Feeder until it is grasped and pulled into the machine. 3 If necessary, press the Contrast button. You may choose NORMAL, - Xerox 385 | User Manual - Page 365
Power Saving OFF. This keeps the printer ready to print with minimum warm-up time. n DIAL MODE - Select the type of dial system your fax machine is connected to: Press 1 if the fax machine is connected to a tone (Touch Tone) dial line. Press 2 if the fax machine is connected to a pulse (Rotary - Xerox 385 | User Manual - Page 366
. This feature is often used by answering services who answer telephones for many different clients. They need to know which number someone is calling on to properly answer the phone. Using the Distinctive Ring Pattern Detection feature, your fax machine can "learn" the ring pattern you designate - Xerox 385 | User Manual - Page 367
to automatically reduce an incoming page (that would otherwise be divided into two pages) to fit on a single page. If the fax machine cannot reduce the data to fit into one page with this feature enabled, the data is divided and printed in actual size on two or more sheets. Press 1 to turn - Xerox 385 | User Manual - Page 368
Frame tool. Prescan Button The Prescan button is used to obtain a low resolution preview of the document. The prescanned document will appear in the Preview Window. Scan Button The Scan button is used to obtain the final scan of the document after all of the enhancement features have been applied to - Xerox 385 | User Manual - Page 369
Rotate Image This selection provides the ability to rotate an image. The rotation mechanism rotates an image clockwise in 90º increments. Flip Image This selection provides the ability to flip an image. The flipping mechanism flips an image about the horizontal or vertical axis. 6-32 Scanning - Xerox 385 | User Manual - Page 370
Straighten the edges on a level surface. Note: If envelopes jam while printing, try reducing the number of envelopes in the Automatic Paper Feeder. For transparencies, refer to the packaging for the transparency stock to determine the print side. Hold the transparencies by the edges and avoid - Xerox 385 | User Manual - Page 371
axes in order to maintain the proportionality of the original image, turn the horizontal reduction feature off. If you turn this feature off, the machine reduces the data as shown below. Original Received data Press 1 to turn this feature on. Press 2 to turn this feature off. System Setup 1-51 - Xerox 385 | User Manual - Page 372
TWAIN Scanner application: Note: To start the WorkCentre 385 TWAIN Scanner application from TextBridge Pro, refer to Starting the WorkCentre 385 TWAIN Scanner Application from TextBridge Pro below. 1 Plug in the WC 385 and switch on your PC. 2 Start Windows. 3 Start/Open the TWAIN-compliant image - Xerox 385 | User Manual - Page 373
Level Adjustment The Level Adjustment dialog box shows the distribution of brightness levels in your image. To adjust the histogram plot, drag the triangles located below the horizontal bar to the desired values. The left (black) triangle changes the shadow levels. The right (white) triangle changes - Xerox 385 | User Manual - Page 374
The Highlight scroll bar allows you to manually set a highlight level. The default for the Highlight settings is 255. You can increase or decrease the highlights in a particular image as needed by adjusting - Xerox 385 | User Manual - Page 375
One-Touch button. 4 Press the Enter button when the name appears correctly or without entering a name. To set another One-Touch number, press the desired One . Using the One-Touch Address Label Sheet A One-Touch label sheet is included with your machine. As you store numbers in One-Touch dial buttons - Xerox 385 | User Manual - Page 376
fax jobs. 1 Press 1 to turn this feature on. Press 2 to turn this feature off. n LOCAL ID - Enabling this feature causes the machine n PRIORITY TERM - You can set your machine to turn Print Priority off automatically if there is no further PC printing activity. There are two user selectable - Xerox 385 | User Manual - Page 377
Paper/Output Tab The Paper Output tab is shown below. Copies Click in the Copies box to enter a value (1 to 99), or click on one of the arrows to raise or lower the value in the Copies box. Paper Source Click on the down arrow to display the two Paper - Xerox 385 | User Manual - Page 378
the Reduce/Enlarge box to enter a percent value (10 to 200), or click on one of the arrows to raise or lower the value in the Reduce/ Enlarge box. Other the bottom of the window. These buttons are used as follows: n Default All: Click on this button to change all printer settings to their default - Xerox 385 | User Manual - Page 379
Image Quality Tab Note: If this tab is accessed through the Printers folder, any changes made to settings will become the default settings for the printer. Settings made when the printer properties are accessed through an application File menu and Print or Print Setup will remain active until the - Xerox 385 | User Manual - Page 380
Paper Output Tab Note: If this tab is accessed through the Printers folder, any changes made to settings will become the default settings for the printer. Settings made when the printer properties are accessed through an application File menu and Print or Print Setup will remain active until the - Xerox 385 | User Manual - Page 381
Reduce/Enlarge This feature allows an image to be automatically enlarged or reduced as it is scanned. The default scaling factor is 100%. The selected scaling factor, the range of which is dependent on the selected image type, affects the printed scan output. Note: When scanning a printed image for - Xerox 385 | User Manual - Page 382
Resolution The resolution setting determines the amount of information the scanner will capture in a scanned image. Resolution is measured in dpi (dots per inch). The higher the resolution is, the finer the image detail and the bigger the image file size is. Increasing the resolution will result in - Xerox 385 | User Manual - Page 383
as the slider moves. Ordinarily, good results can be obtained from your machine by leaving the slider at its default value of 1.00. The Advanced Selection For both the Level Adjustment and the Tonal Map functions, the window displayed contains small representations, known as thumbnail views, of the - Xerox 385 | User Manual - Page 384
option. In order to see the results of Descreen process, it is always necessary to scan the image, and examine the output image on the workstation display. 6-18 Scanning - Xerox 385 | User Manual - Page 385
Note: You can also change Height and Width values by directly adjusting the selection frame. Note: Output image file size is proportional to both Height and Width. If both Height and Width values are doubled, then the image area and image file size will increase four-fold. Note: Once you have - Xerox 385 | User Manual - Page 386
Gray 256 Scales Halftone B/W Lineart B/W Gray 256 Scales Images scanned in Gray 256 Scales mode are scanned in 256 shades of gray. If high quality copies of photographs or other continuous tone originals are desired, Gray 256 Shades mode is the best choice. Gray 256 Scales provides accurate - Xerox 385 | User Manual - Page 387
Invert Image This function inverts all the tone values, providing a photographic negative of the original. This effect is similar to using the Tonal Map to tonally invert the image. 6 Overview 6-33 - Xerox 385 | User Manual - Page 388
for printed text or pen-andink drawings. Like the Halftone B/W image type, this image type defines the state of each pixel in the image with one bit that is either on or off. For this reason, files created in this mode will require approximately the same amount of disk space as - Xerox 385 | User Manual - Page 389
Tonal Map If you select the Tonal Map tab, the following will be displayed. Tonal Map tab The Tonal Map is yet another way to adjust Highlight, Midtone, or Shadow levels in your images. When you open the Tonal Map dialog box, a tonal map consisting of a diagonally straight line appears. Notice that - Xerox 385 | User Manual - Page 390
. A list of supported scanners will be displayed. 2 From the list, select Xerox WorkCentre 385 (TWAIN). Click OK WorkCentre 385 TWAIN Scanner application is displayed. Select the appropriate scan options for the document or photograph to be scanned. After adjusting the settings in the Scan window - Xerox 385 | User Manual - Page 391
and drag diagonally. The first selection frame will disappear while the second one remains. Note: If you hold down the Shift key and drag image within the Preview window; zooming in (the + sign appears on the zoom cursor) enlarges the view of the active image so that you can work on small details in - Xerox 385 | User Manual - Page 392
Chapter 7 Troubleshooting This section describes Troubleshooting for the following areas: n Clearing Jams n LCD Display Error Messages n Fax Problems n Printer Problems n Print Quality Problems Refer to the specific subsection for a description of the problem and associated solutions. 7 7-1
-
 1
1 -
 2
2 -
 3
3 -
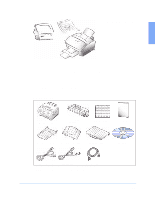 4
4 -
 5
5 -
 6
6 -
 7
7 -
8
-
9
-
10
-
11
-
12
-
13
-
14
-
15
-
16
-
17
-
18
-
19
-
20
-
21
-
22
-
23
-
24
-
25
-
26
-
27
-
28
-
29
-
30
-
31
-
32
-
33
-
34
-
35
-
36
-
37
-
38
-
39
-
40
-
41
-
42
-
43
-
44
-
45
-
46
-
47
-
48
-
49
-
50
-
51
-
52
-
53
-
54
-
55
-
56
-
57
-
58
-
59
-
60
-
61
-
62
-
63
-
64
-
65
-
66
-
67
-
68
-
69
-
70
-
71
-
72
-
73
-
74
-
75
-
76
-
77
-
78
-
79
-
80
-
81
-
82
-
83
-
84
-
85
-
86
-
87
-
88
-
89
-
90
-
91
-
92
-
93
-
94
-
95
-
96
-
97
-
98
-
99
-
100
-
101
-
102
-
103
-
104
-
105
-
106
-
107
-
108
-
109
-
110
-
111
-
112
-
113
-
114
-
115
-
116
-
117
-
118
-
119
-
120
-
121
-
122
-
123
-
124
-
125
-
126
-
127
-
128
-
129
-
130
-
131
-
132
-
133
-
134
-
135
-
136
-
137
-
138
-
139
-
140
-
141
-
142
-
143
-
144
-
145
-
146
-
147
-
148
-
149
-
150
-
151
-
152
-
153
-
154
-
155
-
156
-
157
-
158
-
159
-
160
-
161
-
162
-
163
-
164
-
165
-
166
-
167
-
168
-
169
-
170
-
171
-
172
-
173
-
174
-
175
-
176
-
177
-
178
-
179
-
180
-
181
-
182
-
183
-
184
-
185
-
186
-
187
-
188
-
189
-
190
-
191
-
192
-
193
-
194
-
195
-
196
-
197
-
198
-
199
-
200
-
201
-
202
-
203
-
204
-
205
-
206
-
207
-
208
-
209
-
210
-
211
-
212
-
213
-
214
-
215
-
216
-
217
-
218
-
219
-
220
-
221
-
222
-
223
-
224
-
225
-
226
-
227
-
228
-
229
-
230
-
231
-
232
-
233
-
234
-
235
-
236
-
237
-
238
-
239
-
240
-
241
-
242
-
243
-
244
-
245
-
246
-
247
-
248
-
249
-
250
-
251
-
252
-
253
-
254
-
255
-
256
-
257
-
258
-
259
-
260
-
261
-
262
-
263
-
264
-
265
-
266
-
267
-
268
-
269
-
270
-
271
-
272
-
273
-
274
-
275
-
276
-
277
-
278
-
279
-
280
-
281
-
282
-
283
-
284
-
285
-
286
-
287
-
288
-
289
-
290
-
291
-
292
-
293
-
294
-
295
-
296
-
297
-
298
-
299
-
300
-
301
-
302
-
303
-
304
-
305
-
306
-
307
-
308
-
309
-
310
-
311
-
312
-
313
-
314
-
315
-
316
-
317
-
318
-
319
-
320
-
321
-
322
-
323
-
324
-
325
-
326
-
327
-
328
-
329
-
330
-
331
-
332
-
333
-
334
-
335
-
336
-
337
-
338
-
339
-
340
-
341
-
342
-
343
-
344
-
345
-
346
-
347
-
348
-
349
-
350
-
351
-
352
-
353
-
354
-
355
-
356
-
357
-
358
-
359
-
360
-
361
-
362
-
363
-
364
-
365
-
366
-
367
-
368
-
369
-
370
-
371
-
372
-
373
-
374
-
375
-
376
-
377
-
378
-
379
-
380
-
381
-
382
-
383
-
384
-
385
-
386
-
387
-
388
-
389
-
390
-
391
-
392
 |
 |

Pro 385 User Manual
Table of Contents
Chapter 1
Getting Started
Chapter 2
Making a Copy
Chapter 3
Sending a Fax
Chapter 4
Receiving a Fax
Chapter 5
Printing
Chapter 6
Scanning
Chapter 7
Trouble Shooting
Chapter 8
Maintenance
Chapter 9
Appendix
Chapter 10
Glossary
Index
Pro 385 User Manual