Yamaha 500 YMC-700/500 Owners Manual
Yamaha 500 Manual
 |
View all Yamaha 500 manuals
Add to My Manuals
Save this manual to your list of manuals |
Yamaha 500 manual content summary:
- Yamaha 500 | YMC-700/500 Owners Manual - Page 1
U Media Controller YMC-700 YMC-500 OWNER'S MANUAL - Yamaha 500 | YMC-700/500 Owners Manual - Page 2
the supplied Quick Start Guide. INTRODUCTION Features 2 30 Listening to the Rhapsody® service (YMC-700 only 32 Useful menu 44 ADDITIONAL INFORMATION Troubleshooting 45 Glossary 51 important information about safety and operating instructions. • This manual is printed prior to production. Design - Yamaha 500 | YMC-700/500 Owners Manual - Page 3
40-station preset tuning DOCK terminal ◆ DOCK terminal to connect a Yamaha iPod universal dock (such as the YDS-11, sold separately) or automatic or manual network configuration ◆ USB port to connect a USB storage device (not including USB hard disk drives) Notes • This unit supports USB mass - Yamaha 500 | YMC-700/500 Owners Manual - Page 4
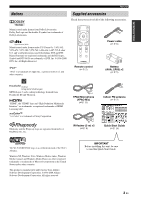
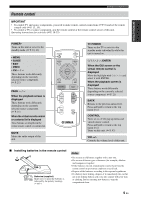
. © 1996-2008 DTS, Inc. All Rights Reserved. iPodTM "iPod" is a trademark of Apple Inc., registered in the U.S. and other countries. POWER GUIDE TV POWER MENU ENTER PREV. CONTROL EXIT BACK CH VOL PAGE MUTE Remote control (☞ P. 5) Power cable (☞ P. 6) Battery (AAA, LR03) ×2 (☞ P. 5) MPEG - Yamaha 500 | YMC-700/500 Owners Manual - Page 5
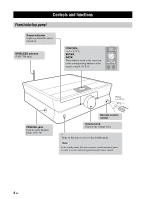
(YMC-700 only) CONTROL, u / d / j / i, ENTER, BACK These buttons work in the same way as the corresponding buttons on the remote control. (☞ P. 5) POWER GUIDE TV POWER MENU ENTER PREV. CONTROL EXIT BACK CH VOL YPAO Mic jack Used for Auto Speaker Setup. (☞ P. 10) Within 6 m (20 ft.) 30° 30 - Yamaha 500 | YMC-700/500 Owners Manual - Page 6
aim the remote control at the remote control sensor of this unit. Operating instructions for activities (☞ P. 18-35) INTRODUCTION POWER Turns on this unit or sets it to list. MUTE Mutes the audio output of this unit. POWER GUIDE TV POWER MENU ENTER PREV. CONTROL EXIT BACK CH VOL PAGE - Yamaha 500 | YMC-700/500 Owners Manual - Page 7
. You can connect or disconnect USB storage devices while this unit is turned on. Supported devices ☞ P. 2 Wired network YMoCn-l7y00 Modem WAN LAN Router PC Setup ☞ P. 9 Speakers Also refer to the supplied Quick Start Guide. Surround Speakers Center Speaker Subwoofer Caution · Be sure to - Yamaha 500 | YMC-700/500 Owners Manual - Page 8
dealer or service center about outdoor antennas. Audio/Video components Connect your audio/video components to these jacks. Refer to the supplied Quick Start Guide for connections. iPod dock/Bluetooth receiver Connect a Yamaha iPod universal dock (such as the YDS-11, sold separately) or Bluetooth - Yamaha 500 | YMC-700/500 Owners Manual - Page 9
. y • You can connect the IR flashers to any of the REMOTE CONTROL OUT 1, 2, and 3 jacks because the same signal is output. • Refer to the owner's manual of the TV and source devices for the position of the remote control sensor. ■ Settings Make the following settings. • The IR setting for your TV - Yamaha 500 | YMC-700/500 Owners Manual - Page 10
SETUP Placing speakers The speaker layout below shows the speaker setting we recommend. ■ 5.1-channel speaker layout C FL FR 30˚ SL SR 60˚ SL 80˚ SR FR SW FL C SR SL FL: Front left speaker FR: Front right speaker C: Center speaker SR: Surround right speaker SL: Surround left speaker SW: - Yamaha 500 | YMC-700/500 Owners Manual - Page 11
Source Device Setup 1 Turn on the TV, then set the video input source selector of the TV to "HDMI 1" (etc.). Refer to the owner's manual of the TV for details. Before starting the Initial Setup Make sure of the following check points. ❏ Speakers are connected appropriately. ❏ The IR flashers are - Yamaha 500 | YMC-700/500 Owners Manual - Page 12
SETUP Initial Setup 4 Select "Yes" to start the initial setup procedure. POWER GUIDE TV POWER MENU 6 Connect the supplied YPAO Mic to the YPAO MIC jack. (Left side) ENTER PREV. CONTROL EXIT BACK Use these buttons to operate - Yamaha 500 | YMC-700/500 Owners Manual - Page 13
Mic from this unit and select "OK". The YPAO Mic is sensitive to heat. Keep it away from direct sunlight. Error message (example) • Solve the problem (☞ P. 50), then select "Retry" to retry the measurement. • Select "Cancel" to cancel the setup process. 12 En - Yamaha 500 | YMC-700/500 Owners Manual - Page 14
code. Learn Code: Jump to the TV Remote Code Learning screen. (☞ P. 42) Select this if you want to program the remote control code manually. Cancel: Skip the TV remote control settings. You can set them later. (☞ P. 42) 4 Check the information, then select "Test". The "TV Remote Code - Yamaha 500 | YMC-700/500 Owners Manual - Page 15
Prepare the A Connection Planning Chart of the Quick Setup Guide in advance. In these instructions, the examples assume that the connections below are made. Code Learning screen (☞ P. 42) and program the remote control code manually. 8 Select "Save" to finish the TV remote control code setting and - Yamaha 500 | YMC-700/500 Owners Manual - Page 16
Initial Setup 1 Select "Yes" to start the input source device setting. The "Source Device Setup" screen appears. 4 Check the confirmation screen, then select "Yes". SETUP If you select "No", the Source Device Setup procedure will be skipped. You can perform it later. (☞ P. 39) 2 Select the type - Yamaha 500 | YMC-700/500 Owners Manual - Page 17
Learning screen (☞ P. 40) and program the remote control code manually. 12 Select "Yes" to register another input source device and repeat steps 2 to 11 until all devices listed in the Quick Start Guide are set. NEXT CODE Virtual remote control Function of the selected button - Yamaha 500 | YMC-700/500 Owners Manual - Page 18
15 Select "OK" to complete the Initial Setup procedure. y You can change the first screen to be displayed later. (☞ P. 43) Initial Setup SETUP 17 En - Yamaha 500 | YMC-700/500 Owners Manual - Page 19
General operation Screens and operation To control playback and make settings, operate the GUI (graphical user interface) screen displayed on the TV using the supplied remote control. In most cases, the screen changes as follows. [Top menu] ENTER Select "Setup" [Setup menu] ☞ P. 36 BACK [ - Yamaha 500 | YMC-700/500 Owners Manual - Page 20
General operation Remote control operations for the GUI GUIDE MENU Moves the highlight up ENTER PREV. program or file to play back. You may need to make some settings before beginning playback. Playback instructions ☞ P. 22-35 Adjust the volume level. You can mute the sound by pressing MUTE. 5 - Yamaha 500 | YMC-700/500 Owners Manual - Page 21
this setting. ☞ P. 42 2 Start playing back the content or desired TV program by using the supplied remote control or the virtual remote control. POWER GUIDE TV POWER MENU ENTER PREV. CONTROL EXIT BACK CH VOL PAGE MUTE ☞ Next page y • When the virtual remote control is not displayed, you - Yamaha 500 | YMC-700/500 Owners Manual - Page 22
sure that you have finished the remote control settings for the component and an IR flasher is connected/attached correctly. Button on the remote control GUIDE MENU u d j i ENTER PREV. EXIT CH u CH d PAGE u PAGE d Type of component you set in the setup menu Blu-ray DVD DVR Cable, Other Video - Yamaha 500 | YMC-700/500 Owners Manual - Page 23
Program ☞ P. 19 Audio Adjustment ☞ P. 19 Preset List Jump to preset list Add to Preset* ☞ Next page * Displayed only on the manual search screen. [Manual search screen] BACK [Preset list] ENTER CONTROL [Pop up menu] Rename ☞ Next page Reorder ☞ Next page Remove from Preset ☞ Next - Yamaha 500 | YMC-700/500 Owners Manual - Page 24
the preset search screen. 2 Select " Remove " to remove the station. Press j/i to tune in to the previous/next preset station. Frequency tuning On the manual search screen, tune into the desired station as follows: • Press and hold i to search for a higher frequency station. • Press and hold j to - Yamaha 500 | YMC-700/500 Owners Manual - Page 25
DSP program [Pop up menu] CONTROL DSP Program Audio Adjustment Repeat Shuffle ☞ P. 19 ☞ P. 19 ☞ Next page ☞ Next page Note If any message appears, refer to "Troubleshooting". (☞ P. 48) 24 En - Yamaha 500 | YMC-700/500 Owners Manual - Page 26
OPERATION Supported USB in other partitions. • Up to 8 levels of folder hierarchy and 500 files and folders per folder are recognized. • Some devices may not operations by remote control. ■ Operation on the playback screen GUIDE MENU ENTER Play/Stop Skip forward Before enjoying the contents on - Yamaha 500 | YMC-700/500 Owners Manual - Page 27
Select folder If you press and hold PAGE u / d, the list scrolls rapidly. [Picture screen] BACK Select a file ENTER Picture Input source Control guide [Pop up menu] CONTROL Slide Show Interval Set as Screen Saver Shuffle Start Slide Show Now Playing ☞ Next page ☞ Next page ☞ Next page - Yamaha 500 | YMC-700/500 Owners Manual - Page 28
BASIC OPERATION Supported USB storage devices ☞ P. 2 Network settings ☞ P. 40 Viewing photos To source is being played back, playback of the audio continues. ■ Operation on the picture screen GUIDE MENU ENTER PREV. CONTROL EXIT BACK Start a slide show Next photo Previous photo Back to the - Yamaha 500 | YMC-700/500 Owners Manual - Page 29
on your iPod Once you have stationed your iPod in a Yamaha iPod dock (such as the YDS-11, sold separately) connected your iPod. • This unit supports iPod touch, iPod (Click Wheel, including iPod classic), iPod nano and iPod mini. • If any message appears, refer to "Troubleshooting". (☞ P. 49) • Some - Yamaha 500 | YMC-700/500 Owners Manual - Page 30
following functions are available upon playback of music/video contents. The detailed functions may differ depending on the connected iPod. ■ Repeat play GUIDE MENU ENTER PREV. CONTROL EXIT BACK Play/Pause Skip forward/Search forward (press hold) Skip backward/Search backward (press hold) Back - Yamaha 500 | YMC-700/500 Owners Manual - Page 31
Radio (YMC-700 only) Use this feature to listen to Internet Radio stations. This unit uses the vTuner Internet Radio station database service particularly customized for this unit, providing a database of over 2000 radio stations. You can store your favorite stations with bookmarks. [Top menu - Yamaha 500 | YMC-700/500 Owners Manual - Page 32
• If any message appears, refer to "Troubleshooting". (☞ P. 48) ■ Storing your favorite -700 only) ■ Operation on the playback screen GUIDE MENU ENTER Play/Stop PREV. CONTROL EXIT BACK vtuner.com/ Notes • This service may be discontinued without notice. • Some Internet Radio stations may not - Yamaha 500 | YMC-700/500 Owners Manual - Page 33
(YMC-700 only) Use this feature to listen to the Rhapsody® music service. [Top menu] Select "Listen" [Source menu] Select "Rhapsody" [Pop up menu] (Menu items vary ☞ P. 19 Audio Adjustment ☞ P. 19 Repeat ☞ Next page Note If any message appears, refer to "Troubleshooting". (☞ P. 48) 32 En - Yamaha 500 | YMC-700/500 Owners Manual - Page 34
track or album from "My Library". Select " Remove " to remove it. ■ Repeat play 1 Select "Rhapsody Music Guide". y • Use "Rhapsody Channels" to browse the channels provided by the Rhapsody® service. • Use "My Library" to register and access the desired albums and songs easily. • You can search - Yamaha 500 | YMC-700/500 Owners Manual - Page 35
to date, provides you with Rhapsody® channels, the Playlist Central online community, and manages your downloads. Your software connects to Rhapsody® service through the internet. Because your account information and Rhapsody® content are on servers instead of any individual computer, your music is - Yamaha 500 | YMC-700/500 Owners Manual - Page 36
receiver. y This unit supports A2DP (Advanced Audio Distribution . You are recommended to read and fully understand all the instructions before starting. 1 Turn on your Bluetooth component, then set message appears, refer to "Troubleshooting". (☞ P. 50) • The Yamaha Bluetooth receiver can be paired - Yamaha 500 | YMC-700/500 Owners Manual - Page 37
Setup menu Setup menu tree You can change the settings of this unit with the Setup menu. Enter the Setup menu from the bottom right corner of the top menu. Setup Initial Setup (P. 37) Speaker Auto Speaker Setup (P. 37) Speaker Configuration Front (P. 37) Center (P. 37) Surround (P. 37) - Yamaha 500 | YMC-700/500 Owners Manual - Page 38
[Setup menu] [Sub menu] ENTER Setup menu [Setting screen] ENTER BACK or ENTER BACK Apply the change and return. Discard the change and return. (Note that some changes are applied immediately.) Initial Setup Initial Setup ☞ P. 10 Speaker menu Almost all settings are optimized by the Initial - Yamaha 500 | YMC-700/500 Owners Manual - Page 39
Does not change the phase of your subwoofer. Reverse Sets the phase of the subwoofer to reverse. ■ Speaker Level Use this feature to manually balance the speaker levels. Control range: -20 to +20 (Test Tone: Off, On) Initial setting: 0 (Test Tone: Off, SWFR: +6) Control step: 1 Choice Test - Yamaha 500 | YMC-700/500 Owners Manual - Page 40
If the connected TV is not compatible with the automatic lip sync function The Lipsync mode of this unit is set to "Manual". Adjust the delay of the sound output manually to synchronize the sound with the picture. Control range: 0 to 240 ms Control step: 1 ms Setup menu ■ Dynamic Range Selects the - Yamaha 500 | YMC-700/500 Owners Manual - Page 41
remote control. You can program the functions of other remote controls to the following buttons. • GUIDE, MENU, PREV., EXIT, u / d / j / i, ENTER, CH u / special signals or extremely long transmissions. • This unit does not support the control interfaces for game consoles. Network menu (YMC-700 only - Yamaha 500 | YMC-700/500 Owners Manual - Page 42
Off Select this setting when you want to set the network parameters manually. IP Address (IP address) Use this parameter to specify the IP to 64 characters) and password (up to 64 characters) provided by the Rhapsody® service, then select "OK". Note If Sign In fails, an error message appears. In - Yamaha 500 | YMC-700/500 Owners Manual - Page 43
the remote control code set with the "TV Remote Code" menu does not function correctly, use the learning feature to program the remote control code manually. 1 Select a button to learn. TV POWER Learn the code of the button for switching the TV's power on and off (standby) on the remote control - Yamaha 500 | YMC-700/500 Owners Manual - Page 44
2 Select "Learn" and immediately press the TV power control button on the remote control of the TV. When learning was successful, "Code learning was successful" appears. If learning was unsuccessful, "Code learning failed" appears. In this case, place the remote control near the remote control - Yamaha 500 | YMC-700/500 Owners Manual - Page 45
the standby mode increases. ■ Screen Saver Screen saver Select a type of screen saver. Choice Functions Off Logos Photos Screen saver is not activated. The Yamaha logo and neoHD logo are used for the screen saver. The selected photos (☞ P. 27) are used for the screen saver. Waiting time Use - Yamaha 500 | YMC-700/500 Owners Manual - Page 46
Troubleshooting Refer to the table below when this unit does not function properly. If the problem you are experiencing is not listed below or if the instructions below do not help, turn off this unit, disconnect the power cable, and contact the nearest authorized Yamaha dealer or service - Yamaha 500 | YMC-700/500 Owners Manual - Page 47
Troubleshooting Problem Cause Remedy Only the center speaker outputs substantial sound. When appropriate setting following the owner's manual of your component. A humming sound is Incorrect cable connections. heard. Connect the audio cables firmly. If the problem persists, the cables may be - Yamaha 500 | YMC-700/500 Owners Manual - Page 48
Troubleshooting Problem Cause Remedy FM stereo reception is noisy. There is distortion, and clear reception cannot be obtained even with a good FM antenna. The desired station cannot be tuned in with the automatic tuning method. The characteristics of FM stereo broadcasts may cause this problem - Yamaha 500 | YMC-700/500 Owners Manual - Page 49
Troubleshooting ■ USB, Network, and Rhapsody Problem of over 8 levels or a directory with more than 500 files. Place music files and directories in the FAT area server function of the router to ON. Alternately, perform manual configuration according to the current operating environment. Connect it - Yamaha 500 | YMC-700/500 Owners Manual - Page 50
. There is a problem with the signal path from your iPod to this unit. Turn off this unit and reconnect the Yamaha iPod universal dock to the DOCK terminal of this unit. Try resetting your iPod. The iPod being used is not supported by this unit. This unit supports - Yamaha 500 | YMC-700/500 Owners Manual - Page 51
Troubleshooting ■ Bluetooth Status message Searching... Pairing Completed Pairing Canceled Bluetooth error. Contact the nearest authorized Yamaha dealer or service center. ■ Auto Speaker Setup If an error or warning message appears, check the cause of the problem, then perform the Auto Speaker - Yamaha 500 | YMC-700/500 Owners Manual - Page 52
New Surround technology developed by Yamaha enables surround with fewer is a technical term that involves both a problem and a capability of maintaining audio and video master, offering a high-definition home theater experience. Supporting bitrates up to 18.0 Mbps, Dolby TrueHD can carry - Yamaha 500 | YMC-700/500 Owners Manual - Page 53
sound quality. In addition to the above types of devices, MPEG-4 AAC is also used to distribute contents on the Internet, and as such is supported by computers, media servers and many other devices. ■ PCM (Linear PCM) Linear PCM is a signal format under which an analog audio signal is digitized - Yamaha 500 | YMC-700/500 Owners Manual - Page 54
Glossary Information on audio/video jacks and cable plugs This unit has three types of audio jacks, two types of video jacks and HDMI jacks. You can choose the connection method depending on the component to be connected. ■ Audio jacks ■ Video jacks AUDIO IN 1 AUDIO IN 2 AUDIO IN 3 (Orange) - Yamaha 500 | YMC-700/500 Owners Manual - Page 55
-ray Disc, HD DVD Bitstream (High Dolby TrueHD, definition Dolby Digital Plus audio) Blu-ray Disc, HD DVD, etc. y Refer to the owner's manual of the input source component and set the component appropriately. Notes • When CPPM copy-protected DVD audio is played back, video and audio signals - Yamaha 500 | YMC-700/500 Owners Manual - Page 56
522-9105 1-800-492-6242 (toll free) 714-228-3390 Media Controller YMC-700/YMC-500 • This device complies with Part 15 of the FCC Rules. • Operation is subject to "Troubleshooting" section of this manual if interference to radio reception is suspected. We Want You Listening For A Lifetime Yamaha and - Yamaha 500 | YMC-700/500 Owners Manual - Page 57
on USB storage devices Playing games Connecting an iPod dock (☞ P. 7) Connecting a Bluetooth receiver (☞ P. 7) Making basic connections (☞ Quick Start Guide) Setting up the speakers, input sources and remote control codes (☞ P. 10) Connecting an FM antenna (☞ P. 7) Connecting a USB storage - Yamaha 500 | YMC-700/500 Owners Manual - Page 58
Quick reference Select input Control playback Controlling playback (☞ P. 20) Registering your favorite TV stations (☞ P. 42) Customizing the remote control (☞ P. 40) Controlling iPod (☞ P. 28) Controlling playback (☞ P. 20) Controlling iPod (☞ P. 28) Pairing (☞ P. 35) and playback on your - Yamaha 500 | YMC-700/500 Owners Manual - Page 59
© 2009 All rights reserved. Printed in China WR17640 - Yamaha 500 | YMC-700/500 Owners Manual - Page 60
YMC-500 Quick Start Guide Start Items used for setup in this guide Supplied items YMC-700/YMC-500 (this installation details, refer to the owner's manual of each source device item. 1 On Cable box Time W CB-528 Game Play2 No 666 Blu-ray Yamaha BD-S2900 HDMI 15 pt 15 pt 15 pt Best 14 pt - Yamaha 500 | YMC-700/500 Owners Manual - Page 61
try to eliminate the problem by using one of manual instructions Yamaha service personnel when any service is needed. The cabinet should never be opened for any reason. 6 Be sure to read the "Troubleshooting unit. Retain this guide and Owner's Manual in a safe place to promote the sale, use or other
-
 1
1 -
 2
2 -
 3
3 -
 4
4 -
 5
5 -
 6
6 -
 7
7 -
8
-
9
-
10
-
11
-
12
-
13
-
14
-
15
-
16
-
17
-
18
-
19
-
20
-
21
-
22
-
23
-
24
-
25
-
26
-
27
-
28
-
29
-
30
-
31
-
32
-
33
-
34
-
35
-
36
-
37
-
38
-
39
-
40
-
41
-
42
-
43
-
44
-
45
-
46
-
47
-
48
-
49
-
50
-
51
-
52
-
53
-
54
-
55
-
56
-
57
-
58
-
59
-
60
-
61
 |
 |
OWNER’S MANUAL
Media Controller
YMC-700
YMC-500
U