Yamaha 500 YMC-700/500 Owners Manual - Page 11
Initial Setup, Before starting the Initial Setup, Step 1: Auto Speaker Setup
 |
View all Yamaha 500 manuals
Add to My Manuals
Save this manual to your list of manuals |
Page 11 highlights
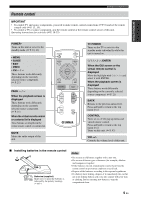
Initial Setup Once all the connections are finished, optimize this unit for your watching/listening/playing environment by using the "Initial Setup" menu. Step 1: Auto Speaker Setup Step 2: TV Remote Control Setup Step 1: Auto Speaker Setup Auto Speaker Setup (YPAO) uses unique technology to optimally calibrate the frequency response and level according to the speaker configuration, characteristics, and their distance. Step 3: Source Device Setup 1 Turn on the TV, then set the video input source selector of the TV to "HDMI 1" (etc.). Refer to the owner's manual of the TV for details. Before starting the Initial Setup Make sure of the following check points. ❏ Speakers are connected appropriately. ❏ The IR flashers are correctly connected to this unit and attached to the connected components. ❏ The connected subwoofer is turned on and the volume level is set to about half way (or slightly less). ❏ The crossover frequency control of the connected subwoofer is set to the maximum. VOLUME CROSSOVER HIGH CUT MIN MAX MIN MAX Controls of a subwoofer (example) ❏ The room is sufficiently quiet. Notes • Be advised that it is normal for loud test tones to be output during the Auto Speaker Setup procedure. • To achieve the best results, make sure the room is as quiet as possible while the Auto Speaker Setup procedure is in progress. If there is too much ambient noise, the results may not be satisfactory. 2 Turn on the connected source devices and subwoofer. 3 Press POWER to turn on this unit. The "neoHD" logo mark appears, followed by the "Initial Setup" menu. y If the Initial Setup menu does not appear, check the following check points: - Is the video input source selector of the TV set correctly? - Is the TV connected to this unit correctly? - Is the TV turned on? - Is this unit connected to the AC wall outlet? 10 En
-
 1
1 -
2
-
3
-
4
-
5
-
 6
6 -
 7
7 -
 8
8 -
 9
9 -
 10
10 -
 11
11 -
 12
12 -
 13
13 -
 14
14 -
 15
15 -
 16
16 -
17
-
18
-
19
-
20
-
21
-
22
-
23
-
24
-
25
-
26
-
27
-
28
-
29
-
30
-
31
-
32
-
33
-
34
-
35
-
36
-
37
-
38
-
39
-
40
-
41
-
42
-
43
-
44
-
45
-
46
-
47
-
48
-
49
-
50
-
51
-
52
-
53
-
54
-
55
-
56
-
57
-
58
-
59
-
60
-
61
 |
 |
