Yamaha AW4416 Tutorial - Page 14
Add the Lead Vocal, Add the Chorus, Listen, Save the Song, individual parts. Hear something you don
 |
View all Yamaha AW4416 manuals
Add to My Manuals
Save this manual to your list of manuals |
Page 14 highlights
Tutorial-Mixdown ❒ Add the Lead Vocal Ah-ha! Fooled you! You thought we were going to add the chorus parts on tracks 11, 12, and 13, and THEN add the lead vocal track, didn't you! Well we won't, and the reason is simply that the chorus parts really must be heard in relation to the lead vocal in order to set appropriate levels. Turn ON channel 14, leave the pan control set at center (the normal position for lead vocals), and reduce the fader level to about -7.3 dB. ❒ Add the Chorus Although the chorus appears before the lead vocal part during the introduction, and this might require a bit of automation at the final mix stage, adjust the chorus levels while listening to a section of the song during which the chorus parts appear with the lead vocal. Turn channels 11, 12, and 13 ON, then set their fader levels to about -10.0. Pan the same tracks to L14, R14, and CENTER, respectively. ❒ Listen! Although you've been listening to the song during the entire rough mix process, now it's time to listen to the entire song in context rather than concentrating on individual parts. Hear something you don't like? Change it. ❒ Save the Song! Now would be a good time to save your work. Press the WORK NAVIGATE [SONG] key to go to the SONG display, if necessary also press the [F1] function key to select the "Song List" page. Move the cursor to "SAVE" on the display and press [ENTER]. When the confirmation window appears move the cursor to "OK" and press [ENTER] again to actually save the song. 14 - Tutorial
-
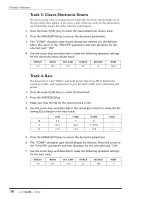
 1
1 -
2
-
3
-
4
-
5
-
6
-
7
-
8
-
 9
9 -
 10
10 -
 11
11 -
 12
12 -
 13
13 -
 14
14 -
 15
15 -
 16
16 -
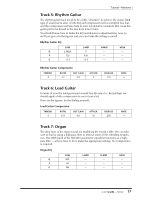 17
17 -
 18
18 -
 19
19 -
20
-
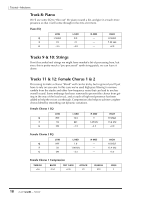
21
-
22
-
23
-
24
-
25
-
26
-
27
-
28
-
29
-
30
-
31
-
32
-
33
-
34
 |
 |