Yamaha AW4416 Tutorial - Page 15
Phase 3: Assemble the Mix Part by Part, Tracks 1 & 2: Drums
 |
View all Yamaha AW4416 manuals
Add to My Manuals
Save this manual to your list of manuals |
Page 15 highlights
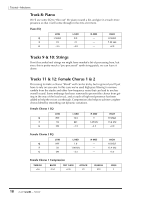
Tutorial-Mixdown Phase 3: Assemble the Mix Part by Part Now we're ready to do some serious work on the sound of the individual tracks in an attempt to make them "mesh" to create a well-balanced overall mix. INSTANT GRATIFICATION! Once again, we've provided a scene you can simply recall to automatically make all the settings included in "Phase 3", below. Press the [SCENE] key (and the [F1] function key if necessary to select the "Scene Mem" page), use the data dial to select the scene number 03 "PHASE 3 MIX", move the cursor to "RECALL", press [ENTER], select "OK" in the confirmation window and press [ENTER] again. After doing this you'll need to press the MIXER [VIEW] key to go back to the VIEW display. An alternate method of doing this - without leaving the VIEW display - is to use the panel SCENE MEMORY keys. Use the [-] and [+] keys to select the scene to be recalled (scene numbers and names appear in the upper right corner of the display), then press [RECALL], select "OK" in the confirmation window, press [ENTER] again, and you're done. Tip! As you're working on the various parts of the mix you'll constantly be turning channels on and off so you can hear things alone or in combination with certain other tracks. In order to use the SOLO function for this select "MIXDOWN SOLO" and "AFTER PAN" in the Solo Setup page (see page 96 of the operation guide for details). The reason for this is that during this phase of the mix you'll almost always want to hear the tracks with EQ, dynamics, and other effects applied. Normal solo monitoring lets you hear the tracks "dry", and that won't help you here. ❒ Tracks 1 & 2: Drums Listening to the drums in the context of the rough mix we notice that they sound a little dull. The lower end is fine, but the cymbals don't have quite the degree of presence we'd like to hear. Otherwise, the drums are fine. If we attempted to use any compression on these tracks we'd probably lose the natural dynamics that make this track work - and dilute the contrast between the acoustic drums and the electronic drums at the end of the song. A subtle touch of high-end EQ is all that is needed here: 1. Press the track 1 [SEL] key (tracks 1 and 2 are paired, so EQ settings you make to track 1 will also be applied to track 2 - convenient, eh?) 2. Press the MIXER [EQ] key (this is so you can see the detailed EQ parameters as we make the adjustment). 3. Make sure that the EQ for the selected tracks is ON (if not, move the cursor to the "EQ ON" parameter and press [ENTER] to turn it "ON"). 4. Press the [HIGH] key in the "virtual EQ" control section to the right of the display to select the HIGH EQ band. 5. Use the [G] control to increase the gain of the 10-kHz shelving EQ to +4.0 dB. No need to change [F] (frequency) and [Q] (bandwidth). 15 - Tutorial
-
 1
1 -
2
-
3
-
4
-
5
-
6
-
7
-
8
-
9
-
 10
10 -
 11
11 -
 12
12 -
 13
13 -
 14
14 -
 15
15 -
 16
16 -
 17
17 -
 18
18 -
 19
19 -
 20
20 -
21
-
22
-
23
-
24
-
25
-
26
-
27
-
28
-
29
-
30
-
31
-
32
-
33
-
34
 |
 |