Yamaha MD8 Owner's Manual - Page 76
Erasing Songs, Erasing Tracks, Use the DATA dial to select the song you want to erase.
 |
View all Yamaha MD8 manuals
Add to My Manuals
Save this manual to your list of manuals |
Page 76 highlights
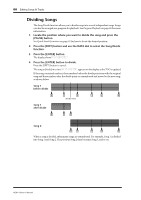
68 Editing Songs & Tracks Erasing Songs The Song Erase function allows you to erase individual songs, which may be necessary to make room for new material you wish to record. 1. Press the [EDIT] button and use the DATA dial buttons to select the Song Erase function. 2. Press the [ENTER] button. The display shows Song No.1 . 3. Use the DATA dial to select the song you want to erase. For example: Song No.3 . 4. Press the [ENTER] button. The display shows Erase EXE? 5. Press the [ENTER] button to erase. Press the [EXIT] button to cancel. The selected song is erased and subsequent songs are renumbered. Writing TOC appears on the display as the TOC is updated. The erased area becomes a recordable blank area. Erasing Tracks The Track Erase function allows you to erase individual tracks. 1. Press the [EDIT] button and use the DATA dial to select the Track Erase function. 2. Press the [ENTER] button. The display shows ********Tr . 3. Use the CURSOR shuttle to select tracks and the DATA dial to set the tracks to be erased. For example: *2**5***Tr . If you like, you can erase more than one track at a time. 4. Press the [ENTER] button. The display shows Erase EXE? 5. Press the [ENTER] button to erase. Press the [EXIT] button to cancel. You can abort the Track Erase operation at anytime by pressing the [STOP] button. Data up to the point that you pressed the [STOP] button is erased. MD8-Owner's Manual
-
 1
1 -
2
-
3
-
4
-
5
-
6
-
7
-
8
-
9
-
10
-
11
-
12
-
13
-
14
-
15
-
16
-
17
-
18
-
19
-
20
-
21
-
22
-
23
-
24
-
25
-
26
-
27
-
28
-
29
-
30
-
31
-
32
-
33
-
34
-
35
-
36
-
37
-
38
-
39
-
40
-
41
-
42
-
43
-
44
-
45
-
46
-
47
-
48
-
49
-
50
-
51
-
52
-
53
-
54
-
55
-
56
-
57
-
58
-
59
-
60
-
61
-
62
-
63
-
64
-
65
-
66
-
67
-
68
-
69
-
70
-
 71
71 -
 72
72 -
 73
73 -
 74
74 -
 75
75 -
 76
76 -
 77
77 -
 78
78 -
 79
79 -
 80
80 -
 81
81 -
82
-
83
-
84
-
85
-
86
-
87
-
88
-
89
-
90
-
91
-
92
-
93
-
94
-
95
-
96
-
97
-
98
-
99
-
100
-
101
-
102
-
103
-
104
-
105
-
106
-
107
-
108
-
109
-
110
-
111
-
112
-
113
-
114
-
115
 |
 |
