Yamaha MO8 Owner's Manual - Page 193
Supplementary information, Song Track Loop-setting example, Step Recording - examples
 |
UPC - 641018006938
View all Yamaha MO8 manuals
Add to My Manuals
Save this manual to your list of manuals |
Page 193 highlights
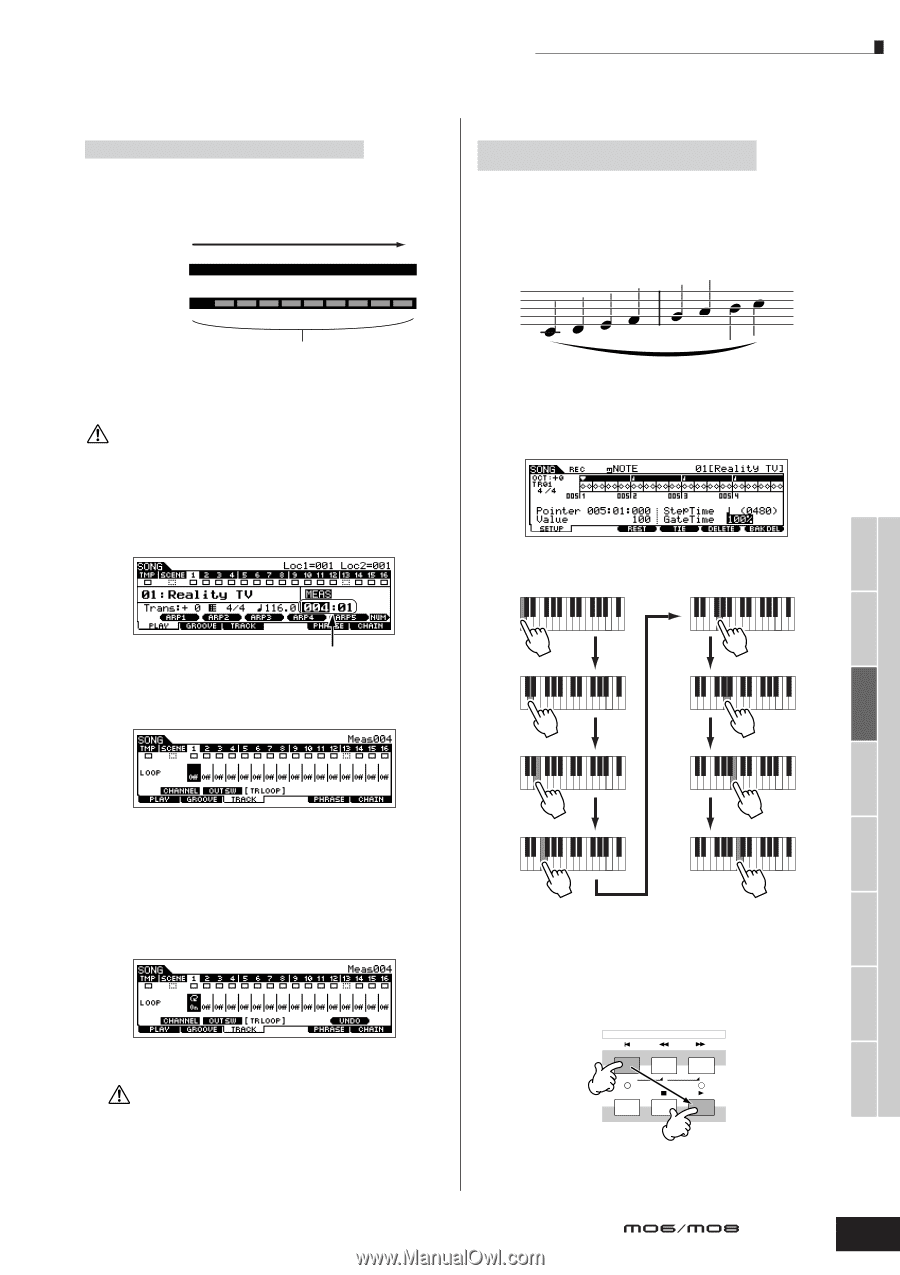
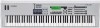
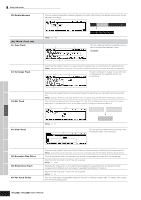
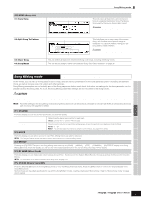
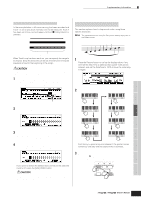
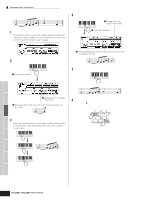
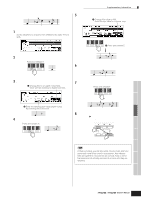
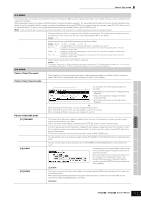
■ Supplementary information Song Track Loop-setting example [SONG] ➞ [F3] TRACK ➞ [SF3] TR LOOP (Track Loop) page 179 In the example below, a 40-measure song has been recorded and Track 1 is set to play back normally over the 40 measures. Track 2 has been set to loop, and will repeat until the [J] (Stop) button is pressed. Playback Track1 (40 measures of data) Track2 (40 measures of data) The four-measure data is repeated ten times When Track Loop has been set to on, you can specify the range to be looped. (Only the end point can be set; the start point of looped playback is fixed to the beginning of the song.) CAUTION Please note that changing the Track Loop from off to on will delete the data of the area that is not looped. 1 Press [F1] to call up the Song Play display. Here, change the change the current measure-this will be used for the last measure of the loop. Supplementary infomation Step Recording - examples [SONG] or [PATTERN] ➞ [REC] ➞ [F1] SETUP ➞ Type page 179 = step This section explains how to step-record notes, using three specific examples. n The explanations here using the Song mode display apply also to the Pattern mode. • Example 1 1 Set the parameters as illustrated below. Press the Record button to call up the display below. Here, we'll set the Step Time to (480) so that quarter notes will be entered, and set the GateTime to 100% to have the notes play in legato. 2 Play the keys C, D, E, F, G, A, B and C in order. In this example, set to "004." 2 Call up the [F3] TRACK → [SF3] TR LOOP display and move the cursor to the track to be looped. Voice mode Performance mode Song mode Pattern mode Reference Mixing Voice mode Utility mode Master mode File mode 3 Set the selected track to on by using the [INC/YES] and [DEC/NO] buttons or the data dial. (The display prompts you for confirmation.) 4 Press the [INC/YES] button. The Loop is set to on and the data after the loop end is deleted. If you want to restore the deleted data and return the selected track to off, press the [SF5] UNDO button. CAUTION The Undo function can only be used on the last Track Loop operation. If you've set other tracks to loop, the data of those previous tracks cannot be recovered. Each time you press a key and release it, the pointer moves forward by one step and the played note is recorded. 3 Move the pointer to the top (beginning) of the song and press the [F] (Play) button to hear the note data you just recorded in steps 1 and 2. SEQ TRANSPORT LOCATE 1 2 REC Owner's Manual 193
-
 1
1 -
2
-
3
-
4
-
5
-
6
-
7
-
8
-
9
-
10
-
11
-
12
-
13
-
14
-
15
-
16
-
17
-
18
-
19
-
20
-
21
-
22
-
23
-
24
-
25
-
26
-
27
-
28
-
29
-
30
-
31
-
32
-
33
-
34
-
35
-
36
-
37
-
38
-
39
-
40
-
41
-
42
-
43
-
44
-
45
-
46
-
47
-
48
-
49
-
50
-
51
-
52
-
53
-
54
-
55
-
56
-
57
-
58
-
59
-
60
-
61
-
62
-
63
-
64
-
65
-
66
-
67
-
68
-
69
-
70
-
71
-
72
-
73
-
74
-
75
-
76
-
77
-
78
-
79
-
80
-
81
-
82
-
83
-
84
-
85
-
86
-
87
-
88
-
89
-
90
-
91
-
92
-
93
-
94
-
95
-
96
-
97
-
98
-
99
-
100
-
101
-
102
-
103
-
104
-
105
-
106
-
107
-
108
-
109
-
110
-
111
-
112
-
113
-
114
-
115
-
116
-
117
-
118
-
119
-
120
-
121
-
122
-
123
-
124
-
125
-
126
-
127
-
128
-
129
-
130
-
131
-
132
-
133
-
134
-
135
-
136
-
137
-
138
-
139
-
140
-
141
-
142
-
143
-
144
-
145
-
146
-
147
-
148
-
149
-
150
-
151
-
152
-
153
-
154
-
155
-
156
-
157
-
158
-
159
-
160
-
161
-
162
-
163
-
164
-
165
-
166
-
167
-
168
-
169
-
170
-
171
-
172
-
173
-
174
-
175
-
176
-
177
-
178
-
179
-
180
-
181
-
182
-
183
-
184
-
185
-
186
-
187
-
 188
188 -
 189
189 -
 190
190 -
 191
191 -
 192
192 -
 193
193 -
 194
194 -
 195
195 -
 196
196 -
 197
197 -
 198
198 -
199
-
200
-
201
-
202
-
203
-
204
-
205
-
206
-
207
-
208
-
209
-
210
-
211
-
212
-
213
-
214
-
215
-
216
-
217
-
218
-
219
-
220
-
221
-
222
-
223
-
224
-
225
-
226
-
227
-
228
-
229
-
230
-
231
-
232
-
233
-
234
-
235
-
236
-
237
-
238
-
239
-
240
 |
 |