Yamaha MO8 Owner's Manual - Page 99
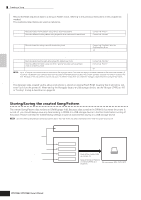
Storing the edited Song Mixing, Pattern Mixing settings to internal, memory
 |
UPC - 641018006938
View all Yamaha MO8 manuals
Add to My Manuals
Save this manual to your list of manuals |
Page 99 highlights
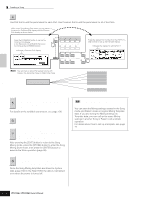
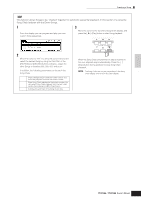
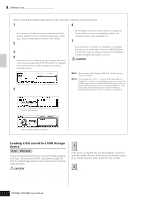
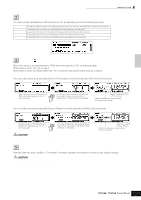
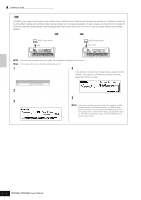
Creating a Song on the MO Quick Guide Creating a Song Storing the edited Song Mixing/ Pattern Mixing settings to internal memory [MIXING] ➞ [STORE] ■ Storing the Mixing settings as a part of a Song Press the [STORE] button to enter the Song Mixing Store mode/Pattern Mixing Store mode, then select "Store to Current Song" by using the data dial, [INC/YES] button, or [DEC/NO] button. Then, press the [ENTER] button to execute the Store operation. The Mixing settings are actually stored to the current Song/Pattern by executing the Store operation. ■ Storing the Mixing settings as a Mixing Template Press the [STORE] button to enter the Song Mixing Store mode/Pattern Mixing Store mode, then select "Store to Template" by using the data dial, [INC/YES] button, or [DEC/NO] button. Then, press the [ENTER] button to execute the Store operation. You can load the Mixing Template stored here for other Songs and Patterns. CAUTION The currently edited Mixing program will be lost when selecting a different Song/Pattern or going to a different mode without storing it. In addition, simply playing back the Song/Pattern or receiving any MIDI messages from an external MIDI instrument may change the current Mixing program. Make sure to store the Mixing program before executing these operations. Saving the Song/Pattern data to the USB storage device [FILE] ➞ [F2] SAVE CAUTION The recorded Song and Pattern data resides temporarily in DRAM (page 150). Because data contained in DRAM is lost when the power is turned off, you should always save any data residing in DRAM to a USB storage device before turning off the power. After connecting the USB storage device to this synthesizer, follow the instructions below. Press the [FILE] button to enter the File mode. 1 Then press the [F1] CONFIG button and [SF1] CURRENT button If the device is divided into several partitions, select the specific partition for use. If the device has several media (e.g., discs) inserted, select a specific Slot number. 2 Press the [F2] SAVE button to call up the Save display. 3 Set the TYPE parameter to "All." Move the cursor to the TYPE, then set the File type by using the data dial, [INC/YES] and [DEC/NO] button. You can select one of the following four file types to save the Song or Pattern data. Here, select "All" because various kinds of data have been created in order to complete a Song. All All Song All Pattern SMF All data in this synthesizer's internal User Memory is treated as a single file (extension: M7A), and can be saved to a USB storage device. All the User Song data in this synthesizer's internal User Memory (DRAM) is treated as a single file (extension: W7S), and can be saved to a USB storage device. All the User Pattern data in this synthesizer's internal User Memory (DRAM) is treated as a single file (extension: W7P), and can be saved to a USB storage device. Sequence track (1 - 16) and Tempo track data of a Song/ Pattern created in the Song/Pattern mode can be saved to a USB storage device as Standard MIDI File (format 0) data. 4 Input a file name. Move the cursor to the file name input location, then input a file name. For detailed instructions on naming, refer to page 38 in the Basic Operation section. File name input location 5 If you have created a destination folder, select the folder. For information on how to select a folder, see page 213. For information on how to create/delete a folder and change the folder name, see page 211. 6 Press the [SF1] EXEC button to actually save the file. If you are about to overwrite an existing file, the display prompts you for confirmation. Press the [INC/YES] button to execute the Save operation to overwrite the existing file, or press the [DEC/NO] button to cancel it. CAUTION While the data is being saved/loaded, make sure to follow these precautions: • Do not remove or eject the media from the USB storage device. • Do not unplug or disconnect the USB storage device. • Do not turn off the power of the instrument or the relevant devices. Owner's Manual 99
-
 1
1 -
2
-
3
-
4
-
5
-
6
-
7
-
8
-
9
-
10
-
11
-
12
-
13
-
14
-
15
-
16
-
17
-
18
-
19
-
20
-
21
-
22
-
23
-
24
-
25
-
26
-
27
-
28
-
29
-
30
-
31
-
32
-
33
-
34
-
35
-
36
-
37
-
38
-
39
-
40
-
41
-
42
-
43
-
44
-
45
-
46
-
47
-
48
-
49
-
50
-
51
-
52
-
53
-
54
-
55
-
56
-
57
-
58
-
59
-
60
-
61
-
62
-
63
-
64
-
65
-
66
-
67
-
68
-
69
-
70
-
71
-
72
-
73
-
74
-
75
-
76
-
77
-
78
-
79
-
80
-
81
-
82
-
83
-
84
-
85
-
86
-
87
-
88
-
89
-
90
-
91
-
92
-
93
-
 94
94 -
 95
95 -
 96
96 -
 97
97 -
 98
98 -
 99
99 -
 100
100 -
 101
101 -
 102
102 -
 103
103 -
 104
104 -
105
-
106
-
107
-
108
-
109
-
110
-
111
-
112
-
113
-
114
-
115
-
116
-
117
-
118
-
119
-
120
-
121
-
122
-
123
-
124
-
125
-
126
-
127
-
128
-
129
-
130
-
131
-
132
-
133
-
134
-
135
-
136
-
137
-
138
-
139
-
140
-
141
-
142
-
143
-
144
-
145
-
146
-
147
-
148
-
149
-
150
-
151
-
152
-
153
-
154
-
155
-
156
-
157
-
158
-
159
-
160
-
161
-
162
-
163
-
164
-
165
-
166
-
167
-
168
-
169
-
170
-
171
-
172
-
173
-
174
-
175
-
176
-
177
-
178
-
179
-
180
-
181
-
182
-
183
-
184
-
185
-
186
-
187
-
188
-
189
-
190
-
191
-
192
-
193
-
194
-
195
-
196
-
197
-
198
-
199
-
200
-
201
-
202
-
203
-
204
-
205
-
206
-
207
-
208
-
209
-
210
-
211
-
212
-
213
-
214
-
215
-
216
-
217
-
218
-
219
-
220
-
221
-
222
-
223
-
224
-
225
-
226
-
227
-
228
-
229
-
230
-
231
-
232
-
233
-
234
-
235
-
236
-
237
-
238
-
239
-
240
 |
 |
