Yamaha MO8 Owner's Manual - Page 64
The Compare Function, Edit Recall, The Effects use DSP Digital Signal Processing to alter
 |
UPC - 641018006938
View all Yamaha MO8 manuals
Add to My Manuals
Save this manual to your list of manuals |
Page 64 highlights
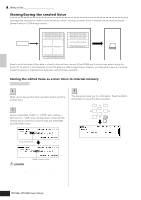
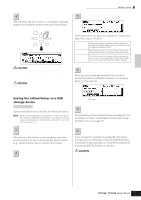
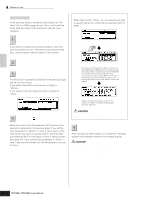
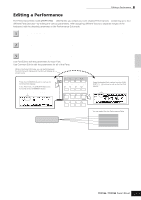
Quick Guide Editing a Program Editing a Performance Select the menu you wish to edit by pressing 4 the [F1] - [F6] buttons and [SF1] - [SF5] buttons, then edit the parameters in each display. The following briefly describes the main Performance parameters. ● Parameters for the Voice assigned to each Part Page 174 Part selection ➞ [F1] VOICE The Voice assigned to each part and its note range can be set also in the Performance Play mode (page 171). In addition to the parameters available in the Performance Play mode, the Performance Edit mode also lets you set Portamento (pitch glide) and Arpeggio Switch (which determines whether the Arpeggio plays a specific Part or not). ● Basic parameters for creating the sound Page 176 Part selection ➞ [F4] TONE Edit the parameters for each Part's Voice such as Pitch, Filter, and Amplitude. The parameters offset the same parameters in the Voice Element Edit mode. ● Effect related parameters [COMMON] ➞ [F6] EFFECT Pages 143, 172 [COMMON] ➞ [F2] OUT/MEF ➞ [SF3] MEF (Master Effect) The Effects use DSP (Digital Signal Processing) to alter and enhance the sound of a Performance. The Common Edit display lets you edit the Effect-related parameters. ● Master EQ related parameters Page 172 [COMMON] ➞ [F2] OUT/MEF ➞ [SF3] MEQ (Master Equalizer) These parameters let you use the five-band Master EQ to process the overall sound of the Performance. Master EQ also features separate EQ shape parameters for the Low and High bands, as well as the Frequency, Gain and Q controls for each band. ● Controller related parameters [COMMON] ➞ [F4] CTL ASN (Controller Assign) Page 70 For each Performance, you can assign the Control Change Number to built-in controllers such as Knob 3 and 4 (ASSIGN1 and 2) and optionally connected controllers, such as Footswitch and Foot Controller. n Functions assigned to Controllers depend on the settings of each Part's Voice edited in the Voice Edit mode. ● Arpeggio related parameters [COMMON] ➞ [F3] ARP (Arpeggio) Pages 145, 173 For each Performance, you can set the Arpeggio related parameters, such as Arpeggio type and playback tempo. These settings can be edited in the Common Edit display. 5 Repeat steps 3 - 4 as desired. 6 Name the edited Performance. Enter a name for the Voice from the NAME display ([COMMON] → [F1] GENERAL → [SF1] NAME). For detailed instructions on naming a Voice, refer to page 38. Enter the desired Performance name. 7 Store the settings as a User Performance. The edited Performance can be stored in the Performance Store mode. For details, see page 66. TIP The Compare Function You can compare the sound of the original (unedited) Performance with the edited Performance. For details, see page 36. TIP Edit Recall If you are editing a Voice and select a different Performance without storing the one you were editing, all the edits you've made will be erased. If this happens, you can use Edit Recall to restore the Performance with your latest edits intact. 1 Press the [JOB] button in the Performance mode to enter the Performance Job mode. 2 Press the [F2] RECALL button to call up the Recall display. 3 Press the [ENTER] button. (The display prompts you for confirmation.) If you wish to cancel the operation, press the [DEC/NO] button. 4 Press the [INC/YES] button to execute Edit Recall to restore the Performance. 64 Owner's Manual
-
 1
1 -
2
-
3
-
4
-
5
-
6
-
7
-
8
-
9
-
10
-
11
-
12
-
13
-
14
-
15
-
16
-
17
-
18
-
19
-
20
-
21
-
22
-
23
-
24
-
25
-
26
-
27
-
28
-
29
-
30
-
31
-
32
-
33
-
34
-
35
-
36
-
37
-
38
-
39
-
40
-
41
-
42
-
43
-
44
-
45
-
46
-
47
-
48
-
49
-
50
-
51
-
52
-
53
-
54
-
55
-
56
-
57
-
58
-
 59
59 -
 60
60 -
 61
61 -
 62
62 -
 63
63 -
 64
64 -
 65
65 -
 66
66 -
 67
67 -
 68
68 -
 69
69 -
70
-
71
-
72
-
73
-
74
-
75
-
76
-
77
-
78
-
79
-
80
-
81
-
82
-
83
-
84
-
85
-
86
-
87
-
88
-
89
-
90
-
91
-
92
-
93
-
94
-
95
-
96
-
97
-
98
-
99
-
100
-
101
-
102
-
103
-
104
-
105
-
106
-
107
-
108
-
109
-
110
-
111
-
112
-
113
-
114
-
115
-
116
-
117
-
118
-
119
-
120
-
121
-
122
-
123
-
124
-
125
-
126
-
127
-
128
-
129
-
130
-
131
-
132
-
133
-
134
-
135
-
136
-
137
-
138
-
139
-
140
-
141
-
142
-
143
-
144
-
145
-
146
-
147
-
148
-
149
-
150
-
151
-
152
-
153
-
154
-
155
-
156
-
157
-
158
-
159
-
160
-
161
-
162
-
163
-
164
-
165
-
166
-
167
-
168
-
169
-
170
-
171
-
172
-
173
-
174
-
175
-
176
-
177
-
178
-
179
-
180
-
181
-
182
-
183
-
184
-
185
-
186
-
187
-
188
-
189
-
190
-
191
-
192
-
193
-
194
-
195
-
196
-
197
-
198
-
199
-
200
-
201
-
202
-
203
-
204
-
205
-
206
-
207
-
208
-
209
-
210
-
211
-
212
-
213
-
214
-
215
-
216
-
217
-
218
-
219
-
220
-
221
-
222
-
223
-
224
-
225
-
226
-
227
-
228
-
229
-
230
-
231
-
232
-
233
-
234
-
235
-
236
-
237
-
238
-
239
-
240
 |
 |
