Yamaha MO8 Owner's Manual - Page 52
Control slider, Changing the volume
 |
UPC - 641018006938
View all Yamaha MO8 manuals
Add to My Manuals
Save this manual to your list of manuals |
Page 52 highlights
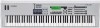
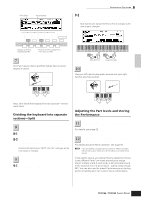
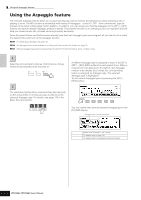
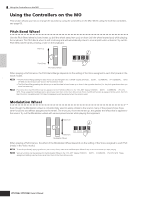
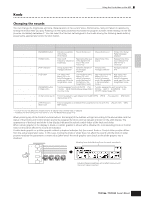
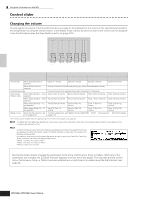
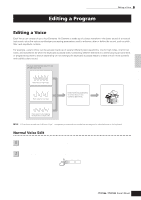
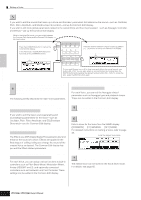
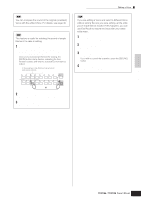
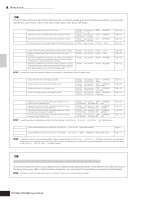
Using the Controllers on the MO Control slider Changing the volume You can adjust the volume of the Voice/Performance you play on the keyboard, or the volume of the specified part (track) of the Song/Pattern by using the Control sliders. In the Master mode, various functions as well as the volume can be assigned to the Control sliders when the Zone Switch is set to on (page 215). Quick Guide Playing the MO MASTER VOLUME ZONE 1 ZONE 2 ZONE 3 ZONE 4 Function sets assigned to the Control slider Mode Control slider 1 Functions controlled by each slider Control slider 2 Control slider 3 Control slider 4 Voice mode When a Normal Voice is selected When a Drum Voice is selected Performance mode Song mode/ Pattern mode When tracks (Parts) 1 - 4 are selected When tracks (Parts) 5 - 8 are selected When tracks (Parts) 9 - 12 are selected When tracks (Parts) 13 - 16 are selected Master mode When the Zone Switch is set to on (page 215) Element 1 Volume Element 2 Volume Element 3 Volume Element 4 Volume Volume of the entire Voice sound (moving any slider produces same volume) Controls Volume of the assigned Parts (see "Precautions" note below). Track 1 (Part 1) Volume Track 2 (Part 2) Volume Track 3 (Part 3) Volume Track 4 (Part 4) Volume Track 5 (Part 5) Volume Track 6 (Part 6) Volume Track 7 (Part 7) Volume Track 8 (Part 8) Volume Track 9 (Part 9) Volume Track 10 (Part 10) Volume Track 11 (Part 11) Volume Track 12 (Part 12) Volume Track 13 (Part 13) Volume Track 14 (Part 14) Volume Track 15 (Part 15) Volume Track 16 (Part 16) Volume Function assigned for each Master from the [MASTER] → [EDIT] → Zone selection → [F5] KN/CS display (page 217) * An Element is the fundamental tone generating unit of a Voice. For details, see page 53. n The [MASTER VOLUME] slider adjusts the overall output level of the instrument, while the Control sliders adjust the MIDI Volume setting of the corresponding Element or Part. n Precautions-Using sliders in the Performance mode In the Performance mode, the Control sliders are assigned according to the specific Parts that are assigned in each Performance. Keep in mind that the slider number may not correspond to the same numbered Part. For example, when using a Performance (as shown at right) in which two Parts (Part 1 and Part 4) are combined, the sliders are assigned as follows: • Slider 1 controls the volume of Part 1. • Slider 2 controls the volume of Part 4. • Sliders 3 and 4 are not used. Edit Indicator Moving the sliders directly changes the parameters of the Voice, Performance, Song, or Pattern. When any of the parameters are changed, the [E] (Edit) Indicator appears in the top left of the display. This indicates that the current Voice, Performance, Song, or Pattern has been modified but not yet stored. For details about the Edit indicator, see page 36. 52 Owner's Manual
-
 1
1 -
2
-
3
-
4
-
5
-
6
-
7
-
8
-
9
-
10
-
11
-
12
-
13
-
14
-
15
-
16
-
17
-
18
-
19
-
20
-
21
-
22
-
23
-
24
-
25
-
26
-
27
-
28
-
29
-
30
-
31
-
32
-
33
-
34
-
35
-
36
-
37
-
38
-
39
-
40
-
41
-
42
-
43
-
44
-
45
-
46
-
 47
47 -
 48
48 -
 49
49 -
 50
50 -
 51
51 -
 52
52 -
 53
53 -
 54
54 -
 55
55 -
 56
56 -
 57
57 -
58
-
59
-
60
-
61
-
62
-
63
-
64
-
65
-
66
-
67
-
68
-
69
-
70
-
71
-
72
-
73
-
74
-
75
-
76
-
77
-
78
-
79
-
80
-
81
-
82
-
83
-
84
-
85
-
86
-
87
-
88
-
89
-
90
-
91
-
92
-
93
-
94
-
95
-
96
-
97
-
98
-
99
-
100
-
101
-
102
-
103
-
104
-
105
-
106
-
107
-
108
-
109
-
110
-
111
-
112
-
113
-
114
-
115
-
116
-
117
-
118
-
119
-
120
-
121
-
122
-
123
-
124
-
125
-
126
-
127
-
128
-
129
-
130
-
131
-
132
-
133
-
134
-
135
-
136
-
137
-
138
-
139
-
140
-
141
-
142
-
143
-
144
-
145
-
146
-
147
-
148
-
149
-
150
-
151
-
152
-
153
-
154
-
155
-
156
-
157
-
158
-
159
-
160
-
161
-
162
-
163
-
164
-
165
-
166
-
167
-
168
-
169
-
170
-
171
-
172
-
173
-
174
-
175
-
176
-
177
-
178
-
179
-
180
-
181
-
182
-
183
-
184
-
185
-
186
-
187
-
188
-
189
-
190
-
191
-
192
-
193
-
194
-
195
-
196
-
197
-
198
-
199
-
200
-
201
-
202
-
203
-
204
-
205
-
206
-
207
-
208
-
209
-
210
-
211
-
212
-
213
-
214
-
215
-
216
-
217
-
218
-
219
-
220
-
221
-
222
-
223
-
224
-
225
-
226
-
227
-
228
-
229
-
230
-
231
-
232
-
233
-
234
-
235
-
236
-
237
-
238
-
239
-
240
 |
 |