eMachines M5116 eMachines 5000 Series Notebook User's Guide - Page 62
CD and the Microsoft Windows Startup Menu will be, to restart your notebook.
 |
View all eMachines M5116 manuals
Add to My Manuals
Save this manual to your list of manuals |
Page 62 highlights
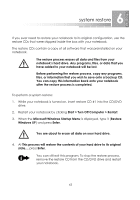
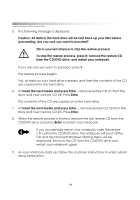
getting started 5. The following message is displayed: Caution: All data in the hard drive will be lost! Back up your files before proceeding. Are you sure you want to proceed? This is your last chance to stop the restore process! To stop the restore process, press N, remove the restore CD from the CD/DVD drive, and restart your notebook. If you are sure you want to proceed, press Y. The restore process begins. First, all data on your hard drive is erased, and then the contents of the CD are copied onto the hard drive. 6. At Insert the next media and press Enter... remove restore CD #1 from the drive and insert restore CD #2. Press Enter. The contents of the CD are copied on to the hard drive. 7. At Insert the next media and press Enter..., remove restore CD #2 from the drive and insert restore CD #3. Press Enter. 8. When the restore process is finished, remove the last restore CD from the CD/DVD drive and press Enter to restart your notebook. If you accidentally restart your notebook while the restore CD is still in the CD/DVD drive, the notebook will boot off the CD and the Microsoft Windows Startup Menu will be reopened. Remove the CD from the CD/DVD drive and restart your notebook again. 9. As your notebook starts up, follow the onscreen instructions to enter system setup information. 64
-
 1
1 -
2
-
3
-
4
-
5
-
6
-
7
-
8
-
9
-
10
-
11
-
12
-
13
-
14
-
15
-
16
-
17
-
18
-
19
-
20
-
21
-
22
-
23
-
24
-
25
-
26
-
27
-
28
-
29
-
30
-
31
-
32
-
33
-
34
-
35
-
36
-
37
-
38
-
39
-
40
-
41
-
42
-
43
-
44
-
45
-
46
-
47
-
48
-
49
-
50
-
51
-
52
-
53
-
54
-
55
-
56
-
 57
57 -
 58
58 -
 59
59 -
 60
60 -
 61
61 -
 62
62 -
 63
63 -
 64
64 -
 65
65 -
 66
66 -
 67
67 -
68
-
69
-
70
-
71
-
72
-
73
-
74
-
75
-
76
-
77
-
78
 |
 |