2008 BMW 1 Series Owner's Manual - Page 77
2008 BMW 1 Series Manual

Page 77 highlights
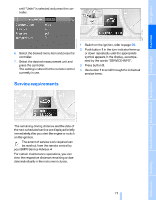
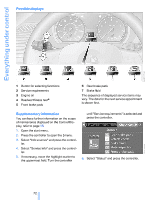
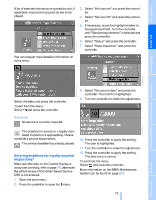
7. Turn the controller until "Set time" is selected and press the controller. 8. Turn the controller to set the hours and press the controller. 9. Turn the controller to set the minutes and press the controller. The system accepts the new time. 2. Press button 2. 3. Use button 1 to set the day of the month. 4. Press button 2 to confirm the entry. 5. Set the month and the year in the same way. 6. Press button 2. The system stores the new date. You will hear three tones just before each full hour. Select "Hour memo" and press the controller. The hour signal is activated. Via iDrive iDrive, for operating principle refer to page 16. 1. Open the start menu. 2. Press the controller to open the menu. 3. Turn the controller until "Settings" is selected and press the controller. 4. Select "Time / Date" and press the controller. 5. Select "Date" and press the controller. Setting the 12h/24h format 1. Select "Time format" and press the controller. 2. Select the desired format and press the controller. Date The settings are stored for the remote control currently in use, refer also to Personal Profile on page 28. Setting the date In the instrument cluster To set the DD.MM or MM/DD date format, refer to Setting the date format. 6. Select "Set date" and press the controller. The first setting of the date display is now highlighted, in this case the day. 7. Turn the controller to make the adjustment. Reference Mobility 75 Online Edition for Part no. 01 41 0 014 691 - © 11/07 BMW AG Communications Entertainment Navigation Switching on the hour signal* Driving tips Adjusting settings 1. Push button 1 in the turn indicator lever up or down repeatedly until the appropriate symbol appears in the display, accompanied by the date and the word "SET". Controls At a glance
-
 1
1 -
2
-
3
-
4
-
5
-
6
-
7
-
8
-
9
-
10
-
11
-
12
-
13
-
14
-
15
-
16
-
17
-
18
-
19
-
20
-
21
-
22
-
23
-
24
-
25
-
26
-
27
-
28
-
29
-
30
-
31
-
32
-
33
-
34
-
35
-
36
-
37
-
38
-
39
-
40
-
41
-
42
-
43
-
44
-
45
-
46
-
47
-
48
-
49
-
50
-
51
-
52
-
53
-
54
-
55
-
56
-
57
-
58
-
59
-
60
-
61
-
62
-
63
-
64
-
65
-
66
-
67
-
68
-
69
-
70
-
71
-
 72
72 -
 73
73 -
 74
74 -
 75
75 -
 76
76 -
 77
77 -
 78
78 -
 79
79 -
 80
80 -
 81
81 -
 82
82 -
83
-
84
-
85
-
86
-
87
-
88
-
89
-
90
-
91
-
92
-
93
-
94
-
95
-
96
-
97
-
98
-
99
-
100
-
101
-
102
-
103
-
104
-
105
-
106
-
107
-
108
-
109
-
110
-
111
-
112
-
113
-
114
-
115
-
116
-
117
-
118
-
119
-
120
-
121
-
122
-
123
-
124
-
125
-
126
-
127
-
128
-
129
-
130
-
131
-
132
-
133
-
134
-
135
-
136
-
137
-
138
-
139
-
140
-
141
-
142
-
143
-
144
-
145
-
146
-
147
-
148
-
149
-
150
-
151
-
152
-
153
-
154
-
155
-
156
-
157
-
158
-
159
-
160
-
161
-
162
-
163
-
164
-
165
-
166
-
167
-
168
-
169
-
170
-
171
-
172
-
173
-
174
-
175
-
176
-
177
-
178
-
179
-
180
-
181
-
182
-
183
-
184
-
185
-
186
-
187
-
188
-
189
-
190
-
191
-
192
-
193
-
194
-
195
-
196
-
197
-
198
-
199
-
200
-
201
-
202
-
203
-
204
-
205
-
206
-
207
-
208
-
209
-
210
-
211
-
212
-
213
-
214
-
215
-
216
-
217
-
218
-
219
-
220
-
221
-
222
-
223
-
224
-
225
-
226
-
227
-
228
-
229
-
230
-
231
-
232
-
233
-
234
-
235
-
236
-
237
-
238
-
239
-
240
-
241
-
242
-
243
-
244
-
245
-
246
-
247
-
248
-
249
-
250
-
251
-
252
-
253
-
254
-
255
-
256
-
257
-
258
-
259
-
260
 |
 |
