1996 Chevrolet Astro Owner's Manual - Page 131
1996 Chevrolet Astro Manual
Page 131 highlights
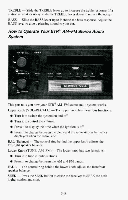
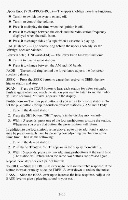
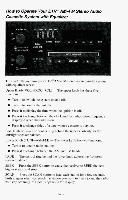
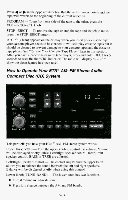
Pushbuttons -The four pushbuttonslet you return to favorite stations. To (7 set the pushbuttons for up to fourteen favorite stations AM and 7 FM): 1. Tune in the desired station. 2. Push the SET button. "SET" appears in the display for about5 seconds. 3. Within the 5 seconds, push one of the four pushbuttons.Whenever you press that button, the preset station will return. In addition to the four stations set as above, up to three additional stations may be preset on each band by pressing two adjoining pushbuttonsat the same time.Then do the following: 1. Tune in the desired station. 2. Press the SET button. 3. Within 5 seconds, press any two adjoining pushbuttonsat the same time. (The station will return when the same twobuttons are pressed again.) To Adjust the Tone -Use the levers in the upper middle left corner to set the bass, midrange,and treble until you get the sound you want. The 60 and 250 1 levers adjust the bass, K is midrange, and 3.5K and 1OK control the treble. We suggest you start with the center lever (1K) in the midpoint position, then move the others upuntil you get the amount of bass and treble you like. Am-St Button - Push the Am-St button when you tune to an AM station that broadcasts in stereo. Your STEREO lightwill come on when you're receiving AM stereo. If you push Am-St and there is no more noise, it means the station isweak. You'll hear the station better if you don't use Am-St. Just push the Am-St button again to delete stereo. To Play A Cassette Your tape playeris built to work best with tapes that 30 to 45 minutes longon are each side. Tapes longer than thatso thin they maynot work well in this player. are Once the tape is playing, usethe upper and lower knobs for volume, balance and fade justas you do for the radio. A lighted arrow shows which direction the tape is being played. CrO2 - The CrO2 button lets you set the system for the type of cassette being used. If you are using chrome or metal tapes, push the Cr02 button in. FWD - To rapidly advance the tape, press 4 or in the direction that the amber arrow points and the tape will rapidly go forward until you press the STOP-EJECT button lightly. REV - To rapidly reverse the tape, press 4 or b in the opposite direction that the amber arrow points and the tape will rapidly reverse until you press the STOP-EJECT button lightly. APS - Press the APS button to the recessed position. Press 4 or b in the direction that the amber arrow points to go to the beginning of the next selection. 3-13
-
 1
1 -
2
-
3
-
4
-
5
-
6
-
7
-
8
-
9
-
10
-
11
-
12
-
13
-
14
-
15
-
16
-
17
-
18
-
19
-
20
-
21
-
22
-
23
-
24
-
25
-
26
-
27
-
28
-
29
-
30
-
31
-
32
-
33
-
34
-
35
-
36
-
37
-
38
-
39
-
40
-
41
-
42
-
43
-
44
-
45
-
46
-
47
-
48
-
49
-
50
-
51
-
52
-
53
-
54
-
55
-
56
-
57
-
58
-
59
-
60
-
61
-
62
-
63
-
64
-
65
-
66
-
67
-
68
-
69
-
70
-
71
-
72
-
73
-
74
-
75
-
76
-
77
-
78
-
79
-
80
-
81
-
82
-
83
-
84
-
85
-
86
-
87
-
88
-
89
-
90
-
91
-
92
-
93
-
94
-
95
-
96
-
97
-
98
-
99
-
100
-
101
-
102
-
103
-
104
-
105
-
106
-
107
-
108
-
109
-
110
-
111
-
112
-
113
-
114
-
115
-
116
-
117
-
118
-
119
-
120
-
121
-
122
-
123
-
124
-
125
-
 126
126 -
 127
127 -
 128
128 -
 129
129 -
 130
130 -
 131
131 -
 132
132 -
 133
133 -
 134
134 -
 135
135 -
 136
136 -
137
-
138
-
139
-
140
-
141
-
142
-
143
-
144
-
145
-
146
-
147
-
148
-
149
-
150
-
151
-
152
-
153
-
154
-
155
-
156
-
157
-
158
-
159
-
160
-
161
-
162
-
163
-
164
-
165
-
166
-
167
-
168
-
169
-
170
-
171
-
172
-
173
-
174
-
175
-
176
-
177
-
178
-
179
-
180
-
181
-
182
-
183
-
184
-
185
-
186
-
187
-
188
-
189
-
190
-
191
-
192
-
193
-
194
-
195
-
196
-
197
-
198
-
199
-
200
-
201
-
202
-
203
-
204
-
205
-
206
-
207
-
208
-
209
-
210
-
211
-
212
-
213
-
214
-
215
-
216
-
217
-
218
-
219
-
220
-
221
-
222
-
223
-
224
-
225
-
226
-
227
-
228
-
229
-
230
-
231
-
232
-
233
-
234
-
235
-
236
-
237
-
238
-
239
-
240
-
241
-
242
-
243
-
244
-
245
-
246
-
247
-
248
-
249
-
250
-
251
-
252
-
253
-
254
-
255
-
256
-
257
-
258
-
259
-
260
-
261
-
262
-
263
-
264
-
265
-
266
-
267
-
268
-
269
-
270
-
271
-
272
-
273
-
274
-
275
-
276
-
277
-
278
-
279
-
280
-
281
-
282
-
283
-
284
-
285
-
286
-
287
-
288
-
289
-
290
-
291
-
292
-
293
-
294
-
295
-
296
-
297
-
298
-
299
-
300
-
301
-
302
-
303
-
304
-
305
-
306
-
307
-
308
-
309
-
310
-
311
-
312
-
313
-
314
-
315
-
316
-
317
-
318
-
319
-
320
-
321
-
322
-
323
-
324
-
325
-
326
-
327
-
328
-
329
-
330
-
331
-
332
-
333
-
334
-
335
-
336
-
337
-
338
-
339
-
340
-
341
-
342
 |
 |
