2000 Ford Windstar Owner Guide 1st Printing - Page 116
2000 Ford Windstar Manual
Page 116 highlights
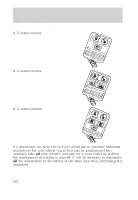
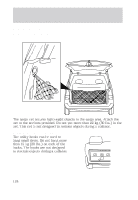
Controls and features Procedure to program spare SecuriLockி keys to your vehicle New coded keys must have the correct mechanical key cut for your vehicle. Conventional (non-coded) keys cannot be programmed to your vehicle. You will need to have two previously programmed coded keys and the new unprogrammed SecuriLock key readily accessible for timely implementation of each step in the procedure. Please read and understand the entire procedure before you begin. 1. Insert the first previously programmed coded key into the ignition and turn the ignition from OFF to ON (maintain ignition in ON for at least one second). 2. Turn ignition to OFF and remove the first coded key from the ignition. 3. Within five seconds of turning the ignition to OFF, insert the second previously programmed coded key into the ignition and turn the ignition from OFF to ON (maintain ignition in ON for at least one second but no more than five seconds). 4. Turn the ignition to OFF and remove the second coded key from the ignition. 5. Within 10 seconds of turning the ignition to OFF, insert the new unprogrammed key (new key/valet key) into the ignition and turn the ignition from OFF to ON (maintain ignition in ON for at least one second). This step will program your new key to a coded key. 6. To program additional new unprogrammed key(s), repeat this procedure from step 1. If the programming procedure was successful, the new coded key(s) will start the vehicle's engine. The theft indicator (located on the instrument panel) will light for three seconds and then go out. If the programming procedure was not successful, the new coded key(s) will not operate the vehicle's engine. The theft indicator will flash on and off. Wait at least one minute and then repeat the procedure from step 1. If failure repeats, bring your vehicle to your dealership to have the new spare key(s) programmed. AUXILIARY POWER POINT The power point is an additional power source for electrical accessories. An additional power point is located in the rear cargo area. 116
-
 1
1 -
2
-
3
-
4
-
5
-
6
-
7
-
8
-
9
-
10
-
11
-
12
-
13
-
14
-
15
-
16
-
17
-
18
-
19
-
20
-
21
-
22
-
23
-
24
-
25
-
26
-
27
-
28
-
29
-
30
-
31
-
32
-
33
-
34
-
35
-
36
-
37
-
38
-
39
-
40
-
41
-
42
-
43
-
44
-
45
-
46
-
47
-
48
-
49
-
50
-
51
-
52
-
53
-
54
-
55
-
56
-
57
-
58
-
59
-
60
-
61
-
62
-
63
-
64
-
65
-
66
-
67
-
68
-
69
-
70
-
71
-
72
-
73
-
74
-
75
-
76
-
77
-
78
-
79
-
80
-
81
-
82
-
83
-
84
-
85
-
86
-
87
-
88
-
89
-
90
-
91
-
92
-
93
-
94
-
95
-
96
-
97
-
98
-
99
-
100
-
101
-
102
-
103
-
104
-
105
-
106
-
107
-
108
-
109
-
110
-
 111
111 -
 112
112 -
 113
113 -
 114
114 -
 115
115 -
 116
116 -
 117
117 -
 118
118 -
 119
119 -
 120
120 -
 121
121 -
122
-
123
-
124
-
125
-
126
-
127
-
128
-
129
-
130
-
131
-
132
-
133
-
134
-
135
-
136
-
137
-
138
-
139
-
140
-
141
-
142
-
143
-
144
-
145
-
146
-
147
-
148
-
149
-
150
-
151
-
152
-
153
-
154
-
155
-
156
-
157
-
158
-
159
-
160
-
161
-
162
-
163
-
164
-
165
-
166
-
167
-
168
-
169
-
170
-
171
-
172
-
173
-
174
-
175
-
176
-
177
-
178
-
179
-
180
-
181
-
182
-
183
-
184
-
185
-
186
-
187
-
188
-
189
-
190
-
191
-
192
-
193
-
194
-
195
-
196
-
197
-
198
-
199
-
200
-
201
-
202
-
203
-
204
-
205
-
206
-
207
-
208
-
209
-
210
-
211
-
212
-
213
-
214
-
215
-
216
-
217
-
218
-
219
-
220
-
221
-
222
-
223
-
224
-
225
-
226
-
227
-
228
-
229
-
230
-
231
-
232
-
233
-
234
-
235
-
236
-
237
-
238
-
239
-
240
-
241
-
242
-
243
-
244
-
245
-
246
-
247
-
248
-
249
-
250
-
251
-
252
-
253
-
254
-
255
-
256
-
257
-
258
-
259
-
260
-
261
-
262
-
263
-
264
-
265
-
266
-
267
-
268
-
269
-
270
-
271
-
272
-
273
-
274
-
275
-
276
-
277
-
278
-
279
-
280
 |
 |