2007 Suzuki Aerio Owner's Manual - Page 169
2007 Suzuki Aerio Manual
Page 169 highlights
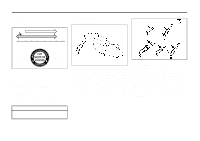
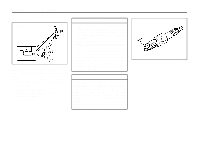
INSPECTION AND MAINTENANCE Automatic Transaxle Fluid Specified Fluid Use an automatic transaxle fluid equivalent to DEXRON®-III. 5) With your foot on the brake pedal, move the gearshift lever through each gear, pausing for about three seconds in each range. Then move it back to the "P" (Park) position. (3) (3) (1) (2) Fluid Level Check CAUTION Driving with too much or too little fluid can damage the transaxle. You must check the fluid level with the automatic transaxle fluid at normal operating temperature. To check the fluid level: 1) To warm up the transaxle fluid, drive the vehicle or idle the engine until the temperature gauge indicates normal operating temperature. 2) Then drive for ten more minutes. NOTE: Do not check the fluid level if you have just driven the vehicle for a long time at high speed, or if you have driven in city traffic in hot weather. Wait until the fluid cools down (about 30 minutes), or the fluid level indication will not be correct. 3) Park your vehicle on level ground. 4) Apply the parking brake and then start the engine in "P" (Park). Let it idle for two minutes and keep it running during the fluid level check. WARNING Be sure to depress the brake pedal when moving the gearshift lever, or the vehicle can move suddenly. (1) (2) 54G317 (1) FULL (2) LOW (3) The lowest point = Fluid level 6) The handle of the A/T fluid dipstick is colored red for easy identification. Remove the dipstick, clean it and push it back in until the cap seats. Pull out the dipstick and read the fluid level. The fluid level should be between the two marks in the "HOT" range on the dipstick. 7) Add just enough specified fluid through the dipstick hole to fill the transaxle to the proper level. It takes only 0.4 liters (0.85 US pt) for 4-speed automatic transaxle to raise the level from "LOW" to "FULL". 75F086 9-16
-
 1
1 -
2
-
3
-
4
-
5
-
6
-
7
-
8
-
9
-
10
-
11
-
12
-
13
-
14
-
15
-
16
-
17
-
18
-
19
-
20
-
21
-
22
-
23
-
24
-
25
-
26
-
27
-
28
-
29
-
30
-
31
-
32
-
33
-
34
-
35
-
36
-
37
-
38
-
39
-
40
-
41
-
42
-
43
-
44
-
45
-
46
-
47
-
48
-
49
-
50
-
51
-
52
-
53
-
54
-
55
-
56
-
57
-
58
-
59
-
60
-
61
-
62
-
63
-
64
-
65
-
66
-
67
-
68
-
69
-
70
-
71
-
72
-
73
-
74
-
75
-
76
-
77
-
78
-
79
-
80
-
81
-
82
-
83
-
84
-
85
-
86
-
87
-
88
-
89
-
90
-
91
-
92
-
93
-
94
-
95
-
96
-
97
-
98
-
99
-
100
-
101
-
102
-
103
-
104
-
105
-
106
-
107
-
108
-
109
-
110
-
111
-
112
-
113
-
114
-
115
-
116
-
117
-
118
-
119
-
120
-
121
-
122
-
123
-
124
-
125
-
126
-
127
-
128
-
129
-
130
-
131
-
132
-
133
-
134
-
135
-
136
-
137
-
138
-
139
-
140
-
141
-
142
-
143
-
144
-
145
-
146
-
147
-
148
-
149
-
150
-
151
-
152
-
153
-
154
-
155
-
156
-
157
-
158
-
159
-
160
-
161
-
162
-
163
-
 164
164 -
 165
165 -
 166
166 -
 167
167 -
 168
168 -
 169
169 -
 170
170 -
 171
171 -
 172
172 -
 173
173 -
 174
174 -
175
-
176
-
177
-
178
-
179
-
180
-
181
-
182
-
183
-
184
-
185
-
186
-
187
-
188
-
189
-
190
-
191
-
192
-
193
-
194
-
195
-
196
-
197
-
198
-
199
-
200
-
201
-
202
-
203
-
204
-
205
-
206
-
207
-
208
-
209
-
210
-
211
-
212
-
213
-
214
-
215
-
216
-
217
-
218
-
219
-
220
-
221
-
222
-
223
-
224
-
225
-
226
-
227
-
228
-
229
-
230
-
231
-
232
-
233
 |
 |
