3Com 3812 Getting Started Guide - Page 21
Rack-mounting - air
 |
UPC - 662705470191
View all 3Com 3812 manuals
Add to My Manuals
Save this manual to your list of manuals |
Page 21 highlights
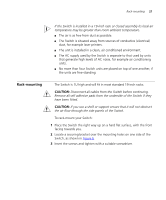
Rack-mounting 21 If the Switch is installed in a 19-inch rack or closed assembly its local air temperature may be greater than room ambient temperature. ■ The air is as free from dust as possible. ■ The Switch is situated away from sources of conductive (electrical) dust, for example laser printers. ■ The unit is installed in a clean, air conditioned environment. ■ The AC supply used by the Switch is separate to that used by units that generate high levels of AC noise, for example air conditioning units. ■ No more than four Switch units are placed on top of one another, if the units are free-standing. Rack-mounting The Switch is 1U high and will fit in most standard 19-inch racks. CAUTION: Disconnect all cables from the Switch before continuing. Remove all self adhesive pads from the underside of the Switch if they have been fitted. CAUTION: If you use a shelf or support ensure that it will not obstruct the air flow through the side panels of the Switch. To rack-mount your Switch: 1 Place the Switch the right way up on a hard flat surface, with the front facing towards you. 2 Locate a securing bracket over the mounting holes on one side of the Switch, as shown in Figure 6. 3 Insert the screws and tighten with a suitable screwdriver.
-
 1
1 -
2
-
3
-
4
-
5
-
6
-
7
-
8
-
9
-
10
-
11
-
12
-
13
-
14
-
15
-
 16
16 -
 17
17 -
 18
18 -
 19
19 -
 20
20 -
 21
21 -
 22
22 -
 23
23 -
 24
24 -
 25
25 -
 26
26 -
27
-
28
-
29
-
30
-
31
-
32
-
33
-
34
-
35
-
36
-
37
-
38
-
39
-
40
-
41
-
42
-
43
-
44
-
45
-
46
-
47
-
48
-
49
-
50
-
51
-
52
-
53
-
54
-
55
-
56
-
57
-
58
-
59
-
60
-
61
-
62
-
63
-
64
-
65
-
66
-
67
-
68
-
69
-
70
-
71
-
72
 |
 |
