3Com 3CR16708-91 Getting Started Guide - Page 23
Placing Units On Top of Each Other, Using a Stacking Clip, CAUTION
 |
UPC - 662705487151
View all 3Com 3CR16708-91 manuals
Add to My Manuals
Save this manual to your list of manuals |
Page 23 highlights
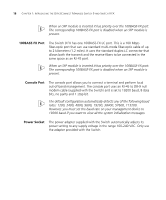
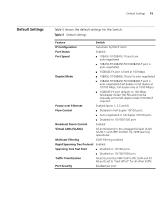
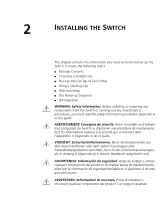
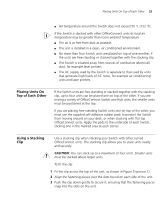
Placing Units On Top of Each Other 23 ■ Air temperature around the Switch does not exceed 50 °C (122 °F). If the Switch is stacked with other OfficeConnect units its local air temperature may be greater than room ambient temperature. ■ The air is as free from dust as possible. ■ The unit is installed in a clean, air conditioned environment. ■ No more than four Switch units are placed on top of one another, if the units are free-standing or stacked together with the stacking clip. ■ The Switch is situated away from sources of conductive (electrical) dust, for example laser printers. ■ The AC supply used by the Switch is separate to that used by units that generate high levels of AC noise, for example air conditioning units and laser printers. Placing Units On Top of Each Other If the Switch units are free-standing or stacked together with the stacking clip, up to four units can be placed one on top of the other. If you are mixing a variety of OfficeConnect Switch and Hub units, the smaller units must be positioned at the top. If you are placing free-standing Switch units one on top of the other, you must use the supplied self-adhesive rubber pads to prevent the Switch from moving around on your desk, or when stacking with flat top OfficeConnect units. Apply the pads to the underside of each Switch, sticking one in the marked area at each corner. Using a Stacking Clip Use a stacking clip when stacking your Switch with other curved OfficeConnect units. The stacking clip allows you to stack units neatly and securely. CAUTION: You can stack up to a maximum of four units. Smaller units must be stacked above larger units. To fit the clip: 1 Fit the clip across the top of the unit, as shown in Figure 5 (picture 1). 2 Align the fastening pieces over the slots found on each side of the unit. 3 Push the clip down gently to secure it, ensuring that the fastening pieces snap into the slots on the unit.
-
 1
1 -
2
-
3
-
4
-
5
-
6
-
7
-
8
-
9
-
10
-
11
-
12
-
13
-
14
-
15
-
16
-
17
-
 18
18 -
 19
19 -
 20
20 -
 21
21 -
 22
22 -
 23
23 -
 24
24 -
 25
25 -
 26
26 -
 27
27 -
 28
28 -
29
-
30
-
31
-
32
-
33
-
34
-
35
-
36
-
37
-
38
-
39
-
40
-
41
-
42
-
43
-
44
-
45
-
46
-
47
-
48
-
49
-
50
-
51
-
52
-
53
-
54
-
55
-
56
-
57
-
58
-
59
-
60
-
61
-
62
-
63
-
64
-
65
-
66
-
67
-
68
-
69
-
70
-
71
-
72
-
73
-
74
-
75
-
76
-
77
-
78
-
79
-
80
 |
 |