3Com 3CR16708-91 Getting Started Guide - Page 28
Choosing the Correct RJ-45 Cables, WARNING, CAUTION
 |
UPC - 662705487151
View all 3Com 3CR16708-91 manuals
Add to My Manuals
Save this manual to your list of manuals |
Page 28 highlights
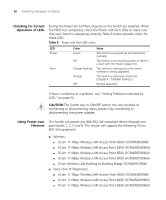
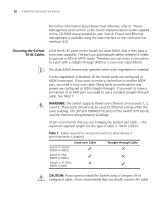
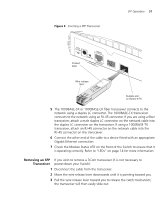
28 CHAPTER 2: INSTALLING THE SWITCH For further information about Power Over Ethernet, refer to "Power Management and Control" in the Switch Implementation Guide supplied on the CD-ROM that accompanies your Switch. Power over Ethernet management is available using the web interface or the command line interface (CLI). Choosing the Correct RJ-45 Cables All of the RJ-45 ports on the Switch are Auto-MDIX, that is they have a cross-over capability. The port can automatically detect whether it needs to operate in MDI or MDIX mode. Therefore you can make a connection to a port with a straight-through (MDI) or a cross-over cable (MDIX). The Auto-MDIX feature only operates when auto-negotiation is enabled. If auto-negotiation is disabled, all the Switch ports are configured as MDIX (cross-over). If you want to make a connection to another MDIX port, you need a cross-over cable. Many ports on workstations and servers are configured as MDI (straight-through). If you want to make a connection to an MDI port, you need to use a standard straight-through cable. See Table 7. WARNING: The Switch supports Power over Ethernet on rear ports 1, 2, 5 and 6. These ports should only be used for Ethernet wiring within the same building. The SFP and 100BASE-FX ports of the Switch 9 FX can be used for Ethernet wiring between buildings. 3Com recommends that you use Category 5e twisted pair cable - the maximum segment length for this type of cable is 100 m (328 ft). Table 7 Cables required to connect the Switch to other devices if auto-negotiation is disabled Cross-over Cable Switch to Switch (MDIX to MDIX) ✓ Switch to Hub (MDIX to MDIX) ✓ Switch to PC (NIC) ✕ (MDIX to MDI) Straight-through Cable ✕ ✕ ✓ CAUTION: If you want to install the Switch using a Category 5e or Category 6 cable, 3Com recommends that you briefly connect the cable
-
 1
1 -
2
-
3
-
4
-
5
-
6
-
7
-
8
-
9
-
10
-
11
-
12
-
13
-
14
-
15
-
16
-
17
-
18
-
19
-
20
-
21
-
22
-
 23
23 -
 24
24 -
 25
25 -
 26
26 -
 27
27 -
 28
28 -
 29
29 -
 30
30 -
 31
31 -
 32
32 -
 33
33 -
34
-
35
-
36
-
37
-
38
-
39
-
40
-
41
-
42
-
43
-
44
-
45
-
46
-
47
-
48
-
49
-
50
-
51
-
52
-
53
-
54
-
55
-
56
-
57
-
58
-
59
-
60
-
61
-
62
-
63
-
64
-
65
-
66
-
67
-
68
-
69
-
70
-
71
-
72
-
73
-
74
-
75
-
76
-
77
-
78
-
79
-
80
 |
 |