AIWA CX-NA30 Operating Instructions
AIWA CX-NA30 Manual
 |
View all AIWA CX-NA30 manuals
Add to My Manuals
Save this manual to your list of manuals |
AIWA CX-NA30 manual content summary:
- AIWA CX-NA30 | Operating Instructions - Page 1
87.NF7-903-01 9701 20AKY-U-9 For assistance and information call toll free I-800-BUFAIWA (United States and Puerto Rico) (mEiE DIGITAL AUDIO - AIWA CX-NA30 | Operating Instructions - Page 2
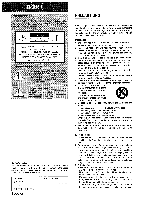
(you will find them on the rear of your set) in the space provided below. Please refer to them when you contact your Aiwa dealer in case of difficulty. Model No. Serial No. (Lot No.) CX-NA30 I SX-NA34 I I I SX-R21O (NSX-A35 only) I I I ENGLISH Read the Operating Instructions carefully and - AIWA CX-NA30 | Operating Instructions - Page 3
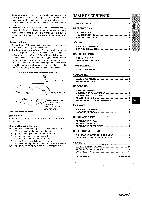
TO SERVICE THE UNIT YOURSELF. TABLE OF CONTENTS Precautions l PREPARATIONS CONNECTIONS . ..m 3 REMOTE CONTROL 5 BEFORE OPERATION 5 SOUND AUDIO ADJUSTMENTS m 6 GRAPHIC EQUALIZER 6 RADIO RECEPTION MANUAL TUNING 7 PRESETTING STATIONS 7 TAPE PLAYBACK BASIC OPERATIONS m 8 CD - AIWA CX-NA30 | Operating Instructions - Page 4
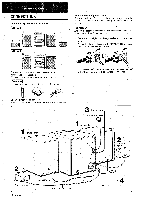
CONNECTIONS Check your system and accessories 1 = I @ I *$?=j; ~ m EEE2' @ \~"p%.:",:r.~.. -f?s3J CX-NA30 Compact disc stereo cassette reciver @ SX-NA34 Front speakers @ * SX-R21 O Surround speakers (For NSX-A35 only) Remote control :~ . AM antenna -' FM antenna I* Operating Instructions - AIWA CX-NA30 | Operating Instructions - Page 5
the FM antenna near metal objects or curtain rails,, q Do not bring the AM antenna near other optional equipment, the stereo system itself, the AC cord or speaker cords, since noise will be picked up. q Do not unwind the AM antenna wire. CONNECTING AN OUTDOOR ANTENNA For better FM reception, use of - AIWA CX-NA30 | Operating Instructions - Page 6
the button, press the button while pressing the SHIFT button. To use the FUNCTION button on the remote control The FUNCTION button substitutes for the function buttons (TAPE/ DECK 1/2, TUNER, VIDEO/AUX,CD) on the main unit. Each time the FUNCTION button is pressed, the next function is selected - AIWA CX-NA30 | Operating Instructions - Page 7
VOLUME control on the main unit, or press the VOLUME buttons on the remote control. The volume level is displayed as a number from O to MAX (31). The volume level is automatically set to 16 when the power is turned off with the volume level set to 17 or more. SUPER T-BASS SYSTEM The T-BASS system - AIWA CX-NA30 | Operating Instructions - Page 8
MANUAL TUNING , PRESETTING STATIONS MONO I TUNER BAND SHIFT -d u 7 Press the TUNER/BAND button repeatedly to select the desired band, ~FM- AM______ If the power is turned off, the previously tuned station will be played (Direct Play Function). To select a band with the remote control system - AIWA CX-NA30 | Operating Instructions - Page 9
to 0000 when the cassette holder is opened. When tapes are loaded in both decks After playback on deck 1 finishes, the tape in the deck 2 will start to play without interruption. (Continuous play) 8 ENGLISH - AIWA CX-NA30 | Operating Instructions - Page 10
Function) Press the CD button. The power is turned on and play of the loaded disc(s) begins. To replace discs before play, press the ~ OPEN/CLOSE button to open the disc compartment. To check the remaining time During play, press the EDIT/CHECK button on the remote control while pressing the SHIFT - AIWA CX-NA30 | Operating Instructions - Page 11
2 1 3 .1 ++-, s 5 u Use the remote control. 1 Press the PRGM button twice while pressing the steps 2 and 3 in stop mode. The track will be programmed after the last track. To change the button is pressed once in step 1, the unit enters the KARAOKE PROGRAM (page 16). 2 Press one of the DISC - AIWA CX-NA30 | Operating Instructions - Page 12
! This section explains how to record from the tuner, CD player, or external equipment. INSERTING BLANK SPACES - 4-second blank q Use Type I (normal) tapes only. q Set the tape to the point where recording will start. q Note that recording is done only one side of the tape. 1 Insert the tape - AIWA CX-NA30 | Operating Instructions - Page 13
DUBBING A TAPE MANUALLY DUBBING THE WHOLE TAPE m q Set the tape to the point where recording will start. q Note that recording will be done on q Dubbing does not start from a point halfway in the tape. q Note that recording will be done on one side of the tape only. 1 Press the TAPE button. 2 - AIWA CX-NA30 | Operating Instructions - Page 14
CLEAR button twice so that''EDlT disappears on m Al edit recording will not start from a pojnt halfway into the tape. The tape must add tracks from other discs in the CD compartment 1 Press the EDIT/CHECK button while pressing the SHIFT button on the remote control to select side A or B. 2 Press - AIWA CX-NA30 | Operating Instructions - Page 15
CD recording while checking the remaining time on each side of the tape as the tracks are programmed. EEn3 The programmed edit recording will unit. 2 Press the CD button and load the disc(s). 3 Press the EDIT/CHECK button twice while pressing the SHIFT button on the remote control. "EDIT and " - AIWA CX-NA30 | Operating Instructions - Page 16
multiplex function for multi audio discs or tapes. Each time the KARAOKE button is pressed, one the volume and tone of the source. 4 Turn the MIC VOL control to adjust the microphone volume. To restored. m q The Karaoke functions may not operate correctly with the following kinds of CDs or tapes. - - AIWA CX-NA30 | Operating Instructions - Page 17
KARAOKE PROGRAM 2 1 1 - u 4 Before or during CD play, you can reserve up to 15 tracks to be played after the current track. Each reservation is cleared when it finishes playing. Use the remote control. 1 Press the PRGM button while pressing a SHIFT button ~. 2 Press one of the DISC DIRECT - AIWA CX-NA30 | Operating Instructions - Page 18
time cannot be displayed during recording. To s'witch to the 24-hour standard Press ille CLOCK button while pressing the SHIFT button on the remote control and then press the s button within 4 seconds. Repeat the same procedure to restore the 12-hour standard. If the clock display flashes This is - AIWA CX-NA30 | Operating Instructions - Page 19
completed within 4 seconds, repeat from step 1, 5 Prepare the source. To listen to a CD, load the disc to be played first on tray 1. To listen to a tape, insert to prepare the source, and adjust the volume and tone. m c Timer playback and timer recording will not begin unless the power is turned off - AIWA CX-NA30 | Operating Instructions - Page 20
RCA phono plugs to connect audio equipment (turntables, LD players, MD players, VCRs, TV, etc.). Connect the red plug to the R jack, and the white plug to the L jack. When connecting a turntable Use an Aiwa turntable equipped with a built-in equalizer amplifier. CD DIGITAL OUT (OPTICAL) JACK This - AIWA CX-NA30 | Operating Instructions - Page 21
TROUBLESHOOTING GUIDE in these Operating Instructions, check the following guide. GENERAL There . q Is the Karaoke function turned on? Is the system picking up dirty? (+ page 20) CD PLAYER SECTION The CD player does not play. q Is any source of magnetism. This will downgrade the sound quality and - AIWA CX-NA30 | Operating Instructions - Page 22
CX-NA30 % (15W, 1 kHz, 6ohms, DIN AUDIO) VI DEO/AUX: 150 mV (adjustable response Recording system Heads 4 1 Compact disc player section Laser Semiconductor laser digital instructions, may cause harmful interference to radio communications. However, there is no guarantee that interference will - AIWA CX-NA30 | Operating Instructions - Page 23
- AIWA CX-NA30 | Operating Instructions - Page 24
NO USER-SERVICEABLE PARTS INSIDE. REFER SERVICING TO QUALIFIED SERVICE PERSONNEL." Aiwa en caso de tener dificultades. I N." de rnodelo I CX-NA30 SX-NA34 SX-R21O (NSX-A35 solamente) I N." de serie (N.O de Iote) I I I 1 ESPANOL PRECAUCIONES Lea cuidadosa y completamente el manual - AIWA CX-NA30 | Operating Instructions - Page 25
LA UNIDAD USTED MISMO. INDICE PRECAUCIONES 1 PREPARATIVES CONEXIONES 3 CONTROL 13EMOT0 5 ANTES DE LA OPERACION 5 SONIDO AJUSTES DE AUDIO 6 ECUALIZADOR GRAFICO 6 RECEPCION DE LA RADIO SINTONIZACION MANUAL 7 PREAJUSTE DE EMISORAS 7 REPRODUCTION DE CINTAS OPERAClONES BASICAS - AIWA CX-NA30 | Operating Instructions - Page 26
SPEAKERS L. - d) CX-NA30 Sintonizador, amplificador, platina de casete y reproductor de discos compactos estereo @ SX-NA34 Altavoces delanteros @ * SX-R21O Altavoces de sonido ambiental (para el NSX-A35 solamente) Control remoto Antena de AM Antena de FM = I*$: ,: $; Manual de instrucciones - AIWA CX-NA30 | Operating Instructions - Page 27
2 Conecte Ios altavoces de sonido ambiental a la unidad principal. (Solo para el NSX-A35) Conecte cada cable de altavoz de sonido ambiental al terminal SURROUND SPEAKERS R O L. CONEXION DE UNA ANTENA EXTERIOR Para obtener la mejor recepcion de FM se recomienda una antena exterior. Conecte la - AIWA CX-NA30 | Operating Instructions - Page 28
encima del boton, pulse ei boton mientras pulsa el boton SHIFT. Para utilizar el boton FUNCTION del control remoto El boton FUNCTION sustituye a Ios botones de funcion (TAPE/ DECK 1/2, TUNER, VIDEO/AUX y CD) de la unidad principal. Cada vez que se pulse el boton FUNCTION, la siguiente funcion se - AIWA CX-NA30 | Operating Instructions - Page 29
AUDIO ECUALIZADOR GRAFICO VOLUME GRAPHIC - EQUALIZER GEQ SHIFT CONTROL DE VOLUMEN Gire el control VOLUME de la unidad principal o pulse 10S botones VOLUME del control , 10 que usted prefiera. T-BASS Para seleccionar con el control remoto Pulse el boton T-BASS m mientras pulsa el boton - AIWA CX-NA30 | Operating Instructions - Page 30
SMVTOIVIZACION MANUAL PREAJUSTE DE EMISORAS MONOI TUNER BAND SHIFT 0-9,+10 7 Puke repetidamente estereo por FM tenga ruido Pulse el boton MONO TUNER .mientras pulsa el boton SHIFT del control remoto para que "MONO aparezca en el visualizador. El ruido se reducira, pero la recepcion sera - AIWA CX-NA30 | Operating Instructions - Page 31
OPERACIONES BASICAS 1 2 Acerca de Ias cintas de casete c Para evitar el borrado accidental, romps con un destornillador u otra herramienta puntiaguda Ias Ienguetas de plastico del casete despues de grabar. II s + EJECT Platina 1 AEJECT Platina 2 Utilice solamente cintas tipo I (normales) 1 - AIWA CX-NA30 | Operating Instructions - Page 32
estb desconectada (funcion de reproduction directs) Pulse el boton CD. La alimentacion se conectara y la reproduction del(de Ios discos. Para comprobar el tiempo restarnte Pulse el boton EDIT/CHECK del control remoto mientras pulsa el boton SHIFT. El tiempo restante hasta que todas - AIWA CX-NA30 | Operating Instructions - Page 33
REPETITION DE REPRODUCTION Utilice el control remoto, Reproduction aleatoria Todaslascanciones aleatoria, la comprobacion del tiempo restante y la seleccion de un disco o cancion. Utilice el control remoto. 1 Pulse dos veces et boton PRGM mientras pulsa el boton SHIFT estando en el modo - AIWA CX-NA30 | Operating Instructions - Page 34
uno de Ios botones de funcion y prepare la fuente de sonido de la que vaya a grabar. Para grabar de un disco compacto, pulse el boton CD e introduzca el(los) disco(s). Para grabar una radiodifusion, pulse el boton TUNER y sintonice la emisora. Para grabar de una fuente de sonido conectada, pulse el - AIWA CX-NA30 | Operating Instructions - Page 35
COPIADO MANUAL DE UNA CINTA COPIADO DE TODA LA CINTA 1 1,3 2 4 c Ponga la cinta en el punto donde vaya a empezar la grabacion. q Tenga en cuenta que la grabacion - AIWA CX-NA30 | Operating Instructions - Page 36
la forma siguiente: Al EDIT - PRGM EDIT 4 Pulse uno de Ios botones DISC DIRECT PLAY ~ara seleccionar un disco. 5 Pulse Ios botones numerados del control remoto para designar la d,uracion de la cinta. Se puede especificar una duration de 10 a 99 minutes. Ejemplo: Cuando utilice una cinta de 60 - AIWA CX-NA30 | Operating Instructions - Page 37
en primer Iugar hacia afuera de la unidad. 2 Pulse el boton CD e introduzca el(los) disco(s). 3 Pulse dos veces el boton EDIT/CHECK mientras pulsa el boton SHIFT del control remoto. 4 Pulse Ios botones numerados del control remoto para designar la duration de la cinta. Se puede especificar una - AIWA CX-NA30 | Operating Instructions - Page 38
discos o cintas de audio multiplex. Cada vez que se pulse el boton KARAOKE, una de Ias funciones y el tono de la fuente de sonido. 4 Gire el control MIC VOL para ajustar el volumen del microfono. Para grabar el aullido. Pongase en contacto con su concesionario Aiwa para que Ie de Ios detalles. I5 - AIWA CX-NA30 | Operating Instructions - Page 39
reserva se borrara cuando termine de reproducirse la cancion. Utilice el control remoto. 1 Pulse el boton PRGM una vez mientras pulsa el Numero de cancion reservada Ptilselo una vez mas para ca~celar el programa de karaoke. La visualization volvera a ser la de la reproduction de discos compactos. - AIWA CX-NA30 | Operating Instructions - Page 40
modo de 24 horas Pulse el boton CLOCK mientras pulsa el boton SHIFT del control remoto y Iuego pulse el boton s antes de que pasen 4 segundos. Repita Preparation Asegurese de que la hors del reloj sea corrects. Utilice el control remoto. 1 Pulse el boton TIMER mientras pulsa el boton SHIFT una vez - AIWA CX-NA30 | Operating Instructions - Page 41
en la platina 2 despues de efectuar el paso 5. i 2 u La unidad se podra apagar automaticamente despues de transcurrido un tiempo especificado. Utilice el control remoto. 1 Pulse el boton SLEEP mientras pulsa el boton SHIFT. 2 Antes de aue pasen 4 seaundos, pulse el 'boton - AIWA CX-NA30 | Operating Instructions - Page 42
Utilice un giradiscos Aiwa con amplificador incorporado. ecualizador TOMA CD DIGITAL OUT (OPTICAL) Esta unidad puede dar salida a set?ales de sonido digital de discos compactos a traves de esta toma. Utilice un cable optico para conectar el equipo de audio digital (amplificador digital, platina de - AIWA CX-NA30 | Operating Instructions - Page 43
PROBLEMAS . Si la unidad no funciona como se describe en este manual de instrucciones, compruebe la gufa siguiente: GENERALIDADES No hay sonido. . salida de sonido no es estereo. q ~Esta activada la funcion de karaoke? (+ pagina 15) Se produce una visualization erronea o unreal funcionamiento. - AIWA CX-NA30 | Operating Instructions - Page 44
ESPECIFICACIONES Unidad principal CX-.NA3O Seccion del sintonizador de FM Gama de con no mas del 17. de distortion armonica total, 6 ohmios) 0,057. (15 W, 1 kHz, 6 ohmios, DIN AUDIO) VI DEO/AUX: 150 mV (ajustable) MIC: 1,8 mV (10 kiloohmios) SUPER WOOFER: 1,3 V SPEAKERS: Acepta altavoces de - AIWA CX-NA30 | Operating Instructions - Page 45
- AIWA CX-NA30 | Operating Instructions - Page 46
BACK). NO USER-SERVICEABLE PARTS INSIDE. REFER SERVICING TO QUALIFIED SERVICE PERSONNEL." Relev6 du quand on contacte un distributeur Aiwa en cas de difficult. N" de modele CX-NA30 SX-NA34 SX-R210 (NSX pas Ies orifices de ventilation. 6 Chariot et support - Si I'appareil est pose ou monte sur - AIWA CX-NA30 | Operating Instructions - Page 47
structure de support et AUDIO KARAOKE 16 HORLOGE ET MINUTERIE REGLAGE DE L'HORLOGE 17 REGLAGE DE LA MINLJTERIE 17 REGLAGE DE LA MINIJTERIE D'ARRET 18 u AUTRES CONNEXIONS CONNEXION D'UN APPAREIL OPTIC)NNEL 19 ECOUTE DE SOURCES EXTERNES 19 GENERALITIES SOINS ET ENTRETIEN 20 EN CAS DE PROBLEME - AIWA CX-NA30 | Operating Instructions - Page 48
a I'appareil principal. Connecter Ies cordons de I'enceinte droite aux bornes SPEAKERS R et ceux de I'enceinte gauche aux bornes SPEAKERS L. 0 CX-NA30 Radio magnetocassette Iecteur de disques compacts stereo @ SX-NA34 Enceintes avant @ *SX-R210 Enceintes surround (Pour NSX-A35 seulement) Parties - AIWA CX-NA30 | Operating Instructions - Page 49
2 Connecter Ies enceintes surround a I'appareil principal. (Pour NSX-A35 seulement) II n'y a pas de difference entre Ies enceintes surround. Connecter Ie cordon de chaque enceinte surround a la borne SURROUND SPEAKERS R OUL. Od0 ,.0 , .' '4 O@ ~, Q '1;4 :. g ,,," 3 Connecter Ies antennes - AIWA CX-NA30 | Operating Instructions - Page 50
Mise en place des piles Enlever Ie couvercle des piles du dos de la telecommande et mettre deux piles R6 (taille AA) en place. s POWER CD ' DEMO I R6(AA) Quand remplacer Ies piles La distance maximale de fonctionnement de la t~lecommande entre cette derniere et Ie capteur situe sur I'appareil - AIWA CX-NA30 | Operating Instructions - Page 51
sous la forme d'un nombre de O a MAX (3"1). Quand on coupe I'alimentation alors que Ie niveau du volume est regle a 17 ou plus, ce niveau est automatiquement regle a 1& SYSTEME SUPER T-BASS Le systeme T-BASS ameliore Ie realisme du son aux basses frequencies. Appuyer sur la touche T-BASS. A chaqus - AIWA CX-NA30 | Operating Instructions - Page 52
accord AM Le reglage par defaut de I'intervalle d'accord AM est de 10 kHz/ pas. Si on utilise cet appareil clans un endroit ou Ie systeme deallocation de frequencies est de 9 kHz/pas, changer I'intervalle d'accord. 'Appuyer sur la touche POWER tout en appuyant sur la touche TUNER/BAND. Pour retablir - AIWA CX-NA30 | Operating Instructions - Page 53
OPERATIONS DE BASE Utiliser seulement des cassettes de type I (normales). 7 Appuyer sur la touche TAPE puis appuyer sur la rnarque A EJECT pour ouvrir Ie porte-cassette. Au sujet des cassettes q Pour eviter un effacement accidental, utiliser un '@,-.;;! tournevis ou tout autre objet effile pour - AIWA CX-NA30 | Operating Instructions - Page 54
MISE EN PLACE DE DISQUES Appuyer sur la touche CD, puis appuyer sur la touche A OPEN/CLOSE pour ouvrir demarrer la lecture quand I'alimentation est toupee (fonction de lecture directe) Appuyer sur la touche CD. L!appareil est mis sous tension et la lecture du (ales) disque(s) en place demarre. - AIWA CX-NA30 | Operating Instructions - Page 55
d'autres plages. 5 Appuyer sur la touche - pour demarrer la lecture. Pour controller Ie programme A chaque pression sur la touche - ou FP en mode arr&, fois sw la touche PRGM a I'etape 1, I'appareil passe au PROGRAMME DE KARAOKE (voir page 16). 2 Appuyer sur une des touches DISC DIRECT PLAY pour - AIWA CX-NA30 | Operating Instructions - Page 56
. A EJECT 2 Appuyer sur une des touches de fonction et preparer la source a enregistrer. Pour enregistrer a partir d'un disque compact, appuyer sur la touche CD et mettre Ie(s) disque(s) en place. Pour enregistrer une emission de radio, appuyer sur la touche TUNER et accorder sur une station. Pour - AIWA CX-NA30 | Operating Instructions - Page 57
DUPLICATION MANUELLE D'UNE CASSETTE DUPLICATION DE LA TOTALITE D'UNE CASSETTE 1 s 2 -m q Bobiner la cassette jusqu'a I'end\roit ob on veut demarrer I'enreclistrement. q Rernarquer que I'enregistrement ne sera fait que Sur Une face de la cassette. 1 Appuyer sur la touche TAPE. 2 Inserer la - AIWA CX-NA30 | Operating Instructions - Page 58
la cassette clans la platine 2. Inserer la cassette avec la face a enregistrer en premier orientee vers I'exterieur de I'appareil. 2 Appuyer sur la touche CD et mettre Ie(s) disque(s) en place. 3 Appuyer une fois sur la touche EDIT/CHECK tout en aplpuyant sur la touche SHIFT de la telecommande - AIWA CX-NA30 | Operating Instructions - Page 59
la cassette clans la platine 2. Inserer la cassette avec la face a enregistrer en premier orient~e vers I'exterieur de I'appareii. 2 Appuiyer sur la touche CD et mettre Ie(s) disque(s) en place. 3 Appuyer deux fois sur la touche EDIT/CHECK tout en appuyant sur la touche SHIFT de la telecommande - AIWA CX-NA30 | Operating Instructions - Page 60
cassettes multi audio. A chaque pression sur la touche KARAOKE, une " Quand on n'utilise pas Ie microphone Regler Ie volume de microphone sur MIN et debrancher Ie microphone de la details, contacter Ie distributeur Aiwa local. @ Vocal Fader Karaoke est en service, Ie son est sorti en monophonic. - AIWA CX-NA30 | Operating Instructions - Page 61
PROGRAMME DE KARAOKE 2 1 1 > s 4 u Avant ou pendant la lecture de disque compact, on peut la touche - a plusieurs reprises jusqu'a ce que "K-POO"soit affiche. Pour annuler Ie programme de Karaoke, appuyer une fois de plus sur cette touche. Laffichage repasse a celui de la lecture de disque - AIWA CX-NA30 | Operating Instructions - Page 62
REGLAGEDEL'HORLOGE REGLAGE DE LA MINIJTERIE 1 1 1 ,2 3 -2,4 -6 1 Appuyer surlatouche CLOCK toutenappuyant sur la touche SHIFT de la telecommande, puis appuyer sur la touche II SET clans Ies auatre ~ondes aui suivent. " Appuyer sur la touche 4 DOWN ou ~ UP pour specifier Ies heures, puis appuyer - AIWA CX-NA30 | Operating Instructions - Page 63
atteinte, I'appareil est mis sous tension et la lecture commence sur la source selectionnee. q Gtuand on coupe I'alimentation alors que Ie niveau du volume est regle a 17 ou plus, ce niveau est automatiquement regle a16. Pour contr61er I'heure et la source specifiers Appuyer sur la touche TIMER tout - AIWA CX-NA30 | Operating Instructions - Page 64
Utiliser un c~ble a fiches phono RCA pour connecter un appareil audio (tourne-disque, Iecteur de disque laser, Iecteur de minidisque; magnetoscope un tourne-disque Utiliser un tourne-disque Aiwa muni d'un amplificateur a egaliseur integre. PRISE CD DIGITAL OUT (OPTICAL) Cet appareil peut sortir - AIWA CX-NA30 | Operating Instructions - Page 65
CAS DE PROBLEME -. Si I'appareil ne fonctionne pas comme decrit clans ce mocle d'emploi, contrder Ie guide suivant. sorti n'est pas stereo. q La fonction Karaoke n'est-elle pas en service? (+ page 15) Un affichage ou un presenle de la distortion. q Le systeme ne capte-t-il pas des bruits - AIWA CX-NA30 | Operating Instructions - Page 66
principal CX-NA30 Partie 1%, 6 ohms) Distortion harmonique totale 0,05% (15 W, 1 kHz, 6 ohms, AUDIO DIN) Entrees VIDEO/AUX: 150 mV (reglable) MIC: 1,8 mV (10 kt2) Sorties plus Partie magnetocassette Format de piste Reporwe en frequence Systeme d'enregistrement T@tes 4 plstes, 2 canaux stereo - AIWA CX-NA30 | Operating Instructions - Page 67
- AIWA CX-NA30 | Operating Instructions - Page 68
PARTS INDEX Instructions about each part on the main unit or remote control are indicated on the right side. The parts are listed in alphabetical order. INDICE DE LAS PARTES Las instrucciones de cada parte de la unidad principal o del control remoto se indican a la derecha. Las partes se indican en
-
 1
1 -
 2
2 -
 3
3 -
 4
4 -
 5
5 -
 6
6 -
 7
7 -
8
-
9
-
10
-
11
-
12
-
13
-
14
-
15
-
16
-
17
-
18
-
19
-
20
-
21
-
22
-
23
-
24
-
25
-
26
-
27
-
28
-
29
-
30
-
31
-
32
-
33
-
34
-
35
-
36
-
37
-
38
-
39
-
40
-
41
-
42
-
43
-
44
-
45
-
46
-
47
-
48
-
49
-
50
-
51
-
52
-
53
-
54
-
55
-
56
-
57
-
58
-
59
-
60
-
61
-
62
-
63
-
64
-
65
-
66
-
67
-
68
 |
 |
For assistance
and information
call toll free I-800-BUFAIWA
(United States and Puerto Rico)
87.NF7-903-01
9701 20AKY-U-9
(mEiE
DIGITAL
AUDIO