Acer F7200 User Manual
Acer F7200 Manual
 |
View all Acer F7200 manuals
Add to My Manuals
Save this manual to your list of manuals |
Acer F7200 manual content summary:
- Acer F7200 | User Manual - Page 1
Acer Projector F7200 / LV-X01 / Y510 F7500 / LV-801 / Y550 F7600 / LV-WU01 / Y560 Series User's Guide - Acer F7200 | User Manual - Page 2
This publication, including all photographs, illustrations and software, is protected under international copyright laws, with all rights reserved. Neither this manual, nor any of the material contained herein, may be reproduced without written consent of the author. © Copyright 2016 Disclaimer The - Acer F7200 | User Manual - Page 3
the projector. These safety and usage instructions will ensure that you enjoy many years of safe use of the projector. Keep this manual there are no user-serviceable parts in the unit. For servicing, contact qualified service personnel. Follow all warnings and cautions in this manual and on the - Acer F7200 | User Manual - Page 4
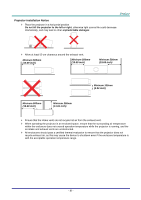
is running, and the air intake and exhaust vents are unobstructed. All enclosures should pass a certified thermal evaluation to ensure that the projector does not recycle exhaust air, as this may cause the device to shutdown even if the enclosure temperature is with the acceptable operation - Acer F7200 | User Manual - Page 5
cord. DO NOT remove the power cord during the shutdown process, as it may cause damage to the projector. In the meantime, the delayed heat radiating will also affect the service life of the projector. The shutdown process may vary depending on the model used. Whatever the case may be, be sure to - Acer F7200 | User Manual - Page 6
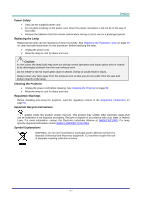
installing and using the projector, read the regulatory notices in the Regulatory Compliance on page 65. Important Recycle Instructions: Lamp(s) inside this DISPOSAL: Do not use household or municipal waste collection services for disposal of electrical and electronic equipment. EU countries - Acer F7200 | User Manual - Page 7
A high brightness rating allows for presentations in daylight or in lit rooms. Supports resolutions up to WUXGA at 16.7 million colors to deliver crisp, clear images. About this Manual This manual is intended for end users and describes how to install and operate the DLP projector. Wherever - Acer F7200 | User Manual - Page 8
CONTROL OPERATING RANGE...9 PROJECTOR AND REMOTE CONTROL BUTTONS Projector 11 Installing the New Lens ...12 STARTING AND SHUTTING DOWN THE PROJECTOR...13 SETTING AN ACCESS PASSWORD (SECURITY LOCK) ...15 ADJUSTING THE PROJECTOR Lamp Time ...52 CLEANING THE PROJECTOR...53 Cleaning the Lens ...53 - Acer F7200 | User Manual - Page 9
AND SOLUTIONS ...55 TIPS FOR TROUBLESHOOTING ...55 LED ERROR MESSAGES...56 IMAGE PROBLEMS...56 LAMP PROBLEMS ...57 REMOTE CONTROL PROBLEMS ...57 AUDIO PROBLEMS ...57 HAVING THE PROJECTOR SERVICED ...57 HDMI Q & A ...58 SPECIFICATIONS ...59 SPECIFICATIONS...59 PROJECTION DISTANCE VS. PROJECTION - Acer F7200 | User Manual - Page 10
projector and check that the following items are included: PROJECTOR WITH LENS CAP REMOTE CONTROL (WITH TWO AAA BATTERIES) POWER CORD VGA CABLE CD-ROM (THIS USER'S MANUAL for warranty service. Caution: Avoid using the projector in dusty environments. Keep Security card in safe place. - 1 - - Acer F7200 | User Manual - Page 11
cover to replace lamp module. 11 SEE PAGE 3 18 11 19 20 7 15 49 Important: Ventilation openings on the projector allow for good air circulation, which keeps the projector lamp cool. Do not obstruct any of the ventilation openings. Note: Suggest to loosen the screw before lens shift adjustment and - Acer F7200 | User Manual - Page 12
Top view-On-screen Display (OSD) buttons ITEM 1. 2. 3. 4. 5. 6. 7. 8. 9. LABEL SOURCE RESYNC MENU MODE DESCRIPTION Navigates and changes settings in the OSD. Enter the Source menu. Navigates and changes settings in the OSD. Toggle auto-tracking image function. Navigates and changes settings in - Acer F7200 | User Manual - Page 13
the AUDIO cable from an input device. Note: Share with DVI & BNC audio input. Turns the projector on or off (main power switch must be turned on first). Press to place the projector in standby 13 mode. Red Standby Green Lamp Lit , System stable Flashing Power on, Cooling, Error code - Acer F7200 | User Manual - Page 14
from a computer. IR receiver Receive IR signal from remote control. 7 SERVICE For service use. RS-232 12V WIRED REMOTE AUDIO IN 3 L/R RCA (YPbPr) plug in the connector before turn on/off the projector. Screen controllers are supplied and supported by screen manufacturers. Do not use this - Acer F7200 | User Manual - Page 15
Bottom view ITEM 1. 2. LABEL Tilt adjustor Ceiling support holes DESCRIPTION SEE PAGE Rotate adjuster lever to adjust angle position. 15 Contact your dealer for information on mounting the projector on a ceiling Note: When installing, ensure that you use only UL Listed ceiling mounts. For - Acer F7200 | User Manual - Page 16
is obstructed, you can bounce the signal off certain reflective surfaces such as projector screens. 3. The buttons and keys on the projector have the same functions as the corresponding buttons on the remote control. This user's manual describes the functions based on the remote control. - 7 - - Acer F7200 | User Manual - Page 17
. Power OFF 23. SOURCE 24. RESYNC 25. 26. 27. MENU 28. VGA 29. DP 30. 3/USER3 31. 5/FREEZE 32. 6 DESCRIPTION Transmits signals to projector. Turns the projector on Displays the ASPECT RATIO selections SEE PAGE 13 Toggle on / off test pattern Navigates and changes settings in the OSD Quick Menu - Acer F7200 | User Manual - Page 18
within a radius of about 7 meters (23 feet) and 15 degrees above or below the projector level. If the projector does not respond to the remote control, move a little closer. Projector and Remote Control Buttons The projector can be operated using the remote control or the buttons on the top of the - Acer F7200 | User Manual - Page 19
. Caution: 1. Only use AAA batteries (Alkaline batteries are recommended). 2. Dispose of used batteries according to local ordinance regulations. 3. Remove the batteries when not using the projector for prolonged periods. - 10 - - Acer F7200 | User Manual - Page 20
Before removing or installing the lens, be sure to turn off the projector, wait until the cooling fans stop, and turn off the main store the lens, attach the lens cap to the projector to keep off dust and dirt. Removing the Existing Lens From the Projector 1. Pull and release the top cover to open - Acer F7200 | User Manual - Page 21
Installing the New Lens 1. Align the notches and correctly position the electrical contact pad as shown in the picture. Note: Pin of Electrical contact pins should be in the direction as shown in the picture. 2. Rotate the lens clockwise until you feel it click into place. Electrical contact pins - Acer F7200 | User Manual - Page 22
power cord and signal cable. When connected, the power led will turn red. 3. Turn on the lamp by pressing " " button on the rear of the projector or " " on the remote control. The PWR LED will now flash red. The startup screen will display in approximately 30 seconds. The first time you - Acer F7200 | User Manual - Page 23
and use ▲▼ to scroll among devices. 5. When the "Power Off? /Press Power again" message appears, press the POWER button. The projector turns off. DVI: Digital Visual Interface HDMI: High-Definition Multimedia Interface compatible DisplayPort: Digital display interface VGA 1 / 2: Analog RGB - Acer F7200 | User Manual - Page 24
Password (Security Lock) You can use the four (arrow) buttons to set a password and prevent unauthorized use of the projector. When enabled, the password must be entered after you power on the projector. (See Navigating the OSD on page 21 and Setting the OSD Language on page 22 for help on using - Acer F7200 | User Manual - Page 25
it at step 6. Note: In case you forget the password, enter the PWD code on the included security card to return normal function to the projector and set Security Lock to off or re-setting password. - 16 - - Acer F7200 | User Manual - Page 26
Level Take note of the following when setting up the projector: The projector table or stand should be level and sturdy. Position the projector so that it is perpendicular to the screen. Remove the Back Foot Holder on the rear adjuster foot before adjusting the projection angle. Ensure - Acer F7200 | User Manual - Page 27
Adjusting Projected Image Position Using Shift Note: Suggest to loosen the screw before lens shift adjustment and tighten up after finished adjustment. The Shift feature provides a lens shift function that can be used to adjust the position of the projected image either horizontally or vertically - Acer F7200 | User Manual - Page 28
Adjusting the horizontal image position With the lens in the center position the horizontal image position can be adjusted to the left or right by up to a maximum of 5% of the image width. Note that the maximum horizontal image height adjustment can be limited by the vertical image position. For - Acer F7200 | User Manual - Page 29
only) to resize the projected image and screen size. 2. Use the Image-focus control (on the projector only) to sharpen the projected image. 3. Use the KEYSTONE buttons on the remote control to correct image-trapezoid (wider top or bottom) effect. 4. The keystone - Acer F7200 | User Manual - Page 30
the OSD You can use the remote control cursor buttons or the buttons on the top of the projector to navigate and make changes to the OSD. The following illustration shows the corresponding buttons on the projector. 1. To enter the OSD, press the MENU button. 2. There are five menus. Press the cursor - Acer F7200 | User Manual - Page 31
Setting the OSD Language Set the OSD language to your preference before continuing. 1. Press the MENU button. Press the cursor ◄► button to navigate to Installation I. 2. Press the cursor ▲▼ button until Language is highlighted. 3. Press the cursor ◄► button until the language you want is - Acer F7200 | User Manual - Page 32
OSD Menu Overview Use the following illustration to quickly find a setting or determine the range for a setting. MAIN MENU SUB MENU Image Display Mode Brilliant Color Brightness Contrast Sharpness Gamma Advanced Computer Video / Audio Reset Horizontal Position Vertical Position Frequency - Acer F7200 | User Manual - Page 33
MAIN MENU SUB MENU Installation I Language Blank Screen Projection Aspect Ratio Keystone Advanced Reset Security Lock Keypad Lock Digital Zoom Presentation Timer Timer Timer Period Timer Reset SETTINGS English, Français, Deutsch, Español, Português Italiano, Norsk, Svenska, Nederlands Suomi Tü - Acer F7200 | User Manual - Page 34
, 0~255, 0~255, 0~255 0~255, 0~255, 0~255, 0~255 0~255, 0~255, 0~255, 0~255 0~255, 0~255, 0~255, 0~255 Cancel, OK Contrast, Sharpness, Gamma Brightness, Brilliant Color, Color Temperature Projector, Mute, Digital Zoom, 3D All, 01 ~ 99 - 25 - - Acer F7200 | User Manual - Page 35
Image Menu Press the MENU button to open the OSD menu. Press the cursor ◄► button to move to the Image Menu. Press the cursor ▲▼ button to move up and down in the Image menu. Press ◄► to change values for settings. ITEM Display Mode Brilliant Color Brightness Contrast Sharpness Gamma Advanced Reset - Acer F7200 | User Manual - Page 36
Advanced Feature Press the Menu button to open the OSD menu. Press ◄► to move to the Image menu. Press ▼▲ to move to the Advanced menu and then press (Enter) or ►. Press ▼▲ to move up and down in the Advanced menu. ITEM DESCRIPTION Color Space Color Temperature Color Manager White Balance Press - Acer F7200 | User Manual - Page 37
Color Manager Press (Enter) / ► to enter the Color Manager sub menu. ITEM Red Green Blue Cyan Magenta Yellow White DESCRIPTION Select to enter the Red Color Manager. Press the ◄► buttons to adjust the Hue, Saturation, and Gain. Select to enter the Green Color Manager. Press the ◄► buttons to - Acer F7200 | User Manual - Page 38
White Balance Press (Enter) or ► button to enter the White Balance sub menu. ITEM R Gain G Gain B Gain R Offset G Offset B Offset DESCRIPTION Press the ◄► buttons to adjust the Red Gain. Press the ◄► buttons to adjust the Green Gain. Press the ◄► buttons to adjust the Blue Gain. Press the ◄► - Acer F7200 | User Manual - Page 39
Computer Menu Press the MENU button to open the OSD menu. Press the cursor ◄► button to move to the Computer menu. Press the cursor ▲▼ button to move up and down in the computer menu. Press ◄► to change values for settings. ITEM DESCRIPTION Horizontal Position Press the cursor ◄► button to adjust - Acer F7200 | User Manual - Page 40
Video Menu Press the MENU button to open the OSD menu. Press the cursor ◄► button to move to the Video menu. Press the cursor ▲▼ button to move up and down in the Video menu. Press ◄► to change values for settings. ITEM Video AGC Video Saturation Video Tint Closed Captioning Audio Reset - Acer F7200 | User Manual - Page 41
Audio Press (Enter) / ► to enter the Audio sub menu. ITEM Volume Mute DESCRIPTION Press the ◄► buttons to enter and adjust the audio volume. Press the ◄► buttons to enter and turn on or off the speaker. - 32 - - Acer F7200 | User Manual - Page 42
Installation I Menu Press the MENU button to open the OSD menu. Press the cursor ◄► button to move to the Installation I menu. Press the cursor ▲▼ button to move up and down in the Installation I menu. Press ◄► to change values for settings. ITEM Language Blank Screen Projection Aspect Ratio - Acer F7200 | User Manual - Page 43
Advanced Feature Press the Menu button to open the OSD menu. Press ◄► to move to the Installation I menu. Press ▲▼ to move to the Advanced menu and then press (Enter) or ►. Press ▲▼ to move up and down in the Advanced menu. Press ◄► to change values for setting. ITEM DESCRIPTION Security Lock - Acer F7200 | User Manual - Page 44
Installation II Menu Press the MENU button to open the OSD menu. Press the cursor ◄► button to move to the Installation II menu. Press the cursor ▲▼ button to move up and down in the Installation II menu. ITEM Auto Source Auto Power Off (min.) Auto Power On Fan Speed Lamp Mode Advanced Reset All - Acer F7200 | User Manual - Page 45
Network. Press (Enter) / ► to enter the Remote Setting menu. See page 48 for more information on Remote Setting. Note: About "On By Lan", RJ45 will support to be waked up in this mode(Under 2W) but scalar won't. Note: To enjoy the 3D function, first enable the Play Movie in 3D - Acer F7200 | User Manual - Page 46
OSD Menu Setting ITEM Menu Position Translucent Menu Menu Display DESCRIPTION Press ◄► button to select different OSD location. Press ◄► button to select OSD background translucent level. Press ◄► button to select OSD timeout delay. - 37 - - Acer F7200 | User Manual - Page 47
Lamp Hour Reset Please refer to Resetting the Lamp on page 52 to reset the lamp hour counter. 3D ITEM 3D 3D Sync Invert 3D Format DESCRIPTION Press ◄► to select Off, DLP-Link or IR. Press ◄► to turn 3D Sync Invert On or Off. Press ◄► to enable or disable 3D Format. - 38 - - Acer F7200 | User Manual - Page 48
Network ITEM Network State DHCP IP Address Subnet Mask Gateway DNS Apply DESCRIPTION Displays the network connection status. Press ◄► to turn DHCP On or Off. Note: If you select DHCP Off, complete the IP Address, Subnet Mask, Gateway, and DNS fields. Enter a valid IP address if DHCP is turned off. - Acer F7200 | User Manual - Page 49
of Extron Electronics, Inc. of the United States. * AMX is a registered trademark of AMX LLC of the United States. Supported External Devices This projector is supported by the specified commands of the Crestron Electronics controller and related software (ex, RoomView ® ). http://www.crestron.com - Acer F7200 | User Manual - Page 50
LAN RJ45 1. Connect an RJ45 cable to RJ45 ports on the projector and the PC (Laptop). 2. On the PC (Laptop), select Start → Control Panel → Network and Internet. - 41 - - Acer F7200 | User Manual - Page 51
3. Right-click on Local Area Connection, and select Properties. 4. In the Properties window, select the Networking tab, and select Internet Protocol (TCP/IP). 5. Click Properties. - 42 - - Acer F7200 | User Manual - Page 52
Internet Explorer with Adobe Flash Player 9.0 or higher). 12. In the Address bar, input the IP address: 10. 10. 10. 10. 13. Press (Enter) / ►. The projector is setup for remote management. The LAN/RJ45 function displays as follows. Based on network web-page for the input-string in tools tab, the - Acer F7200 | User Manual - Page 53
Network Configuration User Password Admin Password IP Address IP ID Port Projector Name Location Assigned To DHCP (Enabled) IP Address Subnet Mask Default Gateway DNS Server Enabled New Password Confirm Enabled New Password Confirm 15 3 5 10 10 - Acer F7200 | User Manual - Page 54
way, so called "RS232 by TELNET" for LAN/RJ45 interface. Quick Start-Guide for "RS232 by TELNET" Check and get the IP-Address on OSD of the projector. Make sure that laptop/PC can access the web-page of the projector. Make sure that "Windows Firewall" setting to be disabled in case of - Acer F7200 | User Manual - Page 55
Input the command format like the below: telnet ttt.xxx.yyy.zzz 23 ("Enter" key pressed) (ttt.xxx.yyy.zzz: IP-Address of the projector) If Telnet-Connection ready, and user can have RS232 command input, then "Enter" key pressed, the RS232 command will be workable. How to have TELNET - Acer F7200 | User Manual - Page 56
Telnet utility directly after TELNET connection ready 5. Limitation 1 for Telnet-Control: there is only one connection for Telnet-Control in one projector Limitation 2 for Telnet-Control: there is less than 50 bytes for successive network payload for Telnet-Control application. Limitation 3 for - Acer F7200 | User Manual - Page 57
information for RGB source and color standard for Video source. Lamp Time used information is displayed. Showing system Software version. Showing serial number of this projector. - 48 - - Acer F7200 | User Manual - Page 58
your local authority. Warning: Be sure to turn off and unplug the projector at least 30 minutes before replacing the lamp. Failure to do so could If a lamp explodes, the gas and broken shards may scatter inside the projector and they may come out of the exhaust vent. The gas contains toxic mercury - Acer F7200 | User Manual - Page 59
4. Unlock the lamp cover. 5. Pull up and remove the cover. 6. Use a screwdriver to remove the screws from the lamp module. 7. Pull out the lamp module. - 50 - - Acer F7200 | User Manual - Page 60
8. Reverse steps 1 to 7 to install the new lamp module. While installing, align the lamp module with the connector and ensure it is level to avoid damage. Note: The lamp module must sit securely in place and the lamp connector must be connected properly before tightening the screws. - 51 - - Acer F7200 | User Manual - Page 61
Resetting the Lamp Time After replacing the lamp, you should reset the lamp hour counter to zero. Refer to the following: 1. Press the MENU button to open the OSD menu. 2. Press the cursor ◄► button to move to the Installation II menu. Press the cursor button to move down to Advanced. 3. Press the - Acer F7200 | User Manual - Page 62
dust and grime will help ensure trouble-free operation. Warning: 1. Be sure to turn off and unplug the projector at least 30 minutes before cleaning. 4. If a lot of water gets into the projector interior when cleaning, have the projector serviced. Cleaning the Lens You can purchase optic lens - Acer F7200 | User Manual - Page 63
Using the Physical Lock Using the Kensington Security Slot If you are concerned about security, attach the projector to a permanent object with the Kensington slot and a security cable. Note: Contact your vendor for details on purchasing a suitable Kensington security cable. The security lock - Acer F7200 | User Manual - Page 64
parts. For example, if you replace batteries and the problem remains, put the original batteries back and go to the next step. Keep a record of the steps you take when troubleshooting: The information may be useful when calling for technical support or for passing on to service personnel. - 55 - - Acer F7200 | User Manual - Page 65
, please disconnect the AC power cord and wait for one (1) minute before restarting the projector. If any other situation didn't listed in the chart above, please contact your service center. Image Problems Problem: No image appears on the screen 1. Verify the settings on your notebook or desktop - Acer F7200 | User Manual - Page 66
If you have replaced the lamp recently, try resetting the lamp connections. 5. Replace the lamp module. 6. Put the old lamp back in the projector and have the projector serviced. Problem: The lamp goes off 1. Power surges can cause the lamp to turn off. Re-plug power cord. When the Power LED is on - Acer F7200 | User Manual - Page 67
HDMI Q & A Q. What is the difference between a "Standard" HDMI cable and a "High-Speed" HDMI cable? Recently, HDMI Licensing, LLC announced that cables would be tested as Standard or HighSpeed cables. ˙Standard (or "category 1") HDMI cables have been tested to perform at speeds of 75Mhz or up to 2. - Acer F7200 | User Manual - Page 68
Dimensions Ac Input SPECIFICATIONS F7200 0.7" XGA DC3 1024x768 1.5 meters ~ 7 meters 36.9" ~ 215.3" Manual Focus/Manual Zoom 1.6 ~ 2.0 output function) wire remote USB (type B) only for service/mouse control USB (type A) only for power supply; WHDI 3D sync Kensington Security Slot - 59 - - Acer F7200 | User Manual - Page 69
Projection Distance vs. Projection Size (XGA) h Image Height h O A V-Sync Projection Distance Projection Distance and Size Table Standard projection lens: TR: 1.6 ~ 2; offset=50% TELE Distance (m) Diagonal (") Image Width (mm) Image Height (mm) h (mm) O (mm) A (mm) 1.50 3.25 4.06 8.13 36.9 - Acer F7200 | User Manual - Page 70
New Short throw projection lens: TR: 0.81; offset=50% FIX Distance (m) 0.80 1.32 1.65 2.47 Diagonal (") 48.6 80 100 150 Image Width (mm) Image Height (mm) 988 1626 2032 3048 741 1219 1524 2286 h (mm) 370 610 762 1143 O (mm) 370 610 762 1143 A (mm) 0 0 0 0 3.29 200 - Acer F7200 | User Manual - Page 71
Timing Mode Table Signal Resolution H-Sync (KHz) V-Sync (Hz) Composite S-Video Component RGB DP/DVI (Analog) HDMI (Digital) NTSC - 15.7 60.0 ○ PAL/SECAM - 15.6 50.0 ○ 640 x 400 37.9 85.1 - 720 x 400 31.5 70.1 - 720 x 400 37.9 85.0 - 640 x 480 31.5 60.0 - 640 x 480 - Acer F7200 | User Manual - Page 72
27.0 24.0 - ○ - ○ 1080p 28.0 25.0 - ○ - ○ 1080p 33.7 30.0 - ○ - ○ 1080p 56.3 50.0 - ○ - ○ 1080p 67.5 60.0 - ○ - ○ O: Frequency supported -: Frequency not supported Resolution others than native resolution may be display with uneven size of text or line. ★ The - Acer F7200 | User Manual - Page 73
Projector Dimensions 433.16 334.30 348.00 159.20 178.20 - 64 - - Acer F7200 | User Manual - Page 74
. This equipment generates, uses, and can radiate radio frequency energy and, if not installed and used in accordance with the instruction manual, may cause harmful interference to radio communications. Operation of this equipment in a residential area is likely to cause harmful interference - Acer F7200 | User Manual - Page 75
Function command summary table: Supported baud rates 115200 APPENDIX I No Code (character) 1 OKOKOKOKOK\r 2 * 0 IR 001\r 3 * 0 IR 002\r 4 * 0 IR 004\r 5 * 0 IR 006\r 6 * 0 IR 007\r 7 * 0 IR 008\r 8 * 0 IR 009\r 9 * 0 IR 010\r 10 * 0 - Acer F7200 | User Manual - Page 76
No Code (character) 37 * 0 IR 040\r 38 * 0 IR 041\r 39 * 0 IR 042\r 40 * 0 IR 043\r 41 * 0 IR 044\r 42 * 0 IR 045\r 43 * 0 IR 046\r 44 * 0 IR 047\r 45 * 0 IR 048\r 46 * 0 IR 049\r 47 * 0 IR 050\r 48 * 0 IR 051\r 49 * 0 IR 052\r 50 * 0 Lamp ?\r 51 * 0 Lamp\r 52 * 0 Src - Acer F7200 | User Manual - Page 77
20 31 0d 3 XXXX\r 58 58 58 58 0d Function feature Return Lamp OFF status Return Lamp ON status Return Lamp hours Source command type (Projector 'receives' commands) NO Code (character) Code (HEX) 1 * 0 Src ?\r 2a 20 30 20 53 72 63 20 3f 0d Function feature Query source input type - 68
-
 1
1 -
 2
2 -
 3
3 -
 4
4 -
 5
5 -
 6
6 -
 7
7 -
8
-
9
-
10
-
11
-
12
-
13
-
14
-
15
-
16
-
17
-
18
-
19
-
20
-
21
-
22
-
23
-
24
-
25
-
26
-
27
-
28
-
29
-
30
-
31
-
32
-
33
-
34
-
35
-
36
-
37
-
38
-
39
-
40
-
41
-
42
-
43
-
44
-
45
-
46
-
47
-
48
-
49
-
50
-
51
-
52
-
53
-
54
-
55
-
56
-
57
-
58
-
59
-
60
-
61
-
62
-
63
-
64
-
65
-
66
-
67
-
68
-
69
-
70
-
71
-
72
-
73
-
74
-
75
-
76
-
77
 |
 |

Acer Projector
F7200 / LV-X01 / Y510
F7500 / LV-801 / Y550
F7600 / LV-WU01 / Y560
Series User
’
s Guide