Acer F7200 User Manual - Page 14
Warning
 |
View all Acer F7200 manuals
Add to My Manuals
Save this manual to your list of manuals |
Page 14 highlights
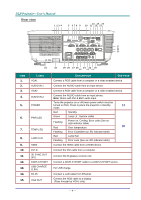
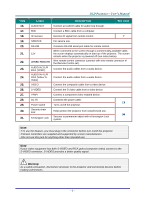
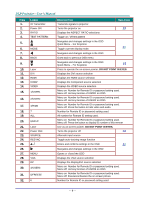
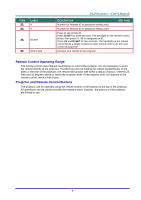
ITEM 16. 17. 18. 19. 20. 21. 22. 23. 24. 25. 26. 27. 28. 29. 30. 31. LABEL DESCRIPTION SEE PAGE AUDIO OUT Connect an AUDIO cable for audio loop through. BNC Connect a BNC cable from a computer. IR receiver Receive IR signal from remote control. 7 SERVICE For service use. RS-232 12V WIRED REMOTE AUDIO IN 3 L/R RCA (YPbPr) AUDIO IN 4 L/R RCA (Video/ SVideo) Connects RS-232 serial port cable for remote control. When connected to the screen through a commercially available cable, the screen deploys automatically on start up of the projector. The screen retracts when the projector is powered off (see notes below). Wire remote control connector (connect with wire remote connector of the Remote Control set). Connect the audio cables from a audio device. Connect the audio cables from a audio device. VIDEO Connect the composite cable from a video device. S-VIDEO Connect the S-video cable from a video device. YPbPr Connect a component video enabled device. AC IN Connects the power cable. 13 Power switch Turns on/off the projector. Security chain lock Helps protect the projector from unauthorized use. 54 Kensington Lock Secures to permanent object with a Kensington Lock system. Note: To use this feature, you must plug in the connector before turn on/off the projector. Screen controllers are supplied and supported by screen manufacturers. Do not use this jack for anything other than intended use. Note: If your video equipment has both S-VIDEO and RCA jacks (composite video) connect to the S-VIDEO connector. S-VIDEO provides a better quality signal. Warning: As a safety precaution, disconnect all power to the projector and connecting devices before making connections. - 5 -
-
 1
1 -
2
-
3
-
4
-
5
-
6
-
7
-
8
-
 9
9 -
 10
10 -
 11
11 -
 12
12 -
 13
13 -
 14
14 -
 15
15 -
 16
16 -
 17
17 -
 18
18 -
 19
19 -
20
-
21
-
22
-
23
-
24
-
25
-
26
-
27
-
28
-
29
-
30
-
31
-
32
-
33
-
34
-
35
-
36
-
37
-
38
-
39
-
40
-
41
-
42
-
43
-
44
-
45
-
46
-
47
-
48
-
49
-
50
-
51
-
52
-
53
-
54
-
55
-
56
-
57
-
58
-
59
-
60
-
61
-
62
-
63
-
64
-
65
-
66
-
67
-
68
-
69
-
70
-
71
-
72
-
73
-
74
-
75
-
76
-
77
 |
 |
