Alpine 9861 Owners Manual - Page 17
DVD/Video CD - dva manual
 |
UPC - 793276500533
View all Alpine 9861 manuals
Add to My Manuals
Save this manual to your list of manuals |
Page 17 highlights
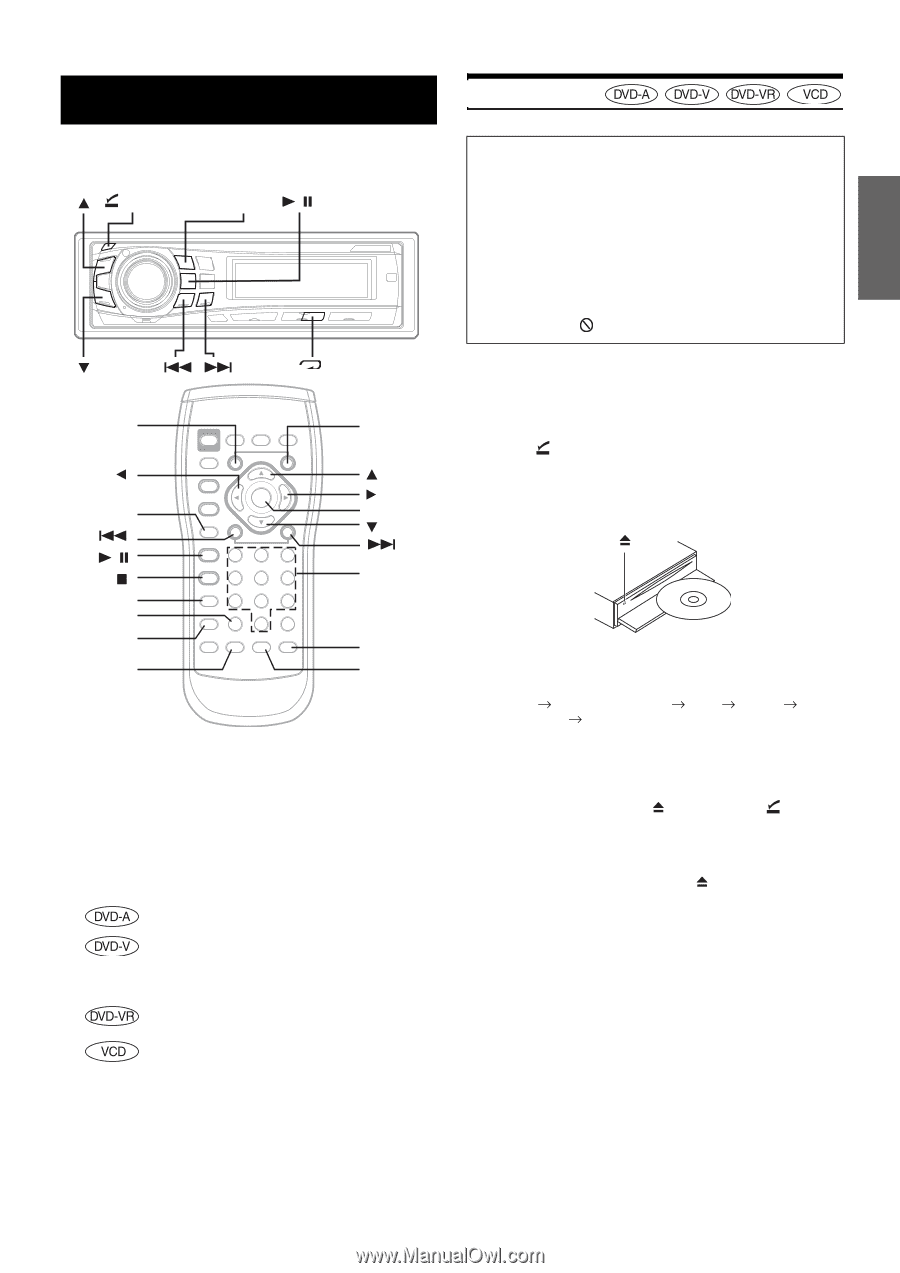
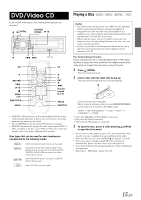
DVD/Video CD In this section, both remote control and main unit operation are described. (OPEN) SOURCE/ POWER / 4 DN UP RETURN / MENU CLR DISP./TOP M. AUDIO ENT. Numeric keypad (0 to 9) ANGLE SUBTITLE • DVD/Video CD operations can be performed from both the remote control and the main unit. In this section, both remote control and main unit operations are described. • To view DVD/Video CD, the optional TV monitor is required. • DVA-9861 automatically changes the video output signal (NTSC or PAL), according to the disc. To set NTSC or PAL on the connected monitor, refer to the Owner's Manual of the monitor. Disc types that can be used for each heading are represented by the following marks. DVD Commercial Audio discs can be used. DVD Commercial Video discs (used for the distribution of movies, etc.) or a DVD-R/DVDRW/DVD+R/DVD+RW recorded in a video mode can be used. DVD-R/DVD-RW discs recorded in DVD-VR mode can be used. Video CD discs can be used. Playing a Disc Caution • Not all functions will operate for every DVD. See the individual DVD's instructions for details on the features supported. • Fingerprints on a disc may adversely affect playback. If a problem occurs, remove the disc and check for fingerprints on the playback side. Clean the disc if necessary. • When using the remote control, be careful to press only one button at a time. Pressing multiple buttons at the same time may cause erroneous operation. • If you try to perform an invalid operation (based on the type of disc being played), the following mark is displayed on the monitor screen: Play Position Memory Function Even if you turn power off or switch the Ignition Key to OFF during playback or change the source, playback will continue from the point where playback stopped when the power is turned ON again. 1 Press (OPEN). The front panel will open. 2 Insert a disc with the label side facing up. The disc will be pulled into the unit automatically. Close the front panel manually. When a disc is already inserted, press SOURCE/POWER on the main unit to switch to the DISC mode. TUNER XM RADIO/SIRIUS*1 DISC IPOD*2 CHANGER*3 TUNER *1 Only when XM Radio or Sirius Radio is connected. *2 Only when the iPod is connected. *3 Only when the CD changer is connected. 3 To eject the disc, press after pressing to open the front panel. (OPEN) • Do not remove a disc during its eject cycle. Do not load more than one disc at a time. A malfunction may result from doing either. • If the disc does not eject, press and hold for at least 2 seconds. • The reverse side of a double-sided DVD will not be played automatically. Remove the disc, turn it over, and reinsert it. • Never insert map discs for navigation purposes as they could damage the equipment. • Refer also to "DVD Setup" (pages 26 to 28). 15-EN
-
 1
1 -
2
-
3
-
4
-
5
-
6
-
7
-
8
-
9
-
10
-
11
-
 12
12 -
 13
13 -
 14
14 -
 15
15 -
 16
16 -
 17
17 -
 18
18 -
 19
19 -
 20
20 -
 21
21 -
 22
22 -
23
-
24
-
25
-
26
-
27
-
28
-
29
-
30
-
31
-
32
-
33
-
34
-
35
-
36
-
37
-
38
-
39
-
40
-
41
-
42
-
43
-
44
-
45
-
46
-
47
-
48
-
49
-
50
-
51
-
52
-
53
-
54
-
55
-
56
-
57
-
58
-
59
-
60
-
61
-
62
-
63
-
64
-
65
-
66
-
67
-
68
-
69
-
70
-
71
-
72
-
73
-
74
-
75
-
76
-
77
-
78
-
79
-
80
-
81
-
82
-
83
-
84
-
85
-
86
-
87
-
88
-
89
-
90
-
91
-
92
-
93
-
94
-
95
-
96
-
97
-
98
-
99
-
100
-
101
-
102
-
103
-
104
-
105
-
106
-
107
-
108
-
109
-
110
-
111
-
112
-
113
-
114
-
115
-
116
-
117
-
118
-
119
-
120
-
121
-
122
-
123
-
124
-
125
-
126
-
127
-
128
-
129
-
130
-
131
-
132
-
133
-
134
-
135
-
136
-
137
-
138
-
139
-
140
-
141
-
142
-
143
-
144
-
145
-
146
-
147
-
148
-
149
-
150
-
151
-
152
-
153
-
154
-
155
-
156
-
157
-
158
-
159
-
160
-
161
-
162
-
163
-
164
-
165
-
166
-
167
-
168
-
169
-
170
-
171
-
172
-
173
-
174
-
175
-
176
-
177
-
178
-
179
-
180
-
181
-
182
-
183
-
184
-
185
-
186
-
187
-
188
-
189
-
190
-
191
-
192
-
193
-
194
-
195
-
196
-
197
-
198
-
199
-
200
-
201
-
202
-
203
-
204
-
205
-
206
-
207
-
208
 |
 |