Alpine 9861 Owners Manual - Page 29
When the setting is complete, press, Setting the language, Setting the TV Screen, Setting - monitor box
 |
UPC - 793276500533
View all Alpine 9861 manuals
Add to My Manuals
Save this manual to your list of manuals |
Page 29 highlights
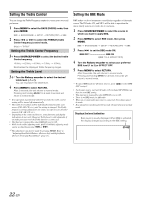
4 When the setting is complete, press SETUP. The setup returns to normal mode. • When settings are changed, old settings are overwritten. Make a note of the current settings before making changes. If the vehicles battery is disconnected, the settings will be cleared and will return to the factory settings. Setting the language The audio language, subtitle language and menu language can be set according to your preferences. Once set, this becomes the default language. This function is convenient when you always want to listen in English. (Not all discs allow changing the default language. If not, the factory default language applies.) Setting item: LANGUAGES Further setting items: AUDIO / SUBTITLE / MENU AUDIO: Set the audio track language. SUBTITLE: Set the language of the subtitles displayed on the screen. MENU: Set the language used for the menus (title menu, etc.). SETUP L ANGUAGES AUD I O SUBT I TLE MENU AUTO AUTO AUTO Setting contents: AUDIO mode / MENU mode AUTO *1 / ENGLISH / JAPANESE / GERMAN / SPANISH / FRENCH / ITALIAN / SWEDISH / CHINESE / OTHERS *2 SUBTITLE mode AUTO *1 / ENGLISH / JAPANESE / GERMAN / SPANISH / OFF / FRENCH / ITALIAN / SWEDISH / CHINESE / OTHERS *2 Press , , or to select your desired language, then press ENT. *1 AUTO: The disc is played with the audio language or subtitle language set as the priority language for the disc. *2 OTHERS: Set this to play the disc with a language other than one of the languages displayed. Press ENT. then use the numeric keypad "0" to "9" to input the 4-digit language code. Then press ENT. again. For the language codes, refer to "List of Language Codes" (page 54). • If you change the language setting when the disc is inside, the setting is decided with one of the following operations. - Turn OFF the main unit - Switch the source on the head unit. • To temporarily change the language of the current disc, either do so from the DVD menu or using the operation described in the section "Switching the Audio Tracks" (page 19). • If the disc does not include the selected language, the disc's default language is set. • Languages set upon shipment from the factory: Audio language : AUTO Subtitle language : AUTO Menu language : AUTO • Press RETURN to return to the previous display. Setting the TV Screen Use the procedure described below to set the output screen according to the type of TV monitor being used. Setting item: TV SCREEN Setting contents: 16:9 (WIDE) / 4:3 (LETTER BOX) / 4:3 (PAN SCAN) • For some discs, the picture may not be set to the selected screen size. (For details, refer to the explanation on the disc's jacket.) • Press RETURN to return to the previous screen. 16:9 (WIDE) Select this when connected to a wide screen TV. This is selected upon shipment from the factory. 4:3 LB (LETTER BOX) Select this when connected to a conventional 4:3 size (normal TV aspect ratio) monitor. There may be black bands visible at the top and bottom of the screen (when playing a 16 : 9 size movie). The width of these stripes will depend upon the original aspect ratio of the theatre release of the movie. 4:3 PS (PAN- SCAN) Select this when connected to a conventional 4:3 size monitor. The picture will fill the entire TV screen. However, due to the mismatch in aspect ratio, parts of the movie at the extreme left and right sides will not be visible (when playing a 16 : 9 size movie). Setting the Country Code Set the country code of which you want to set the rating level (Parental lock). Setting item: PARENTAL Further setting item: COUNTRY CODE Setting contents: CODE 1 Press or to select "PARENTAL," then press ENT. 2 Use the numeric keypad "0" to "9" to input the 4-digit password, then press ENT. PASSWORD * * * * Input numbers are displayed as "*." The default password is 1111 upon shipment from the factory. The PARENTAL display appears. • Can be erased one digit at a time each time CLR is pressed. Press CLR for at least 2 seconds to delete all digits. • Press RETURN to return to the previous screen. • If the password is wrong, the unit returns to the password input display, after displaying "PASSWORD ERROR" for 3 seconds. 27-EN
-
 1
1 -
2
-
3
-
4
-
5
-
6
-
7
-
8
-
9
-
10
-
11
-
12
-
13
-
14
-
15
-
16
-
17
-
18
-
19
-
20
-
21
-
22
-
23
-
 24
24 -
 25
25 -
 26
26 -
 27
27 -
 28
28 -
 29
29 -
 30
30 -
 31
31 -
 32
32 -
 33
33 -
 34
34 -
35
-
36
-
37
-
38
-
39
-
40
-
41
-
42
-
43
-
44
-
45
-
46
-
47
-
48
-
49
-
50
-
51
-
52
-
53
-
54
-
55
-
56
-
57
-
58
-
59
-
60
-
61
-
62
-
63
-
64
-
65
-
66
-
67
-
68
-
69
-
70
-
71
-
72
-
73
-
74
-
75
-
76
-
77
-
78
-
79
-
80
-
81
-
82
-
83
-
84
-
85
-
86
-
87
-
88
-
89
-
90
-
91
-
92
-
93
-
94
-
95
-
96
-
97
-
98
-
99
-
100
-
101
-
102
-
103
-
104
-
105
-
106
-
107
-
108
-
109
-
110
-
111
-
112
-
113
-
114
-
115
-
116
-
117
-
118
-
119
-
120
-
121
-
122
-
123
-
124
-
125
-
126
-
127
-
128
-
129
-
130
-
131
-
132
-
133
-
134
-
135
-
136
-
137
-
138
-
139
-
140
-
141
-
142
-
143
-
144
-
145
-
146
-
147
-
148
-
149
-
150
-
151
-
152
-
153
-
154
-
155
-
156
-
157
-
158
-
159
-
160
-
161
-
162
-
163
-
164
-
165
-
166
-
167
-
168
-
169
-
170
-
171
-
172
-
173
-
174
-
175
-
176
-
177
-
178
-
179
-
180
-
181
-
182
-
183
-
184
-
185
-
186
-
187
-
188
-
189
-
190
-
191
-
192
-
193
-
194
-
195
-
196
-
197
-
198
-
199
-
200
-
201
-
202
-
203
-
204
-
205
-
206
-
207
-
208
 |
 |