Alpine 9861 Owners Manual - Page 26
Setup - dva wallpaper
 |
UPC - 793276500533
View all Alpine 9861 manuals
Add to My Manuals
Save this manual to your list of manuals |
Page 26 highlights
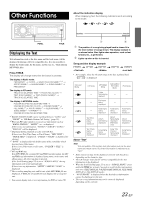
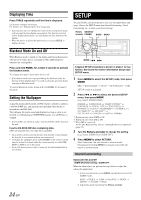
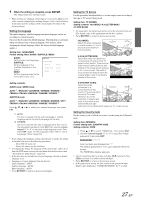
Displaying Time Press TITLE repeatedly until the time is displayed. Each press changes the display. For details, see "Displaying the Text" (page 23). • Selecting any tuner or CD function while in the clock priority mode will interrupt the time display momentarily. The function selected will be displayed for about 5 seconds before the time returns to the display. • When the power is off but the ignition key is on, press TITLE to display the time. SETUP You can flexibly customize the unit to suit your own preferences and usage. Choose the SETUP menu from Sound Customizing, Visual Customizing, etc., to select your desired setting. Rotary SOURCE/ encoder POWER BAND MENU Blackout Mode On and Off When Blackout mode is turned on, the display and button illumination will turn off to reduce power consumption. This additional power enhances the sound quality. Press and hold FUNC. for at least 2 seconds to activate the blackout mode. The display and button illumination will turn off. • If any button on the unit is pressed during the blackout mode, the function will be displayed for 5 seconds to show the operation before returning to Blackout mode. To cancel Blackout mode, press and hold FUNC. for at least 2 seconds Setting the Wallpaper A data file downloaded from the ALPINE Owner's website is written to a CD-R/CD-RW disc, and automatically uploaded when the disc is inserted into the DVA-9861. The wallpaper file can be saved and displayed as long as a disc is not inserted, or while playing a CD/MP3/WMA audio, or if a DVD disc is stopped. • If several files are stored in a disc, only the first file will be stored on the unit. Insert a CD-R/CD-RW disc containing data. After sensing the disc, the data file is updated. • Up to 2 files can be stored on this unit. If a third file is downloaded, the first file is overwritten and new one memorized. • To change the wallpaper, press and hold ENT. on the remote control unit for at least 2 seconds while disc is not inserted, or while PRESTOP or STOP is set in disc mode. • Even if the battery power cable is removed, the downloaded data is not cleared. MODE A typical SETUP procedure is shown in steps 1 to 4 as follows. See below for further information about each SETUP menu. 1 Press MENU to select the SETUP mode, then press MODE. BBE BASS ENGINE SETUP RETURN (OFF) BBE SETUP mode is activated. 2 Press or to select the desired SETUP menu, then press MODE. (e.g. Select SUBWOOFER) DIMMER SUBWOOFER (SUBW SYSTEM)*1 PLAY MODE SCROLL TYPE TEXT SCROLL INT MUTE AUX IN (AUXNAME)*2 POWER IC (CH SELECT)*3 (XM ADF)*3 OPT OUTPUT STATION DEMO DIMMER *1 Displayed only when SUBW is ON. *2 Displayed only when AUX is ON. *3 When SAT is connected. For the SAT Radio Setting, refer to "SAT Radio Receiver (Optional)" (page 32). 3 Turn the Rotary encoder to change the setting. (e.g. Select SUBW ON or SUBW OFF.) 4 Press MENU to select RETURN. After 2 seconds, the unit returns to normal mode. Pressing and holding MENU for at least 2 seconds will return to normal mode. Sound Customizing Subwoofer On and Off SUBW ON (Initial setting) / SUBW OFF When the subwoofer is on, perform the steps below to adjust the subwoofer output level. 1 In the normal mode, press MODE repeatedly to select the SUBW mode. BASS TREBLE SUBW BALANCE FADER DEFEAT VOLUME BASS 2 Adjust the level by turning the Rotary encoder. 24-EN
-
 1
1 -
2
-
3
-
4
-
5
-
6
-
7
-
8
-
9
-
10
-
11
-
12
-
13
-
14
-
15
-
16
-
17
-
18
-
19
-
20
-
 21
21 -
 22
22 -
 23
23 -
 24
24 -
 25
25 -
 26
26 -
 27
27 -
 28
28 -
 29
29 -
 30
30 -
 31
31 -
32
-
33
-
34
-
35
-
36
-
37
-
38
-
39
-
40
-
41
-
42
-
43
-
44
-
45
-
46
-
47
-
48
-
49
-
50
-
51
-
52
-
53
-
54
-
55
-
56
-
57
-
58
-
59
-
60
-
61
-
62
-
63
-
64
-
65
-
66
-
67
-
68
-
69
-
70
-
71
-
72
-
73
-
74
-
75
-
76
-
77
-
78
-
79
-
80
-
81
-
82
-
83
-
84
-
85
-
86
-
87
-
88
-
89
-
90
-
91
-
92
-
93
-
94
-
95
-
96
-
97
-
98
-
99
-
100
-
101
-
102
-
103
-
104
-
105
-
106
-
107
-
108
-
109
-
110
-
111
-
112
-
113
-
114
-
115
-
116
-
117
-
118
-
119
-
120
-
121
-
122
-
123
-
124
-
125
-
126
-
127
-
128
-
129
-
130
-
131
-
132
-
133
-
134
-
135
-
136
-
137
-
138
-
139
-
140
-
141
-
142
-
143
-
144
-
145
-
146
-
147
-
148
-
149
-
150
-
151
-
152
-
153
-
154
-
155
-
156
-
157
-
158
-
159
-
160
-
161
-
162
-
163
-
164
-
165
-
166
-
167
-
168
-
169
-
170
-
171
-
172
-
173
-
174
-
175
-
176
-
177
-
178
-
179
-
180
-
181
-
182
-
183
-
184
-
185
-
186
-
187
-
188
-
189
-
190
-
191
-
192
-
193
-
194
-
195
-
196
-
197
-
198
-
199
-
200
-
201
-
202
-
203
-
204
-
205
-
206
-
207
-
208
 |
 |