Alpine 9861 Owners Manual - Page 31
Audio Setup - dva remote
 |
UPC - 793276500533
View all Alpine 9861 manuals
Add to My Manuals
Save this manual to your list of manuals |
Page 31 highlights
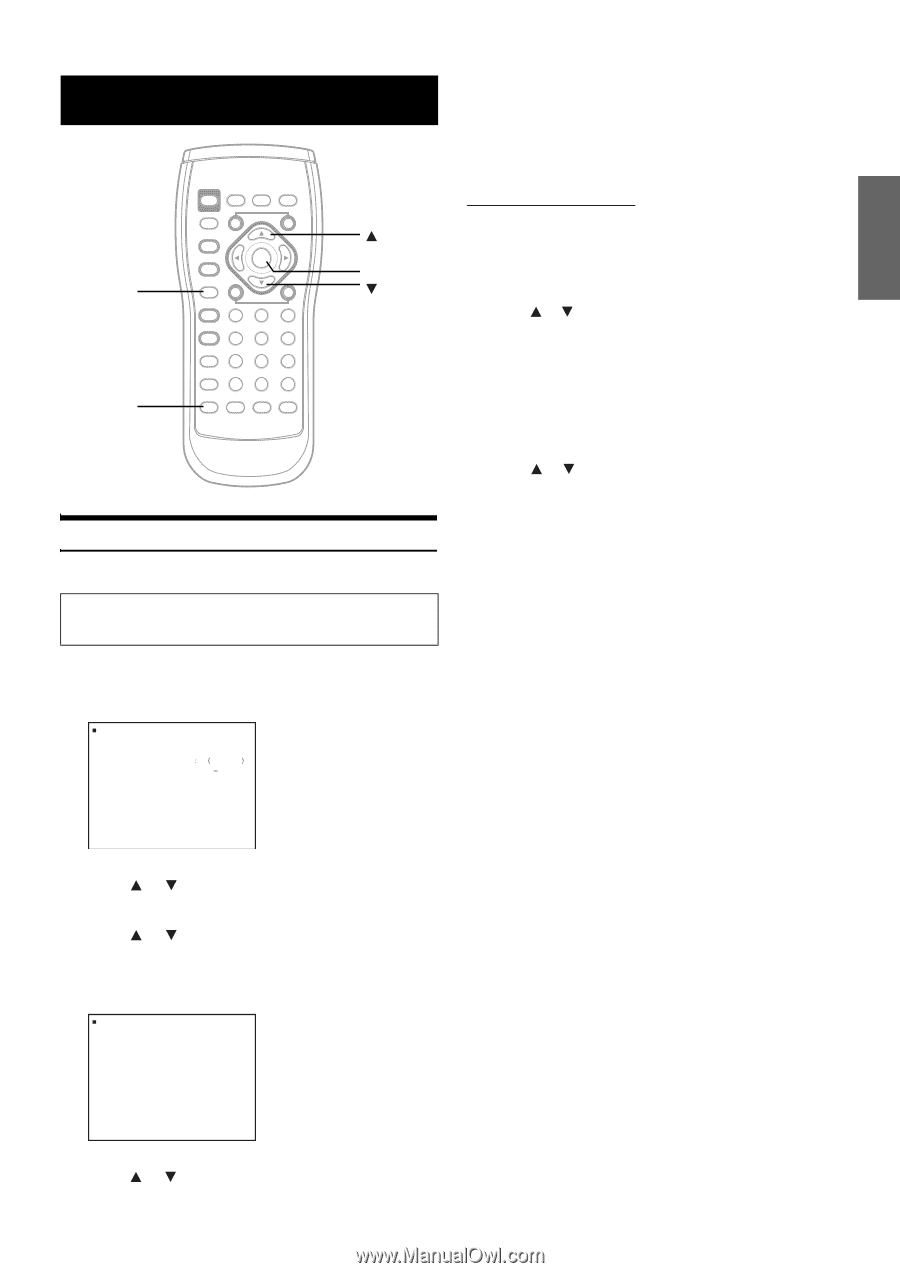
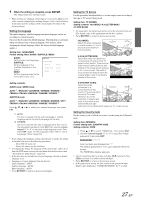
Audio Setup RETURN SETUP ENT. Audio Setup Operation • Audio Setup Operation is performed by the remote control unit. The following 5 steps are common to each of the Audio Setup settings. Refer to the specific section for details. 1 Press SETUP before inserting a disc, or when in stop mode. The setup menu appears on the monitor. SETUP L ANGUAGES TV SCRE EN 16 9 PAR E NTA L OF F AUD I O SETUP CUS TOM S E T UP WI DE EN 5 When the setting is complete, press SETUP. The setup returns to normal mode. • When settings are changed, old settings are overwritten. Make a note of the current settings before making changes. If the vehicle's battery is disconnected, the settings will be cleared and will return to the factory settings. Setting the Digital Output Use the following procedure to set the digital audio signal output from the DVA-9861. Setting item: DIGITAL OUT Further setting items: DOLBY D / DTS Press or to select your desired setting item, then press ENT. DOLBY D: DTS: Sets Dolby Digital output. The initial setting is BITSTREAM. Sets DTS output. The initial setting is BITSTREAM. Setting contents: BITSTREAM / LPCM Press or to select BITSTREAM or LPCM, then press ENT. BITSTREAM:The digital output is switched automatically according to the type of audio signal being played. Be sure to select "BITSTREAM" when you want to connect a digital audio processor and play Dolby Digital audio. "BITSTREAM" is selected upon shipment from the factory. LPCM: The audio signal recorded on the disc is converted to 48 kHz/16 bit (for DVDs) or 44.1 kHz (for video CDs and CDs) linear PCM audio signals for output. • Press RETURN to return to the previous screen. 2 Press or to select "AUDIO SETUP," then press ENT. 3 Press or to select your desired setting item, then press ENT. AUDIO SETUP items: DIGITAL OUT/ DOWNMIX MODE SETUP AUD I O SETUP D I G I TA L OUT DOWNM I X MOD E SURROUND 4 Press or to change the setting, then press ENT. 29-EN
-
 1
1 -
2
-
3
-
4
-
5
-
6
-
7
-
8
-
9
-
10
-
11
-
12
-
13
-
14
-
15
-
16
-
17
-
18
-
19
-
20
-
21
-
22
-
23
-
24
-
25
-
 26
26 -
 27
27 -
 28
28 -
 29
29 -
 30
30 -
 31
31 -
 32
32 -
 33
33 -
 34
34 -
 35
35 -
 36
36 -
37
-
38
-
39
-
40
-
41
-
42
-
43
-
44
-
45
-
46
-
47
-
48
-
49
-
50
-
51
-
52
-
53
-
54
-
55
-
56
-
57
-
58
-
59
-
60
-
61
-
62
-
63
-
64
-
65
-
66
-
67
-
68
-
69
-
70
-
71
-
72
-
73
-
74
-
75
-
76
-
77
-
78
-
79
-
80
-
81
-
82
-
83
-
84
-
85
-
86
-
87
-
88
-
89
-
90
-
91
-
92
-
93
-
94
-
95
-
96
-
97
-
98
-
99
-
100
-
101
-
102
-
103
-
104
-
105
-
106
-
107
-
108
-
109
-
110
-
111
-
112
-
113
-
114
-
115
-
116
-
117
-
118
-
119
-
120
-
121
-
122
-
123
-
124
-
125
-
126
-
127
-
128
-
129
-
130
-
131
-
132
-
133
-
134
-
135
-
136
-
137
-
138
-
139
-
140
-
141
-
142
-
143
-
144
-
145
-
146
-
147
-
148
-
149
-
150
-
151
-
152
-
153
-
154
-
155
-
156
-
157
-
158
-
159
-
160
-
161
-
162
-
163
-
164
-
165
-
166
-
167
-
168
-
169
-
170
-
171
-
172
-
173
-
174
-
175
-
176
-
177
-
178
-
179
-
180
-
181
-
182
-
183
-
184
-
185
-
186
-
187
-
188
-
189
-
190
-
191
-
192
-
193
-
194
-
195
-
196
-
197
-
198
-
199
-
200
-
201
-
202
-
203
-
204
-
205
-
206
-
207
-
208
 |
 |