Alpine CDE-HD148BT User Manual - Page 19
External Device, Setting the Media Xpander mode, Setting the Time Correction Unit, LENGTH, Adjusting
 |
View all Alpine CDE-HD148BT manuals
Add to My Manuals
Save this manual to your list of manuals |
Page 19 highlights
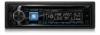
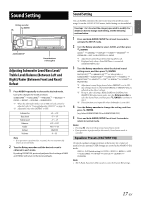
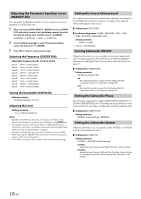
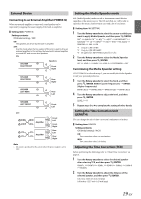
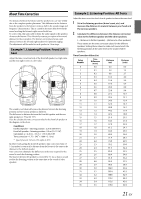
External Device Connecting to an External Amplifier (POWER IC) When an external amplifier is connected, sound quality can be improved by stopping the power supply of the built-in amplifier. Setting item: POWER IC Setting contents: ON (Initial setting) / OFF ON: The speakers are driven by the built-in amplifier. OFF: Use this mode when the line output of this unit is used to drive an external amplifier. In this setting, the head unit's internal amplifier is turned OFF and cannot drive speakers. ON: SPEAKER RIGHT FRONT Speakers Front Right SPEAKER RIGHT REAR SPEAKER LEFT REAR Rear Right Rear Left SPEAKER LEFT FRONT Front Left OFF: Amplifier Amplifier Front Left Front Right Rear Left Rear Right Note • No sound is produced by the system when the power output is set to OFF. Setting the Media Xpander mode MX (Media Xpander) makes vocals or instruments sound distinct regardless of the music source. The CD and iPod, etc. will be able to reproduce the music clearly even in cars with a lot of road noise. Setting item: MX SETTING 1 Turn the Rotary encoder to select the source to which you want to apply Media Xpander, and then press ENTER. FM*1 ANALOG TU*2 HD1*2 HD2*2 HD3&OTHER*2 SIRIUSXM*2 CD CMPM*3 USB IPOD BT AUDIO PANDORA AUX FM *1 Only for CDE-147BT. *2 Only for CDE-HD148BT. *3 Be applied for MP3/WMA/AAC files in disc. 2 Turn the Rotary encoder to select the Media Xpander level, and then press ENTER. OFF LEVEL 1 LEVEL 2 LEVEL 3 CUSTOMIZE OFF Customizing the Media Xpander setting If CUSTOMIZE is selected in step 2, you can modify the Media Xpander to suit your personal preference. 3 Turn the Rotary encoder to select the Band, and then press ENTER. BAND1 (Lower frequencies) BAND3 (Higher Frequencies) BAND1 (Bass) BAND2 (Mid) BAND3 (High) BAND1 (Bass) 4 Turn the Rotary encoder to adjust the level, and then press ENTER. LEVEL: 0 ~ 8 5 Repeat steps 3 to 4 to complete the setting of other bands. Setting the Time Correction Unit (LENGTH) You can change the unit of time correction (centimeters or inches). Setting item: LENGTH Setting contents: CM (Initial setting) / INCH CM: Time correction value is in centimeters. INCH: Time correction value is in inches. Adjusting the Time Correction (TCR) Before performing the following, refer to "About Time Correction" on page 21. 1 Turn the Rotary encoder to select the desired speaker after selecting TCR, and then press ENTER. FRONT-L FRONT-R REAR-L REAR-R SUBW-L SUBW-R FRONT-L 2 Turn the Rotary encoder to adjust the distance of the selected speaker, and then press ENTER. 0.0 cm to 336.6 cm (3.4 cm/step) 0.0 inch to 132.7 inch (1.3 inch/step) 19-EN
-
 1
1 -
2
-
3
-
4
-
5
-
6
-
7
-
8
-
9
-
10
-
11
-
12
-
13
-
 14
14 -
 15
15 -
 16
16 -
 17
17 -
 18
18 -
 19
19 -
 20
20 -
 21
21 -
 22
22 -
 23
23 -
 24
24 -
25
-
26
-
27
-
28
-
29
-
30
-
31
-
32
-
33
-
34
-
35
-
36
-
37
-
38
-
39
-
40
-
41
-
42
-
43
-
44
-
45
-
46
-
47
-
48
-
49
-
50
-
51
-
52
-
53
-
54
-
55
-
56
-
57
-
58
 |
 |