Alpine IVA D310 Owners Manual - Page 12
Getting Started - manual
 |
UPC - 793276200433
View all Alpine IVA D310 manuals
Add to My Manuals
Save this manual to your list of manuals |
Page 12 highlights
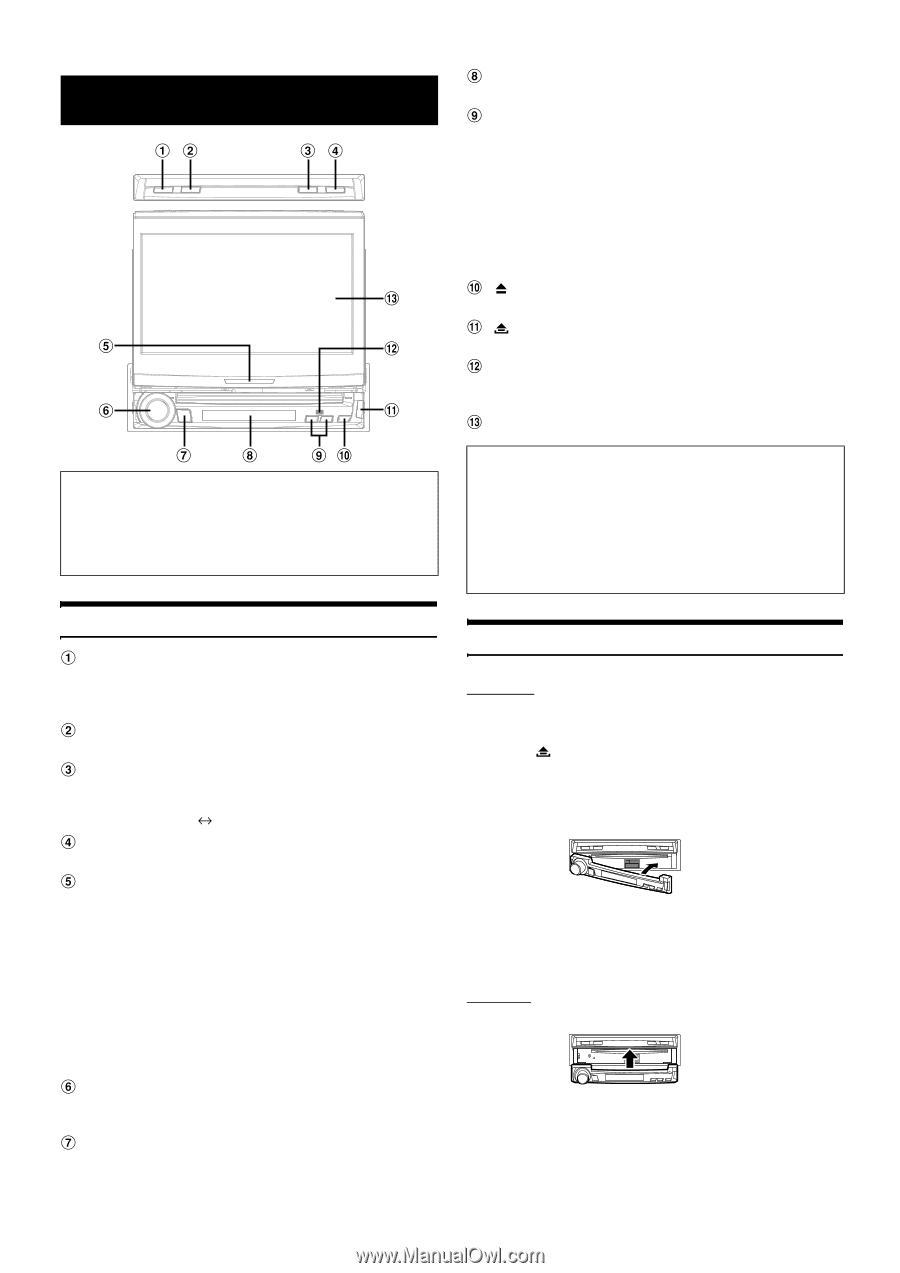
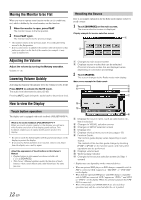
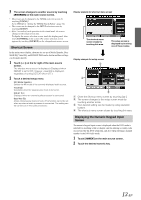
Getting Started Compatibility with Factory Steering Wheel Radio Controls If your vehicle has steering wheel controls for the radio, an optional steering wheel control interface may be available to connect to your Alpine radio. For details, contact your Alpine dealer. Location of Controls BAND button Radio mode: Changes the band. Visual source (except navigation screen): Changes the display mode. MUTE button Turns the MUTE mode ON or OFF. FLAT/SUB DISP. button Press to set the open monitor to the flat position. Press and hold for at least 2 seconds to change the display to the subdisplay (Clock Normal mode for each mode). OPEN/CLOSE button Opens and closes the monitor. Action Indicator The indicator is constantly lit, other than for the following indications. • The indicator blinks when closing the monitor. • The indicator is turned off when the dimmer (monitor display brightness) is set to ON, and is also turned off according to the brightness of the car when the dimmer is set to AUTO. • The indicator slowly blinks when the backlighting (BLACK OUT function) is set to OFF. • The indicator blinks in the voice guidance mode when an ALPINE navigation system is connected. Rotary encoder Adjust the volume by turning to the left or right. If pressed, the audio adjusting screen is displayed. SOURCE/POWER button Turns the power on. Press and hold for at least 2 seconds to turn the power off. Recalls the source selection screen. 10-EN Subdisplay Refer to "About Subdisplay Indications" (pages 59 and 60). TILT DN/UP button Monitor open: The angle of the raised monitor is adjustable between 40° and 105°. If the button is pressed and held, the angle continuously changes. Monitor closed: Pressing the UP/DN button recalls the radio's presets. Pressing the UP/DOWN button changes the track, file or chapter of a disc. Pressing and holding this button advances or reverses the track, file or chapter of a disc. (the same operation is possible for an optional changer, if connected). button Ejects a disc. button Use this button to remove the front panel. Remote Sensor Point the supplied remote control transmitter towards the remote sensor within a range of 2 meters. Monitor About the expression of buttons in this Owner's Manual • The buttons on this unit are expressed in bold (e.g. SOURCE/ POWER). The touch buttons on the display are expressed in bold with [ ] (e.g. [SOURCE]). • This Owner's Manual explains mainly the function of touch buttons, when a touch button and a unit button have the same function. Detaching and Attaching the Front Panel Detaching 1 Turn off the unit power. 2 Press (Release) at the lower right side until the front panel pops out. 3 Grasp the right side of the front panel, lift it up slightly then pull it out. • The front panel may become hot in normal usage (especially the connector terminals on the back of the front panel.) This is not a malfunction. • To protect the front panel, place it in the supplied carrying case. Attaching Attach the front panel squarely onto the main unit until it clicks. • Before attaching the front panel, make sure that there is no dirt or dust on the connector terminals and no foreign object between the front panel and the main unit. • Attach the front panel carefully, holding the sides of the front panel to avoid pushing buttons by mistake.
-
 1
1 -
2
-
3
-
4
-
5
-
6
-
 7
7 -
 8
8 -
 9
9 -
 10
10 -
 11
11 -
 12
12 -
 13
13 -
 14
14 -
 15
15 -
 16
16 -
 17
17 -
18
-
19
-
20
-
21
-
22
-
23
-
24
-
25
-
26
-
27
-
28
-
29
-
30
-
31
-
32
-
33
-
34
-
35
-
36
-
37
-
38
-
39
-
40
-
41
-
42
-
43
-
44
-
45
-
46
-
47
-
48
-
49
-
50
-
51
-
52
-
53
-
54
-
55
-
56
-
57
-
58
-
59
-
60
-
61
-
62
-
63
-
64
-
65
-
66
-
67
-
68
-
69
-
70
-
71
-
72
-
73
-
74
-
75
-
76
-
77
-
78
-
79
-
80
-
81
-
82
-
83
-
84
 |
 |