Archos AV500 User Guide - Page 11
Setting the Recording Parameters, Where is the Recording Saved? - case
 |
UPC - 690590506794
View all Archos AV500 manuals
Add to My Manuals
Save this manual to your list of manuals |
Page 11 highlights
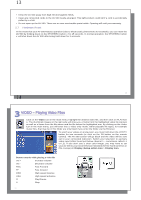
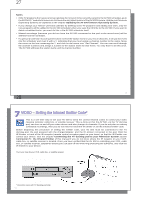
21 5.3 Setting the Recording Parameters You can set the recording parameters manually to suit your specific needs. Click the Setup action icon in the VideoCorder's pre-recording screen. Rename Auto Stop Rec Duration Pre-record Post-record Source Format Resolution Bitrate Sampling 22 Allows you to change the filename before the recording begins. On, Off. If set to On, the AV 500 will stop recording after the duration set in the next line. For example, you want to record a television show for two hours but do not want to stay around for the two hours to manually stop the recording. You would set this parameter to On and the next parameter to 2 hours. If set to Off, the recording will continue until you click on the stop button or until the entire hard drive fills up. This is the duration of time your manual recording will last if Auto Stop Rec above is set to On. This is a safety margin added to the beginning of a scheduled recording which was set via the My Yahoo!® TV scheduler of your personal Yahoo!® calendar. It affects ONLY these recordings. This is just in case the clocks between your AV 500 and the broadcast station are different or if the broadcast station starts earlier than expected. This is a safety margin added to the end of a scheduled recording which was set via the My Yahoo!® TV scheduler of your personal calendar. It affects ONLY these recordings. This is just in case the clocks between your AV 500 and the broadcast station are different or if the broadcast station runs overtime. Composite, S-Video, Auto. You can choose which video input you want the AV 500 to use. Normally, with a good video signal, you can set it to Auto, and the AV 500 will scan the (optional) TV docking pod's two inputs to see which one is receiving video (AV In or S-Video). Auto, 4:3, 5:3, 16:9, 2.35. This is the aspect ratio of the screen that the AV 500 will record. You can set this manually, but in most cases you can just leave it on Auto. Optimal, VGA. Use this to set the resolution of the recorded image. You can leave this on Optimal. Optimal (512 x 384) will give the smoothest image quality, with the smallest file size. VGA (640 x 480) will give sharper images, which are less smooth during fast moving scenes. However, the file size is larger. 500 kb/s, 1000 kb/s, 1500kb/s, 2000 kb/s, 2500kb/s. Use this to set the encoding quality (similar to the idea of JPEG image quality settings). The higher the encoding rate, the higher the image quality but also more hard drive space will be used. Lower bit rates will use less hard drive space. 32kHz, 48kHz. The sound sampling rate. The higher value gives a higher quality sound but will take up more space on the hard drive. 21 Brightness Contrast Saturation Hue Reset Use this to increase or decrease the recorded image brightness Use this to increase or decrease the recorded image contrast Use this to de-emphasize or saturate the colors in the recorded image Use this to change the color spectrum in the recorded image Change the above settings to the AV 500 default settings • Once you have finished changing the parameters, click Stop/escape button to return to the pre-record screen. • Concerning the video standard, the AV 500 will automatically recognize whether the incoming video signal is NTSC (American), SECAM, or PAL (European). There is no need to set anything. You will see the signal type, as well as the selected aspect ratio on the top left of the pre-recording screen. • Click the LEFT/RIGHT buttons to adjust the sound input level. Too far to the right will often give an overdriven distorted quality. Too far to the left may make for a very soft sound. Try a few recordings to get a sense of what is the best sound level. Do not let the headphone volume fool you. That can be adjusted independently with the UP/DOWN buttons. • If you would like to make a recording in another folder instead of the default "Video" folder, go to the desired folder via the main Video icon, then click on the Videocorder action icon. 5.4 Where is the Recording Saved? The default location for video recordings is the folder called Video. If you click on the Video icon in the main menu, you will go to this folder. Notice that there is a Videocorder action icon. Each time you use this button to record video instead of the VideoCorder icon in the main menu, you set the recording default location to the current folder. For example, you have created a folder called /Video/Television/Documentaries. If you go to this folder and then make a recording using the Videocorder action icon, you will set the default record location to this folder. Now, each time you use the VideoCorder icon to start a recording, your recording will be saved in the folder /Video/Television/Documentaries. 22
-
 1
1 -
2
-
3
-
4
-
5
-
 6
6 -
 7
7 -
 8
8 -
 9
9 -
 10
10 -
 11
11 -
 12
12 -
 13
13 -
 14
14 -
 15
15 -
 16
16 -
17
-
18
-
19
-
20
-
21
-
22
-
23
-
24
-
25
-
26
-
27
-
28
-
29
-
30
-
31
-
32
-
33
-
34
-
35
-
36
-
37
-
38
-
39
-
40
-
41
-
42
-
43
-
44
-
45
-
46
-
47
-
48
-
49
-
50
-
51
-
52
-
53
-
54
-
55
 |
 |