Archos AV500 User Guide - Page 17
Remove selected part
 |
UPC - 690590506794
View all Archos AV500 manuals
Add to My Manuals
Save this manual to your list of manuals |
Page 17 highlights
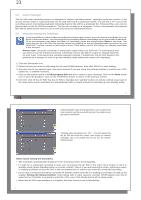
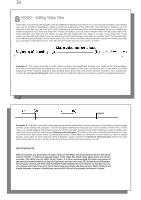
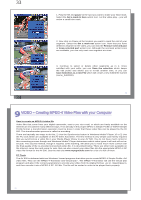
33 1. Play the file and pause at the spot you want to make your Start mark. Select the Set a mark-in here action icon. Let the video play - you will notice a small blue mark. 2. Now click on Pause at the location you want to mark the end of your segment. Select the Set a mark-out action icon. Now that you have defined a segment in the video, you can click the Remove selected part or Keep selected part action icon. Although the set-mark action icons are available, you can only mark one segment at a time. 3. Continue to select or delete other segments as in 2. Once satisfied with your edits, you can Save the selection which keeps the edit points and allows you to re-edit another time, or you can Save Selection as a new File which will create a new edited file named (name_Edit0000). 33 34 9 VIDEO - Creating MPEG-4 Video Files with your Computer How to create an MPEG-4 video file Video files that come from your digital camcorder, sent to you via e-mail, or which are freely available on the Internet are encoded in many different ways. If not already in the proper MPEG-4 Simple Profile or WMV9 Simple Profile format, a transformation operation must be done in order that these video files can be played by the AV 500. This transformation process is called re-encoding. There are basically two ways to do this; 1) Use the Synchronize button in Windows Media® Player 10 or 2) Use the PC tools which are available on the AV 500's hard drive. The first method is very simple and merely requires that you synchronize a video file in your Media Player library to your AV 500. You do not have much control in this converting process though and Windows Media® Player determines which video types it will and will not reencode. The second method, though it requires some learning, will allow you to have much more control over the final quality of the re-encoded (converted) video file. It is described below. There are other tools available on the Internet, some free and some for sale, that can also convert your video files into the appropriate MPEG-4 SP video file format for the AV 500. See the web site www.mpegmobile.com for a list of a few of them. PC Tools The AV 500 is delivered with two Windows® based programs that allow you to create MPEG-4 Simple Profile .AVI video files. They are the MPEG-4 Translator and Virtual Dub™. The MPEG-4 Translator will call the Virtual Dub program and give it the correct parameters to encode your video from its original format, .avi or .mpg (mpeg 1), and then encode it into a MPEG-4 SP .AVI file. The file will be scaled in order to be played back properly. 34
-
 1
1 -
2
-
3
-
4
-
5
-
6
-
7
-
8
-
9
-
10
-
11
-
 12
12 -
 13
13 -
 14
14 -
 15
15 -
 16
16 -
 17
17 -
 18
18 -
 19
19 -
 20
20 -
 21
21 -
 22
22 -
23
-
24
-
25
-
26
-
27
-
28
-
29
-
30
-
31
-
32
-
33
-
34
-
35
-
36
-
37
-
38
-
39
-
40
-
41
-
42
-
43
-
44
-
45
-
46
-
47
-
48
-
49
-
50
-
51
-
52
-
53
-
54
-
55
 |
 |
