Asus CUV4X-E CUV4X-E User Manual - Page 27
Expansion Cards - driver
 |
UPC - 610839878079
View all Asus CUV4X-E manuals
Add to My Manuals
Save this manual to your list of manuals |
Page 27 highlights
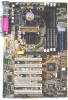
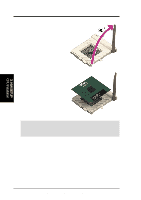
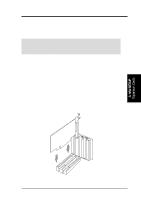
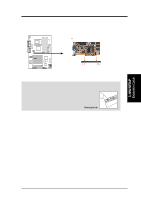
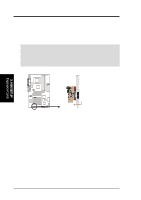
3. HARDWARE SETUP 3.7 Expansion Cards In the future, you may need to install expansion cards. The motherboard has six PCI expansion slots to support these cards. Follow the steps in the next section when installing expansion cards. WARNING! Unplug the system power cord when adding or removing expansion cards or other system components. Failure to do so may cause severe damage to both the motherboard and expansion cards. 3.7.1 Installing an Expansion Card 1. Read the documentation that comes with the expansion card and make any necessary hardware settings for the card before installing it. 2. Remove the system unit cover and the bracket plate on the slot you intend to use. Keep the screw for later use. 3. Align the card connectors with the slot and press firmly until the card fits in place. 4. Secure the card to the slot with the screw you removed earlier. 5. Replace the system cover. 6. Change the necessary BIOS settings, if any. (see section 4.4.3 PCI Configuration to change the settings.) 7. Install the necessary software drivers for the expansion card. 3. H/W SETUP Expansion Cards ASUS CUV4X-E User's Manual 27
-
 1
1 -
2
-
3
-
4
-
5
-
6
-
7
-
8
-
9
-
10
-
11
-
12
-
13
-
14
-
15
-
16
-
17
-
18
-
19
-
20
-
21
-
 22
22 -
 23
23 -
 24
24 -
 25
25 -
 26
26 -
 27
27 -
 28
28 -
 29
29 -
 30
30 -
 31
31 -
 32
32 -
33
-
34
-
35
-
36
-
37
-
38
-
39
-
40
-
41
-
42
-
43
-
44
-
45
-
46
-
47
-
48
-
49
-
50
-
51
-
52
-
53
-
54
-
55
-
56
-
57
-
58
-
59
-
60
-
61
-
62
-
63
-
64
-
65
-
66
-
67
-
68
-
69
-
70
-
71
-
72
-
73
-
74
-
75
-
76
-
77
-
78
-
79
-
80
-
81
-
82
-
83
-
84
-
85
-
86
-
87
-
88
-
89
-
90
-
91
-
92
-
93
-
94
-
95
-
96
-
97
-
98
-
99
-
100
 |
 |
