Asus M4A88TD-M/USB3 User Manual - Page 106
ASUS GPU Boost - evo
 |
View all Asus M4A88TD-M/USB3 manuals
Add to My Manuals
Save this manual to your list of manuals |
Page 106 highlights
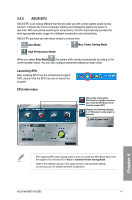
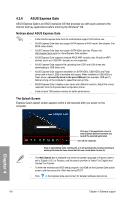
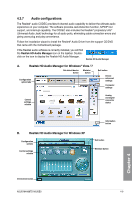
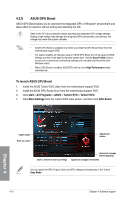
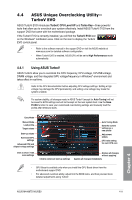
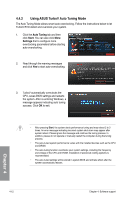
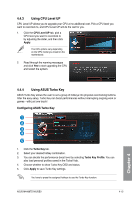
4.3.8 ASUS GPU Boost ASUS GPU Boost allows you to overclock the integrated GPU in WIndows® environment and takes effect in real-time without exiting and rebooting the OS. Refer to the CPU documentation before adjusting the integrated GPU voltage settings. Setting a high voltage may damage the integrated GPU permanently, and setting a low voltage may make the system unstable. • ASUS GPU Boost is available only when you install the GPU Boost driver from the motherboard support DVD. • For system stability, all changes made in ASUS GPU Boost will not be saved to BIOS settings and will not be kept on the next system boot. Use the Save Profile function to save your customized overclocking settings and manually load the profile after Windows starts. • When GPU Boost is enabled, ASUS EPU will be set to High Performance mode automatically. To launch ASUS GPU Boost 1. Install the ASUS TurboV EVO utility from the motherboard support DVD. 2. Install the ASUS GPU Boost driver from the motherboard support DVD. 3. Click start > All Programs > ASUS > TurboV EVO > TurboV EVO. 4. Click More Settings from the TurboV EVO main screen, and then click GPU Boost. Chapter 4 Target values Start-up values Adjustment sliders Click to restore all start-up settings Undoes all changes without applying Applies all changes immediately You can adjust the GPU Engine Clock and GPU Voltage simultaneously in the TurboV Easy Mode. 4-10 Chapter 4: Software support
-
 1
1 -
2
-
3
-
4
-
5
-
6
-
7
-
8
-
9
-
10
-
11
-
12
-
13
-
14
-
15
-
16
-
17
-
18
-
19
-
20
-
21
-
22
-
23
-
24
-
25
-
26
-
27
-
28
-
29
-
30
-
31
-
32
-
33
-
34
-
35
-
36
-
37
-
38
-
39
-
40
-
41
-
42
-
43
-
44
-
45
-
46
-
47
-
48
-
49
-
50
-
51
-
52
-
53
-
54
-
55
-
56
-
57
-
58
-
59
-
60
-
61
-
62
-
63
-
64
-
65
-
66
-
67
-
68
-
69
-
70
-
71
-
72
-
73
-
74
-
75
-
76
-
77
-
78
-
79
-
80
-
81
-
82
-
83
-
84
-
85
-
86
-
87
-
88
-
89
-
90
-
91
-
92
-
93
-
94
-
95
-
96
-
97
-
98
-
99
-
100
-
 101
101 -
 102
102 -
 103
103 -
 104
104 -
 105
105 -
 106
106 -
 107
107 -
 108
108 -
 109
109 -
 110
110 -
 111
111 -
112
-
113
-
114
-
115
-
116
-
117
-
118
-
119
-
120
-
121
-
122
-
123
-
124
 |
 |